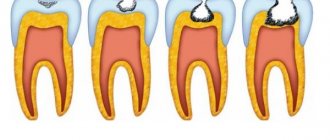
Types of dental pins
Depending on the material used to create a dental device, pins are divided into two groups:
- metal (made from titanium, brass, palladium, stainless steel or gold alloys with impurities);
- non-metallic (made from fiberglass, ceramics or carbon fiber).
According to their shape, pin structures are divided into conical, cylindrical-conical, screw and cylindrical. In turn, according to the method of fixation, such devices are classified into:
- active (having a thread with which they are screwed into bone tissue);
- passive (fixed in the root canal using special cement).
The choice of one or another pin design is made taking into account:
- the degree of destruction of the tooth root, the thickness of its walls;
- degree of damage to the crown of the tooth;
- the planned load on the tooth after completion of its restoration;
- the patient's health and financial capabilities.
Indications and contraindications for the installation of dental pins
Indications for the installation of pin dental structures are:
- the presence of a need to create a strong support for removable and fixed dentures based on teeth that have undergone severe destruction;
- absence of a crown in the presence of a healthy root;
- there is a need to restore teeth whose crowns are more than half destroyed.
Meanwhile, the method of orthopedic treatment using pins also has several contraindications. Reasons for refusing to carry out such a procedure may be:
- blood diseases;
- pathologies in the functioning of the central nervous system;
- carious lesions of teeth;
- periodontal diseases;
- the presence of cystic formations and granulomas in the oral cavity;
- severe deformation of the root canals, their obstruction;
- the presence of signs indicating a superficial attitude of the patient towards compliance with oral hygiene requirements.
Plastic pin teeth
Pin teeth made of plastic The emergence of a new material in dental prosthetics—acrylic plastic—has made it possible to raise the quality of pin teeth to a greater height and to simplify the technique of their manufacture. Due to their lightness, these teeth are useful in the presence of roots with thinned walls. The weak thermal conductivity of plastic protects fabrics from the effects of thermal fluctuations. The shrinkage of the material is practically undetectable, which ensures a good fit of the tooth to the root. The malleability of plastic to processing makes it easy to obtain the desired tooth shape. Plastic pin teeth are useful in deep bites (that is, in cases where no porcelain facet system is applicable) since they can be made very thin. Finally, with a successful selection of colors, they are more suitable for the enamel of natural teeth than porcelain ones. When making pin teeth from plastic, the operating procedure is as follows. Having prepared the root, as described, a stainless steel pin with a thickness of 1-1.5 mm and a length of 1-1.25 cm is fitted. At the free end of the pin, a fissure bur is made in such a way that the pin is subsequently shortened according to this cutting. did not interfere with the bite and did not protrude outward from the thickness of the tooth. Then, with refractory and colorless wax, an imprint of the surface of the root and the cavity for the inlay is pressed. Colorless wax is required to prevent accidental staining from transferring to the plastic tooth. The pin is heated and pushed through the wax into the tooth canal. A small plaster impression is taken of this root and two adjacent teeth, along with a wax impression and a post. The pin is cleared of wax to the edges of the tab. In the impression, the part of the wax impression facing the root and the pin are covered with lightly mixed cement. Thus, the cast model after removing the wax will be combined: the teeth will be plaster, and the walls of the root and its outer surface will be cement. This will ensure the accuracy of the imprint of the root surface and prevent the pin from shifting on the model.
Then the free end of the pin is bitten off with pliers according to the cut made by the doctor and two or three more cuts are made on the pin to better strengthen it in the plastic. The tooth is modeled from unpainted wax, somewhat thicker and longer than the neighboring teeth, with a margin for processing. Then it is separated from the model along with the cement base, gypsumed, molded and polymerized.
The finished tooth is handed over to the doctor for final processing. The plastic is easily processed with carborundum wheels on a drill, sanded with sandpaper and polished. Thus, a number of points in the process of technical manufacturing of a pin tooth are eliminated (casting a protective plate on the root, fitting a porcelain facet, a protective plate for it, soldering parts, riveting the crowns) and a fairly strong and beautiful tooth is obtained. The strength of these teeth is explained by their less fragility compared to porcelain and the solidity of the crown part. Porcelain facets sometimes break off at the location of the crowns; in this case, this possibility is excluded. To prevent the tooth from breaking off from the pin, when expanding the channel, it is necessary to give the pin such a direction that it ends up in the thickness of the plastic; In addition, during molding, the pin must be thoroughly degreased with monomer.
Advantages and disadvantages of pin structures
The most important advantages of restoring damaged teeth using pins are:
- rapid restoration of the functionality of the masticatory apparatus;
- the ability to avoid surgery aimed at extracting a damaged tooth;
- reducing the risk of fracture of the roots of affected teeth when restoring their crown parts with fiberglass pin structures;
- the ability to achieve impeccable aesthetic results;
- high service life of pins (more than 10 years).
At the same time, the method also has several significant drawbacks. In particular, the negative features of dental restorations using post structures are:
- increased degree of development of an allergic reaction to the materials from which the pins are made;
- there is a risk of rejection of the pin device;
- constant thinning of the walls of the restored tooth;
- high probability of developing other complications of the procedure.
Stump Pin Inlay
In the last century, a cast stump pin was a fairly common method when choosing orthopedic treatment. This procedure typically involved the use of metal crowns with a ceramic veneer, but in the 1990s, metal-free porcelain crowns began to replace metal-backed crowns, and the problem arose of how to hide tooth discoloration due to the metal post showing through. The era of microscopes and ultrasonic devices in endodontics has made it possible to remove metal structures from the root canal during re-treatment. But this is risky due to possible loss of root tissue.
Author: Maciej Zarow
There are several indications and contraindications for the removal of metal posts, which are presented in Fig. 1, but the most important rule today should be the preservation of the coronal and root structure of the tooth, which is important for a longer life of endodontically treated teeth.
Clinical case
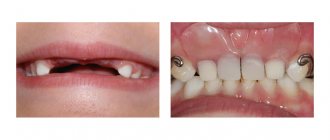
The patient came to the dental office with complaints of an aesthetic defect in the upper central incisor on the left, which was restored with a ceramic crown (Fig. 2, 3). The color and shape of his crown did not match the adjacent teeth. DSD (Definitive Screening Design) analysis revealed that the midline between the central upper incisors does not coincide with the midline of the face (Fig. 4, 5).
A functional analysis was performed, and after four weeks of use of the Kois Deprogrammer, the premature occlusal contacts were removed and multiple fissure-tubercle contacts were confirmed.
Based on the DSD analysis, it was decided that the best treatment option would be to reshape both upper central incisors and adjust the midline between teeth 1.1 and 2.2. The patient refused orthodontic treatment, and we decided to make two restorations: a crown for tooth 2.1 and a veneer for tooth 1.1, both from the same ceramic material - lithium disilicate.
The color of tooth 21, previously restored with a metal post, presented a potential problem.
The condition of the periapical tissues and the quality of endodontic treatment of tooth 21 were acceptable (Fig. 6), and there was no need for retreatment. As for removing the metal pin and replacing it with a fiberglass pin, it would be the best option, but there might be a threat of losing the remaining healthy root tissue, which would affect the quality of the future restoration. Therefore, the procedure of removing the metal pin solely for aesthetic reasons was not indicated. Instead, the plan was to place an opaque layer of composite on the buccal surface of the cast inlay to reduce light absorption and increase metal reflectance. The desired effect was to improve the quality of the core in order to approach the optical properties of dentin.
The metal-ceramic crown was removed from tooth 21 (Fig. 7-9), and after isolation with a rubber dam, a layer of 0.5 mm thick was removed from the buccal surface (Fig. 10). This can be easily done using an H32 amalgam removal bur (Komet) or a diamond head.
The post was then sandblasted (AquaCare Dental Air Abrasion) with 53 micron aluminum oxide particles (proCut, Coarse Cutting Powder) (Fig. 11). The next step was the adhesive treatment of the post and the remaining supragingival part of the tooth with three functional monomers (4-MET, MDP and MDTP) of the adhesive system (G-Premio Bond, GC).
Next, the metal surface was coated with two thin opaque layers of composite (Essentia Masking Liner, GC), then a lower viscosity dentin layer of composite (Essentia MD, GC) was applied using a brush to create a masking layer only 0.5 mm thick. The last layer was applied with a slight excess. (Fig. 12).
Then a prefabricated plastic crown (polymethyl methacrylate, Unifast Trad; GC) was fitted. After the correction, it was fixed on the already formed tooth stump. (Fig. 13-15)
The final preparation and impression taking were postponed for a month, and during this time they decided to whiten the teeth of the lower and upper jaws (6% hydrogen peroxide, WHITE DENTAL BEAUTY, Optident).
The silicone impression was prepared using wax. On the next visit, 11 was prepared for a veneer and stump 21 was finally processed for a crown.
The dental technician fabricated two lithium disilicate ceramic restorations. (E-Max, Ivoclar), which were cemented with dual-cure adhesive composite cement. (G-CEM LinkForce, GC) (Fig. 21-24). The first was to cement the veneer in isolation with a rubber dam. (Fig. 25)
Then, after the cement had hardened and the excess had been removed, before fixing the crown with permanent cement, we double checked that it met the requirements. (Fig. 26, 27).
1) Should we remove the old pins?
Yes:
- there are indications for canal retreatment in case of periapical changes
- there is a risk of loss of pin retention in the canal
- the pin is surrounded by tissues affected by secondary caries or there is suspicion of infection entering the root canal
No:
- preserved supragingival part of the tooth of small size
- there is a risk of root fracture (severely thinned root walls)
- risk of root perforation
- metal pin cemented with adhesive composite cement
2) The patient contacted the dental office with a request to correct her smile.
3) ... with complaints of an aesthetic defect in the upper central incisor on the left, which was restored with a ceramic crown.
4) DSD (Definitive Screening Design) analysis revealed that the midline between the central upper incisors does not coincide with the midline of the face.
5) Clinical picture of tooth 21.
6) X-ray of endodontically treated tooth 21.
7) The crown was sawed and removed.
8) The crown was sawed and removed.
9) View of tooth 21 restored with a cast metal pin.
10) After isolation with a rubber dam, a layer 0.5 mm thick was removed from the buccal surface.
11) The post was then sandblasted (AquaCare Dental Air Abrasion) with 53 micron aluminum oxide particles (proCut, Coarse Cutting Powder).
12) Adhesive treatment of the post and supragingival part of the tooth with three functional monomers (4-MET, MDP and MDTP) of the adhesive system (G-Premio Bond, GC). Next, the metal surface was coated with two thin opaque layers of composite (Essentia Masking Liner, GC), then a lower viscosity dentin layer of composite (Essentia MD, GC) was applied using a brush to create a masking layer only 0.5 mm thick.
13) Prefabricated plastic crown (polymethyl methacrylate, Unifast Trad; GC) for temporary fixation.
14) Correction of a plastic crown directly on the tooth.
15) Final processing of plastic: grinding and polishing.
16) The temporary crown was cemented and the color was pre-selected for the future ceramic restoration. The final preparation and impression taking were postponed for a month, and during this time they decided to whiten the teeth of the lower and upper jaws (6% hydrogen peroxide, WHITE DENTAL BEAUTY, Optident).
17) On the next visit, 11 were prepared for veneers and 21 were finally processed for a crown.
18) The preparations were controlled using a silicone key.
19) Final view of the prepared teeth.
20) In order to make sure that the teeth were prepared correctly, taking into account the symmetry of the face, additional photographs were taken and guidelines were drawn in the MS Power Point program.
21) Adhesive treatment of tooth 11.
22) It was carried out in isolation with a rubber dam.
23) View of ceramic restorations after laboratory production.
24) The veneer was cemented with dual-cure adhesive composite cement. (G-CEM LinkForce, GC).
25) After the cement has hardened and the excess has been removed, before fixing the crown with permanent cement, it is double checked to see if it meets the requirements.
26) Clinical picture immediately after cementation.
27)Final profile view of the upper central incisors.
Conclusion:
1) Masking existing metal inlays with an opaque layer of composite pays off, because at the final stage the aesthetics of ceramic crowns increases.
2) This procedure helps preserve the crown and root structure of the tooth, which is necessary for a longer service life of endodontically treated teeth.
The translation was carried out by Roba N. specifically for the OHI-S.COM website. Please, when copying material, do not forget to provide a link to the current page.
https://www.styleitaliano.org/
Procedure for caring for pinned teeth
In the postoperative period, patients are recommended:
- adhere to a gentle diet, give up alcohol, cigarettes and food that can injure the epithelial tissues of the oral cavity;
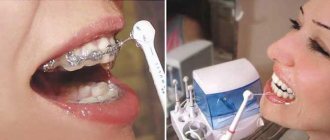
- provide thorough hygienic care of teeth and oral cavity;
- floss regularly;
- do not attempt to open bottles with your teeth, do not crack the shells of nuts or seeds;
- visit the dentist at least once every six months.
It is important to understand that the appearance of pain, swelling, hyperemia or inflammation of the gums in the area of the restored tooth may indicate the development of serious complications of the procedure. For this reason, identifying the symptoms described above is the basis for contacting doctors and receiving professional medical care.