- Types of products
- Ceramic inlay e max: main indications
- Contraindications for installing ceramic inlays
- Ceramic tooth inlay: advantages and disadvantages of products
- Manufacturing and installation stages
- Ceramic dental inlay: care features
If it is necessary to carry out extensive restoration, they often resort not to filling material, but to ceramic inlays (onlays).
They are one of the best methods of dental restoration and provide high-quality results. Ceramic inlays are a microprosthesis that is fixed in the tooth cavity. Such orthopedic structures are characterized by high aesthetics and durability; they are completely identical to healthy enamel, due to which they have become widespread. The e max ceramic inlay is in particular demand; it can be installed in a reliable dental clinic “A-medic”. The company's pricing policy is loyal, the cost of the service starts from 15,000 rubles. Before installing a microprosthesis, dentists conduct an examination and diagnosis to identify possible contraindications. In dentistry, a ceramic inlay is installed in just 2 stages, which allows you to quickly make your smile more attractive. An individual approach to each patient is guaranteed.
Types of products
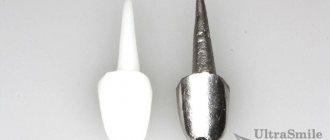
Experts distinguish between two main types of orthopedic structures: stump and restorative. A ceramic core inlay is required to restore the tooth core for subsequent fixation of the crown. Most often it is used for prosthetics of incisors. Restorative structures are used for chewing teeth when one or two surfaces are damaged. In addition to high aesthetics, they are characterized by reliability and durability. Also, the tabs are distinguished by the material used. Below are the most common materials from which products are made.
- pressed ceramics. Products are produced using porcelain injection molding. The procedure is carried out under conditions of high temperature and pressure. Compared to orthopedic structures made of metal or zirconium dioxide, they are not as durable, but are ideal from an aesthetic point of view;
- zirconium dioxide. They are made by grinding finished metal oxide blanks. Grinding is carried out automatically using a ready-made impression (plaster model) of a damaged molar or premolar. Thanks to computer control, finished structures are characterized by high quality. Upon completion, the workpiece is fired, fusing the porcelain mass. Zirconium dioxide is a high-tech material for orthopedic structures, and therefore is in special demand. From an aesthetic point of view, such inlays are in no way inferior to porcelain products, and in terms of strength they are not inferior to metal products;
- metal. The metal most often used is gold or a silver-palladium alloy. Such designs are reliable, but do not have high aesthetics;
- metal ceramics. This is the latest orthopedic design, which is distinguished by high aesthetics, but at the same time cannot boast of proper quality. Due to thermal exposure, such products often fall out of the mouth. Most experts advise installing a structure made of zirconium dioxide or pressed ceramics rather than metal ceramics.
Basic principles of forming cavities for inlays
The preparation of cavities for inlays and fillings is based on completely different principles. The cavity for the latter is created taking into account the delay of the fillings, and they can be filled with filling material even through a narrow hole in it. The cavity for the inlay should allow the wax reproduction to be freely removed when modeling it and inserted in its finished form.
When forming a cavity for an inlay, certain medical and technical rules must be observed.
The outcome of any operation depends not only on the technique of its implementation, but also on knowledge of the anatomical and topographical features of the organs and their relationships with neighboring areas. This rule is no exception for that part of operative dentistry, the field of action of which is the crowns of teeth.
Excision of dentin and enamel always affects the condition of the dental pulp. The more extensive the operation, the more pronounced the reaction of the pulp and the more reason to worry about its fate. Therefore, when forming a cavity for an inlay, you should always leave a sufficiently thick and uniform layer of dentin above the pulp. It is also necessary to know the safety zones within which you can confidently excise the hard tissues of the tooth without fear of opening its cavity. Before forming the cavity for the inlay, for orientation purposes, an x-ray should be taken and the topography of the pulp cavity should be studied. It should be taken into account that X-ray photographs allow one to study the structure of the pulp cavity only in the projection of the image. Therefore, when preparing anterior teeth, you should additionally use the data of N. G. Abolmasov (Fig. 55) on the thickness of the walls of the tooth at different ages.
The study of the topography of the tooth cavity and the thickness of its various walls also made it possible to identify safety zones (I. G. Abolmasov and E. I. Gavrilov) for the upper and lower central incisors (Fig. 56). At the upper and lower incisors they are located:
- a) at the cutting edge,
- b) from the oral and vestibular sides at the level of the equator and
- c) at the level of the cervix.
The canine safety zones are located:
- a) at the cutting edge,
- b) at the level of the equator from the vestibular, oral and contact sides,
- c) at the level of the neck from the vestibular, oral surface, and for the upper canines and from the distal surface.
With age, in all anterior teeth, the safety zones expand more at the cutting edge and less on the oral side at the level of the equator and at the level of the cervix. The thickness of other tooth walls also increases to a lesser extent.
The most dangerous place for incisors is the oral concavity of the crown between the dental tubercle and the cutting edge, as well as the contact walls at the level of the equator and cervix, where they are thinnest.
In the canines, the dangerous places are the oral concavity of the crown and the medial contact wall at the level of the neck, and in the lower canines the distal wall at the same level.
When preparing lateral teeth, you can use the data of E. S. Komalenkova and M. S. Lipets (Table 11). Unfortunately, the table does not indicate changes in the thickness of the walls of the teeth due to age.
Medical rules should also include preventive expansion of the cavity, i.e. excision of those areas that may be the most likely routes for the spread of caries (fissures of the chewing surface, natural pits, on the buccal surface of the molars and the palatal surface of the incisors, the cervical part of the tooth).
Compliance with technical rules involves creating a cavity with stable edges that hold the inlay well, allowing you to freely remove the wax reproduction from it and insert the finished inlay. Therefore, when forming cavities, one should be guided by the following principles:
- 1. The cavity should have a box-like shape, from which the wax model of the inlay should be freely removed in only one direction.
- 2. To prevent relapse of caries, preventive expansion of the cavity should be carried out.
- 3. The bottom of the cavity and its walls should resist chewing pressure well, and their relationship should contribute to the stability of the inlay.
- 4. It is necessary to create retention points that keep the tab from moving in different directions.
- 5. It is necessary to ensure an exact fit of the inlay to the enamel by forming a bevel (rebate).
- 6. The cavity cannot be located only within the enamel layer. It must be immersed in dentin.
The preparation of dental tissues when preparing a cavity for an inlay, as well as during prosthetics with other types of fixed dentures, is carried out with burs, separation discs, carborundum and diamond circles and heads of various styles and sizes (Fig. 57).
The formation of a cavity begins with the removal of affected enamel and dentin within healthy tissue. This is followed by preventive expansion of the cavity due to fissures and flat areas between the tubercles, which are the most likely routes for the spread of caries, especially in young people. In this case, you should be careful with the bridges connecting the cusps of the teeth, and with the cusps themselves. Excision of them weakens the tooth, which can result in a fracture of the tooth crown. The tissues of the bridges must be removed only if they are damaged by caries.
When forming a cavity located on the contact surface of the tooth, the valve should be positioned so that it is covered by the interdental gingival papilla. The same should be kept in mind when forming the cervical cavity, the gingival edge of which should be covered by the gum. An exception is allowed when the edge of the cavity is at least 2 mm away from it. This position of the cavity boundaries prevents the development of secondary caries at the junction of the inlay with the cavity wall.
Before you begin preparing the cavity, you should outline the direction in which it will be convenient to later draw the wax model without deforming it, and later try on the finished inlay. When forming a cavity, straight or angled tips are used, depending on its availability and the direction chosen to remove the wax model of the inlay. The walls of the cavity are formed with burs. The final finishing of the cavity walls, its bottom and corners, and the creation of a bevel are carried out using shaped abrasive heads of various sizes.
The cavity should have slightly diverging walls and a flat bottom with clearly defined angles. All other shapes of the bottom and directions of the walls (trough-shaped, vertical wall, wall inclined at an obtuse angle to the bottom cavity) are unacceptable, since they contribute to the shift of the insert when pressing hard food on its edge.
The cavity is formed quite deep. If the affected area is large and there is a deep cavity, the tab will move under the influence of chewing pressure. The narrow deep cavity is also inconvenient.
The bottom of the cavity, as we have already noted, must be flat. If this cannot be done for some reason, for example, if there is a danger of exposing the pulp horn, a flat bottom is formed using cement. The bottom of the cavity should be located in a horizontal plane, perpendicular to the long axis of the tooth. Tilt is only permissible towards a very strong wall. Tilting the bottom of the cavity towards a weakened wall can cause it to break off, and tilting towards a missing wall (for example, a contact wall) can cause the inlay to shift and fall out.
Since enamel prisms and dentinal tubules have a radial direction, when preparing the cavity, enamel and dentin should not be undermined.
For this purpose, a bevel is made along the edge of the cavity, as shown in Fig. 58. Otherwise, the enamel edge will crumble and caries will develop again, and the tab will fall out.
As already indicated, the tab can be inserted in only one way, for which purpose the walls of the cavity are given a parallel direction. With cavities of the MO and DO types (medially, distally occlusal), there is always a danger of the inlay shifting to the side where the tooth wall is missing. To prevent this, the cavity is shaped like a dovetail, slightly expanding it at the wall facing the middle of the tooth (Fig. 59).
If this cannot be done due to weakening of the walls and the danger of their destruction, the cavity should have the shape of a cube, but at the same time an additional platform is created that strengthens the inlay (see Fig. 62). The stability of the inlay can be increased by creating small channels for the pins. Pins are used quite often as a means of additional fixation of the tab. But it is necessary to take into account the features of the topography of the pulp cavity. In pulpless teeth, inlays can be connected to pins inserted into the root canal.
Concluding the description of the general principles of cavities formation, one should warn against the formation of sharp angles when excising fissures, because the latter can be the site of relapse of caries. The chewing and gingival cavities should not be formed in the form of a strict geometric figure (rectangle, triangle, circle or ellipse, two opposing triangles) (Fig. 60). When inserting an insert into such cavities, you can easily make a mistake when fitting it.
Preference should be given to asymmetrical shapes that make it easy to navigate when inserting the tab. If for some reason the cavity turns out to be symmetrical, then at the bottom of it on one side a recess should be made for the tenon of the tab, which will serve as a guide for its insertion.
Ceramic inlay e max: main indications
Many people mistakenly believe that ceramic inlays are a type of regular filling. In fact, they belong to the category of high-tech microprostheses. Its parameters and characteristics significantly exceed any, even the most modern and high-quality filling material. Among the main indications for installing ceramic inlays are:
- destruction of the coronal part by 30% or more;
- preparing a molar or premolar for the installation of permanent orthopedic structures, for example, bridges;
- increased abrasion of enamel;
- the presence of a large cavity that was formed as a result of an advanced carious process;
- increased sensitivity of molars or premolars to external factors;
- mechanical damage.
If, after fixing the orthopedic structure, pronounced painful sensations occur, you should not delay your visit to the dentist. Most often, pain and discomfort are a sign that the product was installed incorrectly. To avoid such situations, treatment should be carried out only in trusted dental clinics.
Contraindications for installing ceramic inlays
The emax tab also has some contraindications for installation. There are no absolute contraindications, but there are relative and temporary ones, which are recommended to be eliminated before installing a ceramic onlay. Among them, insufficient oral hygiene is the most common contraindication. In this case, a specialist performs professional cleaning and prescribes additional oral care methods that can be done at home.
In case of carious lesions of the teeth, the dentist carries out treatment, and after it proceeds to install the structure. Experts do not recommend installing onlays on the last molars (“eights”). They do not perform a chewing function, so in case of severe destruction, the easiest way is to completely get rid of them without spending time on restoration.
It will not be possible to carry out the installation if only one wall of the tooth remains (at least two remaining walls are required). Problems can arise when the cavity depth is insignificant (less than 2 mm) or the presence of pathological cavities that go deep into the dentin. For bruxism (teeth grinding), the installation of pads is not recommended, since they will quickly wear out, which will significantly reduce the service life. However, you can use a special device (night guard) that will prevent the teeth of the lower jaw from rubbing against the teeth of the upper jaw.
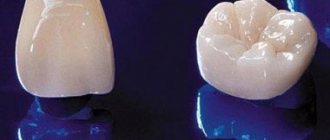
Ceramic tooth inlay: advantages and disadvantages of products
Currently, ceramic onlays are the most common method of restoring incisors, molars or premolars; they are recognized as reliable and durable. Unlike composite fillings, they are not made in the patient’s mouth, but in isolation, in a dental laboratory (using impressions). This allows you to create an anatomically correct tooth shape with increased accuracy. This factor is very important for the area of contact with the adjacent incisor, molar or premolar. The use of ceramic inlays makes it possible not to resort to crowns if the root bases of the teeth are intact. The main advantages of the products include:
- high aesthetic qualities. Ceramic onlays are no different from natural molars or premolars. The material fully matches their visual characteristics. Only a specialist can notice the difference upon careful close examination;
- durability (compared to a conventional filling). If you follow all the recommendations prescribed by your doctor, the orthopedic design can last more than 10 years. For comparison, a regular filling lasts about 3-4 years;
- no changes in appearance. Ceramics do not darken over the course of a year, so the original color remains intact for the entire duration of wear. It is completely resistant to dyes and other external factors;
- no shrinkage and polymerization after fastening. The main factor influencing the development of secondary carious lesions is pathogenic microorganisms that enter the gap between dentin and filling material. It occurs as a result of shrinkage of the filling. Under the influence of ultraviolet radiation, the filling significantly decreases in volume and sags. e max structures retain their dimensions and do not change during the manufacturing and installation process. Their grinding occurs at the same time as the tooth tissues;
- complete safety. The material does not have a negative effect on the human body and does not provoke the development of allergic reactions;
- high strength. Unlike conventional fillings (light, chemical), the inlay is more securely fixed and is characterized by increased resistance to mechanical and thermal stress.
The emax ceramic inlay has no significant disadvantages. Some are confused by the time spent on manufacturing and installing orthopedic structures, which, unlike conventional fillings, require several visits to the dentist's office. Relative disadvantages include the high price (compared to inlays made of other metals). It is worth noting that their quality, aesthetics and long service life justify their relatively high cost.
Oral health
Topic No. 4.
Orthopedic treatment with cast inlays, inlays made of ceramics, photocomposites and glass ceramics. Indications and contraindications. Clinical and laboratory stages of tooth crown restoration using an inlay. Methods for making inlays. Obtaining double and updated impressions. Errors when prosthetizing defects in the coronal part of the tooth with inlays.
Purpose of the lesson
: to study methods of restoring defects in hard dental tissues with inlays, to study the clinical and laboratory stages of making inlays, to learn how to take double impressions.
Lesson duration:
3 hours.
Practical lesson plan:
Time
1. Organizational moment
5 minutes
2
.
Assessment of student knowledge:
- questions to the initial level of knowledge: 10 min
1. List the causes of defects in the crown of the tooth.
2.List the requirements for tabs.
3.Name the features of preparing cavities of classes 1,3,5 according to Black.
- test questions on the topic 30 min
1. Tabs. Materials. Indications, contraindications.
2. Clinical and laboratory stages of inlay manufacturing. Direct, indirect and combined methods.
3. Structural features of the inlay depending on the IROPZ.
4.Obtaining double and updated impressions.
5.Principles of preparation of MOD type cavities.
6.Inlay retention zones: parapulpal canals and pins.
7. Errors when prosthetizing defects in the coronal part of a tooth with inlays.
3. Examination of the case patient by an assistant
30 min
4
.
In-class independent work of students
: 60 min
- preparation of cavities for an inlay,
- wax inlay modeling.
- taking impressions with elastic materials.
5
.
Discussion of students’ independent work
20 min
6. Assignment for the next lesson
5 min
Lesson content Inlays
An inlay is understood as a microprosthesis designed to restore the anatomical shape and replace defects in the hard tissues of the tooth. The causes of tooth decay can be caries, enamel hypoplasia, increased tooth wear, wedge-shaped defects and chronic injuries.
The main method of eliminating dental defects, especially in the initial and intermediate forms, is filling. However, along with the positive aspects, filling also has disadvantages. A change in the volume of fillings leads to the appearance of gaps between the cavity wall and the filling. The opening walls of the cavity can be destroyed by caries. Most filling materials do not have the necessary mechanical strength comparable to the wear resistance of tooth enamel, and quickly wear out in places of occlusal contact, which leads to deformation of the dentition. That is why prosthetics of defects in the crowns of teeth with carious and non-carious lesions with inlays in many cases turns out to be more reliable than filling.
To systematize the localization of carious cavities and the peculiarities of their formation under a filling or inlay, various classifications have been developed. The most famous is Black's classification (1891). Materials for making inlays:
- Gold-based alloy 750, 900 samples
- Silver-palladium alloy;
- KHS - obtained by casting;
- Porcelain mass "Gamma" and other porcelain masses, metals
- sequential firing method;
- by turning method (computer technology);
- Plas-method of laboratory (hot) polymerization;
- Chemical and light curing composite plastics.
Indications for making inlays:
- destruction of the crown part of teeth of carious, traumatic origin at 0.2
- Pathological abrasion of teeth;
- wedge-shaped defects;
- Periodontal diseases.
- Inlays can be independent prostheses and used as supporting elements of bridges and splinted structures.
Indications for using the indirect method of making inlays:
- Making porcelain inlays using the firing method;
- Hard-to-reach cavities located on the distal surfaces of the maxillary molars;
- cavities located on the contact surfaces of two adjacent teeth.
Contraindications for making inlays:
- 0.2>IROPZ>0.6
- Fluorosis, enamel necrosis, enamel hypoplasia
- Acute, multiple caries
- Hard-to-reach cavities (on the contact surfaces of the teeth without access to the occlusal surface.)
Clinical and laboratory stages of manufacturing a plastic inlay using the direct method
- Clinical stage Examination, diagnosis, choice of treatment method, psychotherapeutic preparation of the patient, premedication (if necessary)
- Forming a cavity for the tab
- Preparing the cavity for modeling a wax reproduction of the inlay
- Modeling a wax reproduction of an inlay with a reserve of its thickness and taking into account the anatomical shape of the tooth
- Removing wax reproduction using pins
- Preparing the wax reproduction of the inlay for packaging (coating the sides facing the cavity with liquid phosphate cement)
- The fitting and fixation of the inlays is carried out by a doctor after the cement has hardened.
Clinical and laboratory stages of manufacturing a plastic insert using an indirect method
- Clinical stage
- Examination, diagnosis, choice of treatment method, psychotherapeutic preparation of the patient, premedication (if necessary)
- Preparation / formation / carious cavity under the tab
- Wax reproduction modeling
- Taking an impression with a ring from a tooth and from the dentition of the upper and lower jaws
- Laboratory stage
- Getting the combined tab model
- Converting a reproduction of an inlay from wax to plastic
- Mechanical processing of the finished tab and transfer it to the doctor
- Clinical stage
- Fitting and fixing the tab
- Grinding and polishing of the inlay is carried out by a doctor after the cement has hardened.
Clinical and laboratory stages of manufacturing a metal inlay using a combined method
- Clinical stage
- Examination, diagnosis, choice of treatment method, psychotherapeutic preparation of the patient, premedication (if necessary)
- Formation of a carious cavity under the tab
- Taking an impression with a ring from a tooth and from an anatomical cast and from the dentition of the upper and lower jaws /or a double impression/
- Checking the wax reproduction of the inlay in the mouth before casting it and eliminating its shortcomings
- Laboratory stage
- Obtaining a combined model
- Modeling a wax reproduction of an inlay
- Converting a wax reproduction into a cast inlay
- Mechanical finishing of cast inlay
- Clinical stage
- Fitting and fixing metal tabs. The final finishing of the inlay is carried out by a doctor the next day after the cement has hardened.
Porcelain inlays
Producing a porcelain inlay involves creating a refractory model on which the porcelain mass is fired. After fitting and glazing the inlay, it is strengthened with a composite material or glass ionomer cement.
Porcelain is a ceramic product obtained by firing porcelain mass prepared from the main components - kaolin, feldspar, quartz and dyes. Photocomposites
Making an inlay from this material involves applying an insulating layer to the surface of the tooth and the wall of the cavity, filling the defect with a light-curing composite material, exposing it to light, removing (“breaking off”) the inlay after final polymerization and strengthening it with a material with higher adhesive properties. Composite polymers (compomers, ceramers).
These are substances in which a mineral (glass ceramic) filler (40 – 80%) is combined with an organic dimethacrylate matrix using silanization.
Obtaining double refined impressions
Silicone impression materials are used, which are available in the form of two pastes - basic and catalyst. The liquid supplied with the base paste can also be used as a catalyst.
High viscosity pastes (base and catalyst pastes or base paste and catalyst liquid) are used alone or as the first, base layer in double prints.
Low viscosity pastes (base and catalyst pastes or base paste and catalyst liquid) are used as a second or corrective layer of double impressions.
To prepare the mixture, catalyst liquid or paste is added to the required amount of base paste, measured using a paper dosage scale placed under a glass plate. They are mixed using a plastic spatula. To obtain a uniform consistency or color. A paste of dense consistency (high viscosity) is collected with special measuring cups and, after adding a catalyst liquid, mixed by hand. Mixing time is 30 – 40 seconds. Some silicone masses harden in 2.5 - 4.0 minutes, others in 5.0 - 8.0 minutes. To carry out the manipulation you need: a set of tools (mirror, tweezers, angled probe, smoothers of different sizes); means for gum retraction (knitted rings or cotton threads). Gum retraction is a pharmaco-mechanical expansion of the gingival sulcus (pocket) in order to introduce impression material into its gaping cavity to accurately depict the ledge, neck of the tooth and the bottom of the sulcus (pocket). One-stage method of obtaining a double impression (sandwich method) Having filled the spoon with the main paste, the doctor makes a depression in it, in the area of the projection of the supporting teeth. Corrective paste is injected there. It is applied from a syringe to the prepared teeth. After this, a spoon with two pastes is inserted into the oral cavity to take an impression.
Two-step method of obtaining an impression. Stage 1
: a dense base paste mixed with a catalyst is applied to an impression tray lubricated with an adhesive (adhesive) and an impression is taken. In this case, in order to create space for the corrective paste, the procedure is carried out before preparing the teeth, either without removing the provisional crowns, or by first covering the impression material with a strip of thin polyethylene film.
After preparation, a pharmaco-mechanical expansion of the gingival sulcus of the supporting teeth is carried out, a cotton thread or a knitted ring is introduced there in advance or ex tempore, soaked in solutions of a vasoconstrictor or astringent.
After applying the retraction cord to the gingival sulcus, a cotton cylinder is placed on the prepared tooth. The dentition is then fused to provide a clean, dry, and open gingival sulcus. The cotton cylinder and retraction cord are removed before taking the impression.
Stage 2
: The first layer of the impression personalizes the standard tray with which it was produced. A layer of paste is cut off at the top of the palate and along the edges of the impression for its free reintroduction into the oral cavity. In addition, the interdental septa are removed to prevent compression of the interdental papillae, and the drainage grooves from the dental imprints to the top of the palatal vault are engraved, radially, to prevent elastic deformation of the impression.
Then the first layer of the impression is dried and filled with clarifying paste. The threads are removed from the pockets, and the pockets themselves are dried. They can be filled with corrective paste using a special syringe with a curved cannula. You can take an impression without using a syringe by filling the impression with clarifying paste and reintroducing it into the oral cavity.
Based on the topography of caries and the pattern of its distribution, 6 classes
carious cavities.
Class 1:
cavities arising in fissures and natural pits are combined with preservation of all the walls around the cavity.
Class 2:
includes cavities on the contact surfaces of the chewing teeth, as well as cavities that later spread to the chewing surface.
The disappearance of the interdental contact point can lead to marginal periodontal disease. Class 3:
includes cavities on the contact surfaces of the front teeth while maintaining the cutting edge and its angles.
Class 4:
combines cavities located on the front teeth and involving partially or completely the cutting edge.
Class 5:
defects of the gingival part of the tooth - cervical cavities.
Class 6:
atypical cavities located on the cusps of chewing teeth and the cutting edges of incisors and canines.
Formation of a MOD type cavity (mesial-occlusal-distal surface of the tooth)
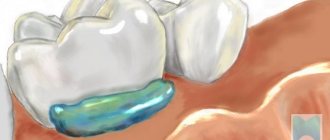
The MOD type cavity consists of two main cavities - mesial and distal, connected to each other by a jumper. To ensure tooth strength, the width of the bridge should not be less than 1/3 of the width of the chewing surface. A wider bridge can weaken the cavity walls and encourage spalling. In case of carious lesions of two contact surfaces, it is necessary to form a U-shaped cavity.
To prevent chipping of thinned tubercles of the chewing surface, they can be ground off. In this case, the tab becomes an overlay. Its molded chewing surface protects weakened hard tissues.
A decrease in the depth of the cavity and the associated possible deterioration in the fixation of the inlay can be compensated for by additional means of retention. Structural features of the tab.
When deciding on the method of restoring a damaged tooth, that is, before the “filling-inlay” alternative, one should approach it comprehensively and at the same time strictly differentiated. Some help in choosing a method for restoring a damaged crown can be provided by V.Yu. Milikevich (1984) index of destruction of the occlusal surface of teeth (IROPD). The entire area of the occlusal surface of the tooth is taken as one. The destruction index (surface area of the cavity or filling) is calculated from one, that is, the area of the entire occlusal surface. With IROP equal to 0.55-0.6, that is, with destruction of more than 55%, inlays are shown; with an index of more than 0.8 - pin structures. The generally accepted international classification defines the differences between microprostheses depending on the method of location in the hard tissues of the tooth. I distinguish 4 groups of microprostheses: Group 1: microprostheses, which include only the inside of the hard tooth tissue. Inlay – located inside.
Group 2: microprostheses covering the occlusal surface of the tooth and at the same time entering its hard tissues to varying depths - Onlay.
Group 3: microprostheses covering most of the tooth crown from the outside - Overlay.
Group 4: microprostheses of the first three groups, which are additionally strengthened in the hard tissues of the tooth or in the root canal using Pinlay pins. When there is a large degree of destruction of the coronal part of the tooth, cast and parapulp pins and retention pads are used to improve the fixation of the tooth inlay. Errors in prosthetic defects
crown part of the tooth with inlays
- Pulp exposure
- Thinning of the walls of the tooth cavity
- Deformation of the wax inlay structure
- Errors when fitting a tab:
- Cementing the tab
- Fracture of the wall of the tooth cavity
- Secondary caries
LITERATURE.
- Markov B.P., Lebedenko I.Yu., Erichev V.V. Guide to practical training in orthopedic dentistry. Part 1. – M.: GOU VUNMC Ministry of Health of the Russian Federation, 2001. – 662 p.
- Markov B.P., Lebedenko I.Yu., Erichev V.V. Guide to practical training in orthopedic dentistry. Part 2 – M.: GOU VUNMC Ministry of Health of the Russian Federation, 2001. – 235 p.
- Orthopedic dentistry: Textbook for dental students. fak. honey. universities / Ed. V.N. Kopeikina, M.Z. Mirgazizova. – 2nd ed. add. – M.: Medicine, 2001. – 621 p.
- Trezubov V.N., Shteyngart M.Z., Mishnev L.M. Orthopedic dentistry: Applied materials science: Textbook for honey. universities – St. Petersburg: SpetsLit, 2001. – 480 p.
- Trezubov V.N., Shcherbakov A.S., Mishnev L.M. Orthopedic dentistry: Propaedeutics and the basics of a private course: Textbook for honey. universities – St. Petersburg: SpetsLit, 2001. – 480 p.
- Guide to prosthetic dentistry. / Ed. V.N. Kopeikina. – M.: Triada-X, 1998. – 495 p.
Topic No. 5.
Artificial crowns - their types, classification. Clinical rationale for orthopedic treatment with stamped crowns. Preparation of teeth in the manufacture of a stamped crown. Requirements for a properly prepared tooth. Taking impressions. Obtaining plaster models. Fixation of dentition in central occlusion. Fitting artificial crowns. Fixation of stamped crowns with cement. Possible errors at the clinical and laboratory stages of manufacturing stamped crowns and complications during their use.
Source: topuch.ru
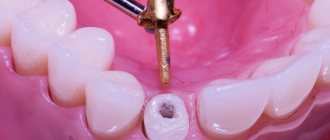
Manufacturing and installation stages
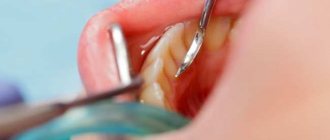
Manufacturing and installation of an orthopedic structure is not difficult and does not take much time. At the initial appointment, the dentist examines the oral cavity to determine indications and contraindications for the procedure. If contraindications are identified, they are eliminated, after which they proceed to therapy. If necessary, endodontic treatment and hygienic treatment of the diseased tooth are carried out. By analogy with standard filling, the specialist removes all destroyed tissue from the tooth, forming an area for a microprosthesis. After this, a cast is made that exactly repeats its shape.
The production time for an emax ceramic inlay based on the impression obtained (3D modeling results) is about 5-10 days. At this time, a temporary filling material is placed in the patient's cavity. The onlay is made in laboratory conditions, taking into account the individual characteristics of the patient’s dental system. The orthopedic structure is fired and covered with layers of ceramics. At the secondary appointment, the patient’s temporary filling is removed and a finished microprosthesis is installed. It is attached using special cement, which firmly adheres to the ceramics and enamel of the tooth. This guarantees a secure fit. At the end of the process, the surface is polished. The whole procedure takes no more than 120-150 minutes.
Ceramic dental inlay: care features
The ceramic inlay and onlay do not require complex care. You need to care for your teeth like you would for regular teeth - brush twice a day, use floss and mouth rinses after each meal. It is worth noting that ceramic inlays, due to their physical properties, do not require additional care (unlike light fillings) - professional cleaning.
In order to promptly detect leaks in the Emax tab, you need to regularly visit the dentist’s office (once every six months). When a dark stripe appears, there is a high probability that pathogenic microorganisms have begun to penetrate under the ceramic inlay, which provoke the development of a carious process. On average, the service life of ceramic structures is about 7-8 years. Subject to all rules and hygiene standards, as well as the absence of increased stress, they can last several years longer.
You can install a ceramic inlay in Moscow at the reliable A-Medic clinic. Qualified specialists with extensive experience work here, which guarantees a positive result. The orthopedic design is no different from natural teeth and can last for many years. In the event that there are contraindications to the installation of this product, A-Medic dentists will be able to select another method of tooth restoration.
Preparation for a ceramic inlay
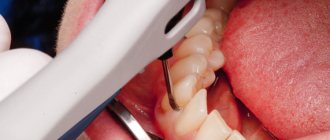
Dissection is the excision of hard tissue and the formation of a cavity of a certain shape. This operation is performed in the treatment of various diseases or for the installation of orthopedic structures (inlays). During excision, the doctor must take into account not only the shape of the inlay, but also the structural features of the tooth, its tissues in different areas, etc.
Preparation stages
Preparing a tooth for an inlay is carried out in several stages:
- Excision of affected tissues, removal of pathological areas of dentin. It is very important to clean all affected areas as completely as possible, otherwise they may cause secondary complications.
- Expansion of the cavity. After removing the pathological tissue, the doctor uses a bur to enlarge the resulting cavity. This is necessary in order to prevent the likelihood of caries recurrence.
- Giving the cavity the desired shape. For this purpose, burs of different shapes are used - spherical, cylindrical, flame-shaped, cone-shaped.
Features of preparing teeth for inlays
Preparing a tooth for an inlay differs from preparing a tooth for a filling. The doctor is faced with the task of forming a cavity that can ensure the strength of the orthopedic structure in the future. To do this, it must have a certain depth and relatively parallel side walls.
Preparation for the stump tab is done taking into account the following requirements:
- The shape should be such that the tab can only be pulled out in one direction. The side walls are parallel or slightly divergent, but their inclination can vary. The deeper the cavity, the greater the slope should be.
- The bottom must have sufficient thickness above the pulp. Safe thickness varies depending on the age of the patient and the stage of tooth formation. In an adult patient, the thickness of the fundus should be at least 0.6 mm; in adolescents, this parameter is 1.4 mm.
- The depth must be sufficient, always with immersion into the dentin.
Specific methods for preparing a tooth for an inlay will vary. The doctor chooses a method based on the condition of the dental crown, gum tissue, and the material of the orthopedic structure. For example, processing a tooth for a ceramic inlay must meet the following requirements:
- There should be no bevels in the enamel.
- The corners of the cavity are rounded.
- The bottom is within the enamel.
- Finishing of the edges is not carried out.
Possible complications
Dissection is a serious intervention in tissue. When excision of vital teeth there is a very high risk of damaging the pulp, and violation of the preparation technology very often leads to the development of complications. The most common are:
- Increased postoperative sensitivity. In the early days after surgery, a slight increase in sensitivity is normal. When the problem persists, you need to consult a doctor.
- Traumatic pulpitis. If the wrong technique is chosen or under the influence of other factors, the pulp may be damaged. The opening of the pulp and the development of inflammation against this background is one of the most common complications associated with medical errors.
- Development of secondary caries. To prevent secondary caries, the cavity is expanded. This eliminates the risk of retaining infected tissue under the inlay and crown.
The risk of complications is influenced by various factors, but much depends on the experience and professionalism of the dentist performing the preparation.
Cavity classes
There are 5 classes of cavities:
- 1 class. The walls of the crown are completely preserved, and the shape of the cavity follows the fissure pattern. During preparation for the inlay, the doctor takes into account the characteristics of the tooth and its defects, after which he selects the optimal angle of inclination of the walls. In order for the tab to be stable, the cavity is made asymmetrical.
- 2nd grade. First, the doctor makes a separation in a strictly vertical plane, then forms a complex-shaped cavity with a ledge and platform on the chewing surface. This configuration allows you to securely fix the orthopedic structure.
- 3rd grade. The doctor chooses the method of turning the tooth under the tab depending on the degree of carious lesion. It also affects the choice and condition of neighboring teeth, for example, in their absence, a cavity in the form of a triangle with a convex bottom is formed in the tooth being prepared.
- 4th grade. The characteristics of the preparation and the shape of the cavity depend on the degree of destruction of the cutting edge of the crown.
- 5th grade. Formed in the cervical region. The difficulty of the preparation lies in the fact that the doctor grinds down the tissue located next to the pulp chamber.
In addition to forming the cavity, it is necessary to prepare the root canal for the tab. If the dentinal canals were previously filled, they are unsealed to approximately 2/3 of the depth. In order to protect dentin from external influences, desensitizer materials are used. They allow you to seal the canals and reduce dentin sensitivity. After completing the procedure for preparing teeth for inlays, the doctor takes an impression and places a temporary filling.