January 9, 2018
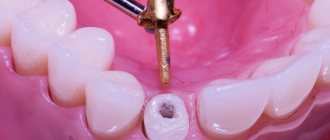
If you have broken a tooth, but its root is in good condition, your dentist will probably recommend putting a core in its place. This is a kind of permanent prosthesis for a crown, thanks to which you will be able to lead a lifestyle as close as possible to the one you had before tooth destruction (smile, chew, bite). The stump tab is a design that the doctor develops individually based on a previously taken impression. It consists of root and crown parts. The stump differs from the classic restorative one in that it is fixed not only in the coronal part of the tooth, but also captures the dental canal. In this way, the root is strengthened, which allows the life of the tooth to be extended by at least five years.
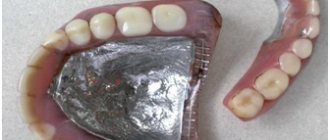
Stump tab
UltraSmile.ru decided to figure out what dental inlays are made of and which of the materials presented in dental laboratories are considered the best for creating such dentures.
How is a microprosthesis installed?
Depending on the number of tooth roots, the inlay can be single-channel or multi-channel. In addition, it can be cast (solid) or collapsible (mainly used for multi-rooted teeth, i.e. each individual root is a separate “pin”). Installation of the stump tab is carried out in the following way:
- removal of the nerve, thorough cleaning of the canals from foci of inflammation - it is very important that caries does not develop under the prosthesis, otherwise the inlay will have to be removed,
- root filling,
- unsealing the root to the required depth and width,
- taking impressions,
- fabrication of structures in a dental laboratory,
- fixation of the prosthesis inside the tooth,
- restoration of the coronal part - for this, composite filling materials or a classic artificial crown can be used.
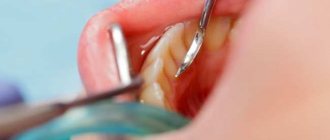
Installation of a core tab
The difference between core tabs and standard pins is that the installation takes place over several visits to the doctor, and with the help of a core tab the load on the tooth is distributed evenly. It fits more tightly, therefore reducing the risk of developing caries in the future, lasts longer and only in extremely rare cases leads to the destruction of the root under load (and this very often happens when installing pins).
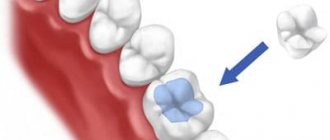
Crown inlay
Types of tabs
Typically, the dentist recommends a particular type of inlay to the patient. Let's look at the main features of such structures.
Stump prosthetic models are used in the form of two types of dentures:
- collapsible;
- cast.
Cast stump inlay
Cast ones are used most often; they are also called pin ones. They are manufactured at high temperature and pressure. Such models include a main platform (for holding the tooth) and fixation pins (for strengthening in the dental canal). This type of prosthesis is used for single-rooted or double-rooted teeth (including those with non-parallel canals). These dentures are not suitable for multi-channel teeth.
A pin stump insert (or cast) is used in cases of severe destruction of the tooth base. It can also secure crowns when restoring extremely damaged teeth.
For the pin insert, especially reliable materials are used that clearly retain the required shape during casting. For this purpose, they usually take gold and other metal alloys (including cobalt + chromium), and cermets.
Collapsible tabs
Collapsible structures are used for multi-channel dental roots (3-4 channels). In this case, the pin is partially made removable in order to freely enter the root canal. This type of denture perfectly matches the shape of the tooth.
Thanks to the dismountable technique, individual pins are inserted into the tooth and secured there. They cannot be removed after installation, so collapsible structures have a lifetime warranty.
The best materials for making dental inlays
Ceramics
Usually, inlays are created from it for the front teeth, solely for aesthetic reasons. And the ceramics themselves are not very strong, so they can crack on the side teeth, where there is a very heavy load. It is possible to choose the color of the products to match the enamel of the patient’s real teeth, which will make the presence of the prosthesis virtually invisible. Also, this material does not cause allergies, so for people suffering from this problem, ceramics are even added to inlays designed to replace chewing teeth.
Ceramic stump inlay
Base metals
Cobalt-chrome alloy is the strongest alloy, and therefore ideal for posterior teeth, which are destined to experience enormous loads. However, due to the high degree of allergenicity, the material is not suitable for everyone.
Nickel-chrome stump inlays
Inlays are also made from other metals. Silver has exclusive bacteriological properties, but stains the gums adjacent to the tooth in a grayish color. Titanium is brittle, and nickel causes severe shrinkage and allergies. But for some patients, these materials are ideal, especially if a metal-ceramic crown is installed on top.
On a note!
Inlays that are made of metal require veneering - a composite or a metal-ceramic crown, since they have a gray tint and do not at all complement the aesthetics of the tooth being restored.
Making plastic inlays
Making plastic inlays Having received a wax reproduction from the clinic, to maintain the accuracy of the form when it is reproduced in plastic, the technician covers all surfaces of the reproduction facing the tooth cavity with lightly mixed phosphate cement. The wax reproduction in cement is plastered into the base of the bridging ditch, leaving only the part of the wax not covered with cement free. After the plaster has hardened, carefully heat the free end of the pin, by which the insert was removed from the cavity, and remove it from the wax. Then the cuvette is covered with the other half and a counter-stamp is cast. The wax is removed with a stream of hot water, plastic of the appropriate color is placed in a cooled cuvette and polymerized. After polymerization, the technician removes the resulting excess plastic in the mold parting plane. In order to facilitate the removal of the cement remaining on the tab, the tab is placed in a 10-20% solution of hydrochloric acid. The cement dissolves in it, becomes loose and is easily removed with a thin instrument. The doctor grinds and polishes the inlay.
Indirect method of manufacturing inlays The production of inlays by the indirect method is carried out in the following sequence: 1) formation of a cavity in the tooth; 2) obtaining impressions of the tooth and dentition; 3) obtaining a combined model; 4) modeling a wax reproduction of the inlay; 5) transferring a reproduction of the inlay from wax to metal or plastic. When making an inlay using the indirect method, modeling the inlay is preceded by the clinical stage of obtaining an impression of the tooth and dentition, and in the laboratory by the stage of obtaining models. The impression is taken using a copper ring attached to the tooth and a thermoplastic impression mass of the MMSI-V-2 type or eugenoloxyzinc paste. Once the mass has hardened, a plaster cast is taken from the entire dentition. Having received the impressions, the technician prepares an amalgam (7-10 g) and fills the tooth impression with the resulting mass. Amalgam is introduced into the tooth in small portions into the deepest areas of the impression and compacted with a plugger. When the impression cavity is completely filled, a square or cone is modeled over the impression from amalgam and left to harden. The next day, a plaster cast is collected, and a ring with hardened amalgam is installed in the bed for the ring and mass. The ring with the mass and amalgam must be installed accurately and well in the impression and glued to the plaster of the impression with wax to avoid movement when casting the model. Then a plaster model is obtained, from which the ring and impression mass are removed after heating them in hot water. In the same way, a combined model of phosphate cement and gypsum is obtained. The models are strengthened with plaster into a wire occluder and modeling of the inlay begins. The amalgam tooth is lubricated with petroleum jelly, and excess is removed with a dry cotton swab. Modeling wax is heated over a burner flame or, better yet, in hot water and pressed into the cavity. While the wax has not hardened, the occluder should be closed to obtain the shape of the chewing surface. When the wax hardens, remove the excess or add molten wax to the areas where it was missing, and, after checking the correct modeling of the occlusal surface, remove the inlay from the cavity (a sprue-forming pin is inserted into the neutral area, through which a reproduction of the inlay is removed). All subsequent work is carried out as with the direct method.
Zirconium dioxide
The most modern development is a zirconium dioxide inlay - a material that is obtained from solid zirconium. It is more expensive than its analogues, but has no disadvantages at all. This tab is durable, aesthetic, and hypoallergenic. It can be used on both the front and lateral teeth. If you decide to install a stump inlay, the material for it should be selected together with your doctor. He will test you for compatibility between your body and the components that will make up the prosthesis. The structure is placed for a long time, and therefore, in case of incompatibility, removing it will be quite problematic - you will have to remove it along with the tooth.
Zirconium dioxide core inlay
Clinical stages of making inlays. Stages of the first visit
To find out the advantages and disadvantages, indications and contraindications for prosthetics with inlays, we used them in 8 patients. Making the inlay requires two visits.
The first visit involves the following steps:
I. DETAILED EXAMINATION 1) clarification of complaints 2) collection of anamnesis of life and illness 3) clinical examination, consisting of extraoral and intraoral examination 4) X-ray diagnostics 5) functional diagnostics using impressions and models II. DETERMINING THE COLOR OF THE FUTURE CONSTRUCTION III. CAVITY PREPARATION IV. OBTAINING IMPRESSIONS V. MANUFACTURING A TEMPORARY FILLING
Detailed examination
Extraoral examination includes assessment of the symmetry of the face and neck, the cleanliness and color of the skin, the red border of the lips, the condition of the facial muscles, and palpation of the temporomandibular joint (Fig. 1).
Rice. 1. Palpation of the temporomandibular joint
Rice. 2. Intraoral examination
Intraoral examination (Fig. 2) includes an assessment of the condition of the soft and hard tissues of the oral cavity, the presence of carious and non-carious lesions of the hard tissues of the teeth, the presence of poor-quality restorations, mobility, bleeding, and the gingival sulcus were determined.
As a result of the intraoral examination in this patient, we discovered two poor-quality restorations (Fig. 3 and 4), which were subject to replacement.
X-ray diagnostics
An important stage in diagnosis and differential diagnosis. Allows you to determine the condition of periodontal tissues, the depth of the carious cavity, and the condition of the contact point. As an additional research method, radiographs help determine the treatment method. We used sighting (Figs. 5 and 6) and panoramic radiographs.
Rice. 5 and 6. Sight radiographs
Functional diagnostics
Diagnostics of occlusion includes the diagnosis of static occlusion and dynamic occlusion, the first is performed using occlusion recorders, plaster models obtained from alginant impressions, the second with articulating paper (Fig. 7). Determines premature contacts or lack of contacts of antagonist teeth.
Fig.7. Registration of occlusal contacts using articulation paper
Indications for prosthetics with inlays
After the diagnosis, we determine the indications for prosthetic inlays, which are: - destroyed contact point (Fig. 8), - multiple dental caries, - deep MOD cavities (Fig. 9), - restoration of cusps fixing the height of the bite, - as a supporting element of a bridge prosthesis .
Fig.8. Contact point destroyed
Rice. 9. Cavity MOD
Determining the color of the structure
Whether the prosthesis will be aesthetically pleasing largely depends on the color of the structure. The stage of determining the color of the teeth (Fig. 11) requires compliance with numerous rules. It is necessary to determine the color in daylight and in the presence of an adequate source of artificial lighting, the walls of the office should be painted in neutral dull tones, with a reflectance coefficient of up to 40%, the doctor’s clothing should be painted in cool dull tones: green-blue-white, it is necessary to take breaks for long-term color determination.
The Vita 3D Master system was used (Fig. 10), in which the following steps were sequentially performed: - Determination of color tone (color name or combination of colors) - Determination of saturation (amount of pimento) - Determination of brightness (amount of gray tint)
Fig. 10. Vita 3d master system for color determination
Rice. 11. Determination of tooth color
Video about installing a stump tab
Notice
: Undefined variable: post_id in
/home/c/ch75405/public_html/wp-content/themes/UltraSmile/single-item.php
on line
45 Notice
: Undefined variable: full in
/home/c/ch75405/public_html/wp-content /themes/UltraSmile/single-item.php
on line
46
Rate this article:
( 2 ratings, average: 5.00 out of 5)
prosthetics