Determination of working length
Author: Hans-Willi Herrmann
Accurate determination of the working length is critical to the successful completion of endodontic treatment. Without knowing the exact working length, no root canal can be properly instrumented or obturated. However, the process of determining working length can be challenging for the clinician. These problems may arise from the working length determination procedure itself and may also be related to the wide variability in root canal anatomy. In this regard, it is important to consider all methods for determining working length (radiographic, electronic and tactile), which can be used either individually or in combination. Problems and special situations must be recognized and effectively addressed to ensure accurate working length determination for each root canal undergoing endodontic treatment.
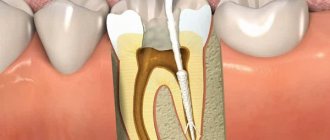
The endodontic working length is defined as the distance between the fixed coronal point and the apical point (apical constriction). The dentist can arbitrarily determine the coronal reference point, but it must be clearly fixed (for correct work in the subsequent session). Clinical experience has shown that the best coronal reference point is the apex of a cusp. If the reference points for each root canal are different, they should be noted in the patient's chart.
The working length is marked on the endodontic instrument using a silicone stopper. The apical reference point must also be determined, as detailed below. Although the exact position of the apical starting point is still controversial, in almost all cases it seems advisable to complete the root canal instrumentation in the area of the apical constriction.
Instrumentation and obturation of root canals should end at the apical narrowing (physiological opening) for the following reasons:
- no trauma to apical tissues;
- no damage to the periodontal ligament;
- it is possible to treat lateral canals;
- preventing filler from going beyond the root;
- no pushing of infected tissue beyond the root canal;
- allows adequate filling of the root canal due to compaction;
- there are no remains of infected tissue in the canal.
When determining the working length, the condition of the pulp in each individual case should also be taken into account. In the case of a vital tooth, the primary concern of the clinician is to create as small an “apical wound” as possible, while in a necrotic pulp the primary concern is to remove all bacteria. Both of these problems can be solved by avoiding excessive instrumentation of the root canal in the area of the apical narrowing. Considering that the apical constriction in many cases is a line rather than a point, it is debatable whether the root canal should be filled
Apical-coronal method of root canal treatment
Apical-coronal technique
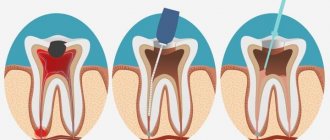
root canal treatment - “Step-back”, or “step back”. When carrying it out, the following steps are performed (Fig. 45).
1. Determine the working length of the root canal. The established length is marked with limiters on drilbors (root
examples and files), root drills (Hedström files), root needles of different sizes, which will be used for instrumentation.
2. A root drill (file) of the smallest diameter (usually No. 10) is inserted into the root canal to the working length marked by the limiter (Fig. 45, a). If this depth is not achieved, then no force should be applied and the drill should not be pushed in the apical direction. The instrument is used to move predominantly along the vertical axis of the canal: up and down on all canal walls and slight rotational movements of the instrument around its axis within 90° counterclockwise and clockwise. When removing the file from the canal, you should rinse it with an antiseptic solution and repeat the procedure until it freely reaches the full working length of the root canal. This drill (file), which has the smallest diameter, penetrates the root canal to its full working length and determines the distance to the apical foramen, is called the initial apical file, or main, master file. After each such instrumental treatment, the root canal is washed with an antiseptic solution from an endodontic syringe. In the dental literature, treatment of the root canal with drills of different diameters (files and reamers) is called rimming.
3. The same procedure is repeated (depending on the condition of the canal several times) with a file one size larger than the previous one (up to No. 25 is allowed) (Fig. 45, b, c, d). It is important to achieve free passage of the instrument through the full length of the root canal. After achieving free passage of the root canal with an instrument of this size, a file of the previous size is inserted into the canal to remove dentin filings and other organic debris that may block the root canal. This point is very important in this technique and is periodically performed with tools one size smaller with the further use of files of larger diameter. Based on this, the technique was called “Step-back”, or “step back”. The approximate sequence of using tools of different diameters can be presented as follows: No. 10-15-10-20-15-25-20 and so on.
4. Preparation continues with a file (or reamer) one or two numbers larger than the initial one and 1 mm shorter than it until it completely and freely penetrates the root canal (Fig. 45, e-j). Using this instrument, a so-called apical stop is formed - a small expansion at the apical part of the root canal in front of the relatively narrow apical foramen, which is necessary to prevent the filling material from moving beyond the apex of the tooth during filling. When the instrument reaches free passage of the root canal, work with this number is stopped and they move on to a file (rp-measure) one size larger and, accordingly, 1 mm shorter than the previous one (Fig. 45, l). After each instrumental oop.j-boot of the canal with a file (reamer), the canal is washed with a syringe and its passage to the marked length is determined with a file of the previous size (as described above) (Fig. 45, f, h, j). For this re-processing, appropriately sized root augers (Hedström files) can be used. They are inserted into the root canal until a slight stop is felt and, without rotating around the axis, they are removed. This procedure of reprocessing with a smaller file is called "recapitulation". And again, after each instrumental treatment of the root canal, it is irrigated with an antiseptic solution or other medication. To dry the root canal, cotton pads or paper points are used.
5. After completing the treatment of the canal with drills (files and reamers), some irregularities, ledges, etc. may remain on its walls. They are smoothed using root drills (Hedström files), starting with the smallest size and alternating between sizes and lengths in the same order as the drills (reamers and files). This treatment of the root canal in order to smooth its walls is called filing.
6. The mouth of the root canal is further processed, expanded and given the shape of a cone (Fig. 45, l, m, n). This stage is completed by restoring the patency of the canal with a master file (Fig. 45, o). The final mechanical treatment of the root canal along its entire length is carried out using a Hedström file of the size corresponding to the master file (Fig. 45, p).
As a result of the instrumental treatment, a root canal is obtained that is free from organic pulp residues, with smooth walls, and a regular cone shape. The effectiveness of instrumental treatment of root canals by this method depends on the mandatory fulfillment of the following conditions: strict adherence to the sequence of use of instruments; correct technique for working with drills (files, reamers) and root drills (Hedstrom files); mandatory use of drugs for antiseptic treatment and expansion of root canals.
Petrikas pulpectomy / Chapter 13 Root canal examination / 03 Determination of the working length of the tooth
Determination of working tooth length
Typically, a convenient, memorable and stable point of reference (reference point) is selected on the surface. It should not be excised during crown preparation (Fig. 13-4).
Rice. 13-3.
Tooth length and working length of tooth.
The working length is calculated in mm from the apical foramen to the reference point on the tooth crown
(Fig. 13-3).
Rice. 13-4.
You should not use the weakened walls of the tooth (A) as a guide, which can later be excised (B). It is better to carry out this excision immediately 475, 177].
Working length is the depth of the canal space at which endodontic manipulations are carried out. Anatomically, the apical reference point for the working length or apical border of the canal is the end of the apical constriction (physiological foramen,196 “physiological apex”17).
Mention has already been made of tooth length tables (Table 13-1). Durov36 made a special metal ruler template indicating the maximum, minimum and average length of each tooth (Fig. 13-5).
Rice. 13-5.
Endodontic template-ruler Durov [36].
When pulpectomy of living teeth, you can focus on the minimum indicators. When treating non-living things, it is better to focus on the average. We should not forget about the existence of extra-long teeth (Fig. 13-6).
Rice. 13-6. Macrodontia.
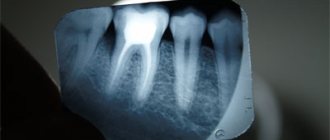
A - Upper canine 47 mm long [239]. B - The lower premolar, 38 mm long, is strongly curved. Electronic length measurement.
Table 13-1.
Length of teeth in millimeters7
| Upper | Maximum + 10% | 27,5 | 25,0 | 29,7 | 23,0 | 24,0 | 24,0 | 23,0 | 20,0 |
| Average | 25,0 | 23,0 | 27,0 | 21,0 | 22,0 | 22,0 | 21,0 | 18,0 | |
| Minimum - 10% | 22,5 | 21,0 | 24,0 | 19,0 | 20,0 | 20,0 | 19,0 | 16,0 | |
| TEETH | 1 | 2 | 3 | 4 | 5 | 6 | 7 | 8 | |
| Lower | Maximum + 10% | 23,0 | 24,0 | 28,5 | 24,0 | 24,0 | 24,0 | 23,0 | 20,0 |
| Average | 21,0 | 22,0 | 26,0 | 22,0 | 22,0 | 22,0 | 21,0 | 18,0 | |
| Minimum - 10% | 19,0 | 20,0 | 23,5 | 20,0 | 20,0 | 20,0 | 19,0 | 16,0 |
To date, there are plenty of tables of tooth lengths in the endodontic literature. The values used by Durov deviate towards the maximum specifically to meet our main principle: “excess is better than deficiency.” Table 13-2, supported by both American and German clinicians, appears to be the current standard. Therefore, we additionally offer its full version with deviations in the maximum and minimum directions.
Table 13-2.
Average length of teeth with average maximum and minimum deviations
in mm171.176
| Teeth | Average | Maximum | Minimum |
| Upper | |||
| Central incisor | 23,3 | 25,6 | 21 |
| Lateral incisor | 22,8 | 25,1 | 20,5 |
| Fang | 26 | 28,9 | 23,1 |
| First premolar | 21,8 | 23,8 | 18,8 |
| Second premolar | 21 | 23 | 19 |
| First molar | |||
| Buccal-mesial | 19,9 | 21,6 | 18,2 |
| Buccal-distal | 19,4 | 21,2 | 17,6 |
| Palatine | 20,6 | 22,5 | 17,6 |
| Second molar | |||
| Buccal-mesial | 20,2 | 22,2 | 18,2 |
| Buccal-distal | 19,4 | 21,3 | 17,5 |
| Palatine | 20,8 | 22,6 | 19,0 |
| Lower | |||
| Central incisor | 21,5 | 23,4 | 19,6 |
| Lateral incisor | 22,4 | 24,6 | 20,2 |
| Fang | 25,2 | 27,5 | 22,9 |
| First premolar | 22,1 | 24,1 | 20,1 |
| Second premolar | 21,4 | 23,7 | 19,1 |
| First molar | |||
| Mesial | 20,9 | 22,7 | 19,1 |
| Distal | 20,9 | 22,6 | 19,2 |
| Second molar | |||
| Mesial | 20,9 | 22,6 | 19,2 |
| Distal | 20,8 | 22,6 | 19,0 |
Endodontics - root canal anatomy
Endodontics is one of the fastest growing branches of dentistry. Information constantly appears about new instruments for root canal treatment, new medications, and new preparation techniques. However, there are some fundamental principles, deviation from which will lead to an unfavorable outcome of endodontic treatment, even when using the latest technologies. One of these principles is the need for careful instrumental and mechanical treatment of the apical part of the root canal, which ensures the elimination of a chronic source of infection and is the key to successful endodontic treatment. Errors made at this stage cannot be compensated for by high-quality obturation of the root canal and restoration of the coronal part. Therefore, it is necessary to take a responsible approach to the process of apical preparation, which is impossible without having a complex of theoretical knowledge about the anatomy, morphology of the root canal, as well as knowledge about existing processing methods, their advantages and disadvantages.
Anatomy of the root canal. The complex structure of root canals with multiple lateral branches and anastomoses makes complete cleaning of the canal a difficult task. This determines the need for a clear understanding of the anatomy of the root canals, and its accurate diagnosis is an important part of endodontic treatment.
The pulp space in the tooth root is represented by a system of canals. It includes the main, main canal, located in the center of the root along its entire length, and additional, short ones, extending from it at different levels. If there are several main canals, transversal anastomoses are located between them. The canals do not always end with holes on the root surface; sometimes they are “blind” depressions. In the area of the root apex, one or more small canals may separate from the main canal, forming a deltoid branching.
A widespread classification of root canal structure options identifies 8 main types, presented below.
- Type I - one canal continues from the cavity of the tooth to the apex. This type of structure is quite simple to dissect.
- Type II - two independent canals originate at the bottom of the tooth cavity and unite near the apex, opening with a common apical foramen.
- Type III - one canal originates at the bottom of the tooth cavity, divides into two canals and then merges again into one canal near the apex, opening at a common apical foramen.
- Type IV - two independent canals originate at the bottom of the tooth cavity and open with independent apical foramina.
- Type V - one canal originates at the bottom of the tooth cavity and divides near the apex, opening into independent apical foramina.
- Type VI - two independent canals originate at the bottom of the tooth cavity, merge into one and separate again, opening with independent apical foramina.
- Type VII - one canal originates at the bottom of the tooth cavity, divides into two canals, which again combine into one canal, again dividing near the apex, opening into independent apical foramina.
- Type VIII - three independent canals from the tooth cavity to the apex - three canals in one root.
The root canal is divided into coronal (orifice), middle and apical (apical) parts (thirds). The coronal part, usually the widest, is adjacent directly to the mouths of the canals. The diameter of the root canal decreases towards the apical foramen, and the maximum narrowing is located at a distance of 1-1.5 mm from the foramen. In the apical part, various variants of the canal structure are observed: its narrowing, apical bend, branching (ramification), lateral location of the apical foramen, fusion of several canals, unclosed apical foramen, physiological or pathological root resorption. In the apical part, at the dentinocemental border, the canal ends with a narrowing (physiological apical foramen). The anatomical apex is usually understood as the place where the root canal exits the root surface. The radiographic apex is the most distant point of the root, determined using X-ray examination.
In 40% of cases, the apical foramen is located at the apex of the tooth root, in another 40% - on the lateral surface of the root, in 20% on the vestibular or lingual surface. In this case, the physiological apical foramen may be located much further from the radiological apex (up to 5 mm), which is not recorded on a conventional radiograph. And with age, it moves even further from the radiographic apex due to the deposition of secondary cement. Contrary to the prevailing belief that the cross-section of root canals in the apical part is circular, in fact it turned out that in the apical region only 32% of molar roots had a relatively circular cross-section. Among studies of roots cut transversely at a distance of one millimeter from the apical foramen, the oval shape predominated.