6639
In orthodontics and dental orthopedics, a large number of different methods of restoring the dentition are used.
But the creation of any prosthetics is impossible without first making impressions.
In dentistry, they are also called an impression, and taking it is an important step on the path to a beautiful smile.
What is it and what is it for?
A cast, or impression, is a negative representation of the teeth, soft tissues and bone structures of the oral cavity on a special impression material.
The impression is a material, frozen after removal from the oral cavity, located on the impression tray.
It contains the contours of prepared and healthy teeth, displays mucoalveolar cords and other structures - transverse palatal sutures on the upper jaw, frenulum of the lips, tongue.
Without taking an impression, it is impossible to make plaster models and directly obtain an orthopedic structure.
Impressions are taken not only by orthopedic doctors; orthodontists also resort to the use of impressions in their practice.
With their help, they make diagnostic or working models, which are used to study the pathological form of the bite, measure the size of the teeth, jaws, and so on.
Types of impressions
Casts are classified according to numerous criteria. They are:
- anatomical and functional;
- full, partial;
- by material: alginate, silicone, polyester and others;
- one-stage, two-stage (depending on the stages of removal);
- single-phase, two-phase (depending on the number of phases of the material used);
- compression, decompression.
Anatomical impressions reflect the state of teeth, soft tissues, and bone structures in a state of physiological rest. Taking impressions of this type is carried out more often, but they also have their own separate indications, which are familiar to every orthopedic doctor.
Functional impressions involve special Herbst tests, which make it possible to obtain an impression with formed edges while performing the function of retracting the cheeks, pulling the lips forward, wide opening the mouth, etc.
This is extremely important, since taking these parameters into account will make it possible to obtain a design in the future, the presence of which during the performance of various functions will not in any way burden the patient’s life, and will take into account the individual characteristics of the oral cavity.
Functional impressions are most often taken for complete dentures.
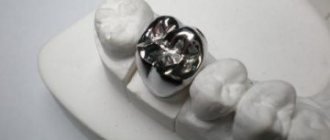
Are steel crowns on teeth and methods of their manufacture still relevant?
Let's talk here about the requirements for temporary crowns on implants.
Follow the link https://www.vash-dentist.ru/protezirovanie/nesemnyie-p/koronki-np/bolit-zub-pod-chto-delat.html if you are wondering what you can do when the tooth under the crown hurts.
Material groups
Among the main materials used for taking impressions are hard, elastic, thermoplastic, polyester, and modeling.
Hard materials
The main representative is crystalline gypsum. Among the advantages are its availability, low cost, accurate display of imprints of teeth, soft tissues, etc.
At the moment, it is rarely used , since gypsum, after crystallization and hardening, is removed from the oral cavity partially, in pieces, and the doctor needs to compare them into a single whole with considerable accuracy.
Also, plaster should not be used when taking impressions of teeth that have significant mobility.
Elastic materials
Materials based on alginic acid – alginate impression materials – are widely used in the present time.
Among the advantages are their availability, good display of the structures of the oral cavity, color change when mixing the material, which indicates its readiness to be placed in a spoon.
The disadvantages include significant deformation of the cast over time; plaster models must be cast fairly quickly.
Also, alginates are not always suitable for use in certain clinical situations. For some types of crowns and bridges, accurate mapping of the gingival part of the teeth is necessary in order to achieve accurate further modeling and casting of the structure.
Scope of application: stamped crowns, inlays, complete removable dentures, clasp prosthetics. A popular representative among dentists is Stomalgin.
Silicone materials
Two types of silicones are used – C-silicones and A-silicones. This name is obtained due to the polyaddition reaction (A-silicones) or the polycondensation reaction (C-silicones), which underlie the solidification of the masses.
They are rightfully considered one of the best materials for taking impressions, providing an accurate representation of the gingival part of the tooth, the ledge, if any.
Before using A-silicones, it is not necessary to completely eliminate the effect of moisture on the material. The downside is the cost - it is quite high.
C-silicones must be isolated from oral fluid. Application: solid cast structures. For example, Puffy Speedex.
Also, this category of materials includes Dentol - a domestically produced material based on guaiacol - clove oil and zinc oxide. It is distinguished by good properties and a rather pleasant taste.
Polyester materials
They are an expensive category, but they provide very accurate images of the relief of the soft tissues of the oral cavity, teeth, and bone formations, which makes it possible to obtain the most accurate impression when taken correctly.
Thermoplastic materials
As the name implies, the state of these materials changes under the influence of temperatures. When heated, the material softens, and when cooled, it hardens.
Positive properties:
- quite easy to use;
- connects well with the impression tray;
- possibility of repeated use.
Negative:
- the possibility of deformation of the cast during removal of the mass;
- insufficient accuracy of displaying undercuts necessary for casting more accurate models.
Their group also includes Kerr masses 1,2,3.
- 1 – intended for relining dentures from toothless jaws, taking impressions for prosthetics for patients with complete edentia;
- 2 – used in the manufacture of maxillofacial devices;
- 3 – for taking impressions for half-crowns, inlays, and making some types of splints.
Modeling materials
They are represented by all kinds of materials, the basis of which is wax, stearin, paraffin, and their combinations.
Pros:
- easy to use;
- universal;
- accurate display of imprints of prepared teeth, soft tissues, etc.;
The only downside is significant susceptibility to deformation due to wax softening under the influence of temperatures.
Manufacturing technology of Cerec crowns and price of products.
This material is dedicated to the features of Prettau crowns.
Here https://www.vash-dentist.ru/protezirovanie/nesemnyie-p/koronki-np/e-max-tehnologiya.html we will talk about E Max ceramic crowns.
Individual spoons can be made from
1) metal (steel, aluminum) by stamping;
2) plastics:
a) basic (fluorax, ethacryl, yarocryl) polymerization method;
b) quick-hardening (redonta, protacryl) using the free-forming method;
c) standard plastic plates AKR-P;
d) light-curing plastic;
3) solar-cured materials with polymerization in special chambers or using a solar lamp;
4) thermoplastic impression masses (Stens);
5) wax.
Individual spoons are made in the laboratory or directly in front of the patient.
Making an individual spoon from quick-hardening plastic
After completing the drawing of the boundaries, the undercuts are isolated with wax so that the finished individual spoon can be removed from the model. Warm up the base wax plate and press it evenly onto the model. Cut it along the previously drawn border. In the area of the palate and alveolar processes in the lateral section, round or square holes (windows) are made in the wax to create restrictions on an individual tray, which in these areas will be in contact with the oral mucosa. This is done to create a uniform gap between the spoon and the mucous membrane, which will be filled with corrective silicone mass. The window area is lubricated with insulating varnish (Izokol-69, Pikasep, Vaseline, vegetable oil, etc.).
Next, cold polymerized plastic is mixed according to the manufacturer's instructions (usually in a powder to monomer weight ratio of 2:1). The easiest way to model a spoon made of cold-cured plastic is to use a special silicone mold with a base-shaped model a few millimeters high. A thin plastic film (cling film, etc.) is spread on the bottom of the mold, the mixed plastic is poured into the mold, leveled in the mold and covered with a second layer of film on top. It is left for a few minutes for the plastic to mature and enter the “test stage”. After this, the top (second) layer of film is removed, the top side of the plastic is pressed against the model, accordingly it turns over and the bottom layer of film is on top. Next, the plastic is adapted to the model through the film. The film is removed and a handle is modeled from the excess part of the material (plastic that extends beyond the boundaries of the spoon). If it is necessary to model the finger supports on the side of the spoon, then this is also done from excess plastic.
Next, the dental technician waits for the plastic to harden. After hardening, remove the spoon from the plaster model and, if necessary, separate the wax from the spoon. Shortens the spoon according to the drawn boundaries on the model. If necessary, perforations are made in the tray for better adhesion to the impression material.
This is interesting: The design and principle of operation of the Persin apparatus in orthodontics
Advantages:
- Cheapness;
- Lack of grips in the undercut area;
- No need for special equipment.
Flaws
- Toxicity as the technician inhales monomer fumes;
- Limited simulation time;
- Inconvenience of grinding the spoon (the material can melt and clog the cutter);
- The need to isolate undercuts on the model;
- Inconvenience of modeling a handle.
All stages of making an individual spoon from chemically cured plastic are presented in the video.
Making an individual spoon from a thermoplastic plastic plate using vacuum molding
After completing the drawing of the boundaries, the undercuts are blocked using a special material resistant to high temperatures (Erkogum, etc.). They adjust the pen. Next, the model is placed in the center of the perforated table of the vacuum forming apparatus. A special porous rubber plate (Erkopor, etc.) having a thickness of 3 mm is applied to the model. Place a thermoplastic polystyrene plate (Erkorit klar, etc.) into the holder and start the vacuum molding process. The plate is heated and, after transitioning to a plastic state, it is lowered down, tightening the model, while a hermetically sealed connection is formed along the edges with the table of the vacuum forming apparatus. A vacuum pump between the plate and the table creates a vacuum due to which the plate fits tightly to the model and to the table of the device. A special aluminum spoon is heated with a torch and melted into the plate in the right place, or a plastic handle is glued to the spoon with a special glue.
After cooling, the model along with the plate is removed from the apparatus. Cut the spoon along the borders, if necessary, make holes in the spoon.
All stages of making an individual spoon using vacuum molding are presented in the video.
Advantages:
- Ease of manufacture;
- High production speed;
- No toxic materials.
Flaws
- Special equipment required;
- Relatively higher manufacturing cost;
- Special materials required;
- Inconvenience of grinding the spoon (the material can melt and clog the cutter);
- There is no possibility of making finger supports in the side section of the spoon;
- It is necessary to isolate the undercuts on the model.
Making an individual spoon from a photopolymer composite plate
After completing the drawing of the boundaries, the undercuts are isolated with wax so that the finished individual spoon can be removed from the model. Warm up the base wax plate and press it evenly onto the model. Cut it along the previously drawn border. In the area of the palate and alveolar processes in the lateral section, round or square holes (windows) are made in the wax to create restrictions on an individual tray, which in these areas will be in contact with the oral mucosa. This is done to create a uniform gap between the spoon and the mucous membrane, which will be filled with corrective silicone mass. The window area is lubricated with insulating varnish (Izokol-69, Pikasep, Vaseline, vegetable oil, etc.).
A special photopolymer plate (Individo Lux, Fastray LC, etc.), which has the consistency of plasticine, is pressed onto the model and cut along the borders.
From the cut parts of the photopolymer plate, a spoon handle and finger rests in the side section are modeled. After completing the modeling, place the spoon in a photopolymerizer for several minutes. After polymerization, remove the spoon from the model, remove the wax, make holes in the spoon if necessary, and grind the edges of the spoon.
Advantages:
- Ease of manufacture;
- High production speed;
- No toxic materials;
- Convenience of modeling handles and supports;
- Convenient grinding of the spoon (the material does not melt and does not clog the cutter);
- There is no time limit for simulation.
Flaws
- Special equipment is required, but it can be replaced with a regular halogen lamp;
- Relatively higher manufacturing cost;
- The need to isolate undercuts on the model.
Detailed steps for making an individual spoon from a photopolymer plate are presented in the video
Primary requirements
In order to obtain a high-quality design as a result of prosthetics, the following basic requirements are imposed on impressions:
- Accurate negative representation of the dentition, transitional fold of the oral cavity, transverse palatal folds, frenulum, bucco-alveolar cords - all the main anatomical formations of the oral cavity.
- No pores or pronounced deformations after receiving it.
If deformation, pores, or inaccurate representation of the structures of the oral cavity are detected, it is necessary to retake the impression, because the convenience and non-traumatic nature of the future design will depend on this.
Preparation
Often, almost immediately after the patient selects a design, the doctor begins taking impressions.
First, under local anesthesia, he prepares the hard tissues of the teeth, depending on the chosen prosthesis.
After this, when using some materials, it is necessary to dry the oral cavity with cotton swabs or using tools - a gun.
Next comes the selection of a spoon, its fitting, and after determining the size, actually mixing the material.
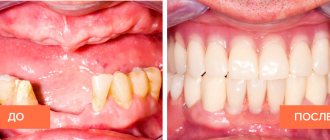
In the case of complete absence of teeth, more often in elderly patients, changes occur in the dental system. In place of long-term missing teeth, bone tissue is lost and bone outgrowths are formed - exostoses.
In such cases, before taking an impression, it is necessary to carry out preliminary surgical preparation of the oral cavity for prosthetics in order to obtain the most optimal impression in this situation.
Sirona Omni Cam intraoral scanner at Dial-Dent
Recently, Family Dentistry purchased an intraoral scanner Sirona Omni Cam (Germany) for our patients. This is an excellent modern device. The Sirona Omni Cam intraoral scanner works quickly and very accurately! Thanks to its small camera, it does not cause discomfort to the patient, even when distant teeth are scanned. German software from the well-known company Sirona allows you to immediately obtain a three-dimensional model of the patient’s jaws on the computer screen. The doctor, rotating the models in three-dimensional space, can almost immediately show the patient some features of his bite. Digital models are stored on the Dial-Dent server for an unlimited amount of time. They can also be transferred to the patient in the form of a special file. However, to view this file you will need a program that can work with STL files (three-dimensional objects). Only the best clinics use such equipment and technology. We are glad that this technology is now available to both our doctors and patients.
Video about how teeth are scanned with an intraoral scanner:
Many of our doctors have been trained to use the scanner. And at this point in time, we are actively using scanning instead of traditional dental impressions in diagnostics when correcting bites and in the production of various orthodontic devices.
We try to provide our patients with the best and most modern types of diagnostics and treatment. Digital dental impressions (scanning) have not yet completely replaced traditional dental impressions. In some cases, dental impressions made with silicone mass will be preferable. So these technologies, traditional and digital, rather complement each other!
Make an appointment for a consultation by phone +7-499-110-18-04 or through the form on the website. You can ask questions about dental treatment to the chief doctor of the clinic, Sergei Vladimirovich Tsukor, at
Removal process
After assessing the clinical situation, selecting the impression material, and treating the teeth for a particular design, the doctor mixes the impression material and places it in a tray, introducing it into the oral cavity.
Spoons are presented in many types and have their own classification:
- according to the material of manufacture - metal, non-metal;
- by purpose - for the upper, lower jaw;
- depending on the type of impression – compression, decompression (excluding excess pressure on soft tissues).
The size of the spoon depends on the size, shape of the jaw, the width and length of the dentition and the height of the crowns. Orthopedic doctors have sets of standard spoons of various numbers available, by fitting which they can determine the size.
However, standard spoons are not always suitable - sometimes there is a need to make individual devices (complete loss of teeth, end defects). The doctor can make the spoon himself or a dental technician can do it.
Depending on the clinical situation and the chosen design, the doctor selects the preferred class of impression materials, the type of impression and begins mixing the material.
Next, the resulting impression is washed under running water and dipped in a disinfectant solution, and after that you can begin mixing the plaster and casting the model.
What prostheses are made from impressions?
The basis of orthopedic structures are dental impressions. This material reflects the dentition and soft tissues of the oral cavity, on the basis of which dentures are made.
Impressions of teeth for prosthetics
are removed for the manufacture of the following structures:
- braces and trainers used in the treatment of malocclusion;
- dental crowns;
- bridges;
- removable and fixed prostheses;
- individual abutments.
Price
Many patients are concerned about the cost of impressions. It depends on several factors:
- depending on the individual characteristics of the case (for example, in the case of complete absence of teeth, the manufacture of an individual spoon is indicated, which will affect the cost);
- from the choice of impression material - the doctor will obviously not use the most expensive material in cases where it is possible to get by, for example, with alginates.
Accurate representation of the gingival part is an important criterion for successful prosthetics with some structures, and this requires the use of more expensive materials. This will undoubtedly also affect the price.
Additional information on the topic of the article is presented in the video.
Impression techniques
How is the procedure for taking an impression carried out, what are the disadvantages of each method and their features? Despite the external versatility of the open method, it also has its drawbacks and is often complemented by combinations.
The closed method, in addition to being inconvenient, in some cases is the most suitable. Below is a detailed description of both methods.
Open spoon
The open tray method involves removing the hardened impression from the oral cavity along with the transfer. For this to be feasible, the spoon must have holes through which the screws can be accessed.
Thanks to these holes, the transfer is disconnected from the implant before removing the impression from the mouth. To do this, you just need to unscrew the mounting screw that “peeks out” from the hole. Thus, spoons with holes are “open” to access the screw, hence their name.
This technique uses individual or standard personalized spoons. Personalization consists of making holes in them in the projection of the implants installed in the patient’s jaw. Usually, in addition to large holes, spoons also have small perforations.
The procedure for taking impressions with an open tray is carried out in the following sequence:
- Before starting the operation, make sure that the mucosal tissue around the gum former is fully formed and there is no bleeding. If the area is bleeding and/or the mucous membrane in the area where the healing abutment emerges has not completely healed, the impression taking procedure is postponed.
- Turn out the gum former.
- The transfer is attached to the implant using a fastening screw. The latter should protrude above the occlusal surface of adjacent teeth by no less than 5-10 mm. It is very important that the seating surface fits accurately and completely into the implant.
- Holes are milled in the spoon in projection.
- Fill it with impression material.
- Impression material is applied to the gum around the transfer.
- Insert the spoon into the oral cavity, positioning it so that the transfers come out into the holes. Then the patient is asked to clench his jaw.
- When the mass hardens, the patient opens his mouth wide, the orthopedist unscrews the fastening screws, and carefully removes the impression with the transfers remaining in it from the patient’s mouth.
- The internal cavity of the implant is washed and the gum former is reattached to it.
Next, analogues (copies) of the implants installed in the patient are attached to the transfers located in the impression.
At this point, the stage of taking the impression ends, and the next phase begins - making a plaster model , in which analogues of implants attached to the transfer will take exactly the same position as real implants in the patient’s oral cavity.
Thanks to this, the prosthesis made according to the model will be absolutely accurately installed on the implants in the patient’s mouth.
This is interesting: Methods for treating narrowing of the upper and lower jaws and dentition
The advantages of the open spoon method include:
- absolute accuracy of moving the position of the implant , due to the fact that the transfer is not removed from the impression, which may cause an error;
- the ability to take accurate impressions in the most difficult clinical situations - with non-parallelism and a large number of implants, their close location to each other, etc.;
- avoiding deformation of the print.
Flaws:
- increased duration of the procedure while unscrewing the transfer screws;
- the need for the patient to open his mouth wide (with TMJ diseases this may be difficult or even impossible);
- the patient may have a gag reflex when manipulating his mouth.
Closed spoon
The closed method completely coincides in procedures with a two-layer impression, which is taken during prosthetics.
Important! Before starting work, it is recommended to make sure that the former, fixed during healing, is in optimal condition.
This is determined by a number of indicators:
- The element must be securely held in a fixed state.
- The gums around are not inflamed and do not differ in color and external parameters from nearby ones.
- When tapped, the element produces an unpleasant metallic ringing sound.
- Manipulations during the examination do not cause any pain in the patient.
If no defects are found, it is necessary to remove the former, thoroughly disinfect the channels and fix a transfer for closed technology in its position.
To ensure complete coincidence of the polyhedra, it is recommended to slightly rock the element clockwise in the channel. The slot must be treated with wax.
Next, the print is prepared in a couple of steps:
- First, take out the first layer, on which the interdental septa and undercuts are removed.
- Afterwards, by applying a corrective gel, the final impression is taken.
After this, in a strictly defined sequence, the transfers are turned out and reinstalled in the prepared place. Then specialists in the dental laboratory prepare the implants based on the impressions provided. The hardening time of one “artificial tooth” is from one to three days.
The created frame needs to be tried on and tested for strength. The structure must be securely fastened and not wobble; it must also be put on without tension or effort. Next, using one transocclusal screw, it is necessary to check the stability of fixation of all supporting parts of the structure.
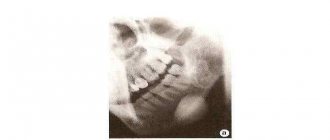
At the final stage, the quality of the fit is checked using an X-ray machine, and if necessary, adjustments are made. And you need to choose the appropriate color (the issue is resolved using special tables).
The video provides additional information on the topic of the article.
Reviews
A significant part of the success of the entire treatment depends on the qualifications of the dentist.
A competent doctor will always determine the need for the use of certain materials and select the most rational prosthesis in any clinical case.
You can share your impressions of treatment and impression taking in the comments to this article.
If you find an error, please select a piece of text and press Ctrl+Enter.
Tags: fixed dentures, dental impressions
Did you like the article? stay tuned
Previous article
Reliable and durable dental restoration with Alpha Dent implants
Next article
Dental implantation tactics using a surgical template