Ways to hold forceps
The tooth extraction operation is performed with the right hand using forceps. The surgeon's fingers should be positioned so that with one hand it is possible to move the jaws of the forceps apart and bring them together. The forceps are held in such a way that they can be moved along the axis of the tooth under the gum. There are two ways to hold the forceps. The first method involves holding both handles of the forceps with the entire right hand, except for the IV and V fingers. These fingers are placed between the handles; if necessary, they can be used to push the jaws apart. When the handles of the forceps are closed, fingers IV and V are removed from the space between the jaws. In the second method, the most suitable for removing teeth of the upper jaw, the thumb covers one handle of the forceps, and the IV and V fingers hold the other handle. The ends of both handles rest against the palm, which helps propel the forceps. The branches of the forceps are moved apart, straightening the third finger, and closed when bending the fourth and fifth fingers. When bringing the third finger out after applying the forceps, they are squeezed with all fingers except the index.
Methods of holding forceps : a, c - when applying forceps to a tooth; b, d - when fixing the forceps on the tooth
Removal method
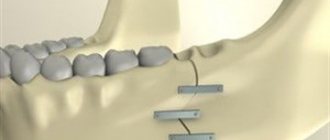
The basis of a surgical operation in which an elevator appears in the instrumentation is the principle of leverage. Thanks to the shape of the cheek, the working part fits perfectly into the periodontal gap, breaking the ligaments, and is fixed between the socket and the tooth.
CAREFULLY! We must not forget that when introducing an elevator or forceps into the periodontal fissure, it is necessary to hold the alveolar process with the index finger and thumb. Next, having installed it in the required position, the doctor applies force pressure to the end of the handle, which is transmitted to the tooth itself. As a result, it dislocates from the socket and it comes out.
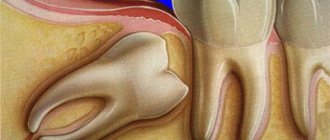
Wisdom teeth on the lower jaw are removed in a similar way. The only caveat is that when removing connected roots, they are first sawed with a fissure bur.
- When applying the elevator to the required position, its cheek should rest on the adjacent tooth. In order not to dislocate it, you need to hold it with two fingers. If the doctor feels that this tooth is already unstable and there is a risk of its retraction, then the operation continues with the use of forceps.
- It is advisable to remove the third molar chewing tooth of the lower jaw using an elevator only if there is a seventh tooth tightly fixed in the socket. And even better if it’s the sixth. Then almost ideal conditions are created for using this tool. But again, it all depends on the specific clinical case.
- When working with a drill, cooling with water is a prerequisite. It is very important not to overheat the tissue at this stage.
Signs of forceps
A sign of the width of the cheeks . Forceps with a cheek width of more than 0.75 cm are intended for removing molars, i.e. teeth with wide crowns, and forceps with narrow cheeks (less than 0.75 cm wide) are used to remove teeth with a narrow crown (incisors, canines, premolars, roots).
Form sign . Most forceps can be used to remove teeth on the right or left side; their cheeks are the same sharp or rounded. At the same time, to remove upper molars that have two buccal roots, the forceps are selected in such a way that the cheek with the pointed end is facing the vestibular side so that the pointed end of the cheek fits between the two buccal roots and tightly fixes the crown.
Sign of the angle of the forceps for tooth extraction: 1-3 - upper jaw; 4 - lower jaw
Thus, there are forceps for removing teeth on the right and left sides. A sign of the bend and length of the forceps . The length of the handles and cheeks of the forceps depends on the location of the teeth. So, to remove the upper incisors and canines, straight forceps with short cheeks are used (Fig. 5-5). Special S-shaped forceps are used to remove upper premolars and molars. If there is a spike on the vestibular side, they are used to remove molars, and without a spike - for premolars. Special forceps with slightly elongated converging cheeks and jaws, shaped like a bayonet, are called bayonet-shaped, or bayonet (from the French “bayonet” - bayonet). These forceps are designed to remove the roots of maxillary molars. In clinical practice, these forceps can be used to remove the roots of all teeth in the upper jaw. In addition, bayonet forceps, if necessary, can be used to remove the roots of the incisors and canines of the lower jaw. That's why bayonet pliers are also called universal pliers.
The upper third molars are removed using bayonet forceps with longer and more curved cheeks.
Forceps for removing teeth and tooth roots on the upper jaw ; 1 - for removing incisors and canines; 2 - for removing premolars; 3 - universal; 4 - for removing molars; 5 - for removing third molars
When removing teeth from the lower jaw, beak-shaped forceps are used, curved along the edge (with converging and non-converging ends of the cheeks). These forceps are mainly used to remove anterior teeth and premolars. Molars, especially third ones, are removed using forceps curved along a plane. The same forceps are used to remove molars of the lower jaw with limited mouth opening. The roots of all teeth in the lower jaw are removed using beak-shaped forceps with converging ends of the cheeks.
Removal of tooth roots and teeth using elevators
Elevators are used in cases where it is impossible to remove tooth roots, and in some cases even teeth, with forceps. Most often this happens when the root is located deep in the hole. The use of forceps in these cases is often accompanied by significant damage to the mucous membrane and bone tissue of the alveolar process, but it is still not possible to capture the root. Intervention with an elevator is less traumatic. Sometimes removing the lower third molar and teeth located outside the dentition (especially on the side of the hard palate) is easier to do with an elevator than with forceps. The position of the patient in the chair and the doctor when using elevators is the same as when removing teeth with forceps. Before removal, you should carefully separate the circular ligament from the neck of the tooth and the gum from the edge of the alveolus on all sides.
Removal of tooth roots using a direct elevator.
This elevator is used to remove single roots of the upper jaw teeth, which have a conical shape, as well as separated roots of the upper large molars. During the operation, the handle of the elevator is held with the right hand, the terminal phalanx of the second finger is placed on the connecting rod next to the cheek, the doctor grabs the alveolar process with the first and second fingers of the left hand from the outer and inner sides, respectively, of the tooth being removed. This allows you to control the insertion of the elevator without fear of damage to the surrounding mucous membrane if the instrument accidentally slips. An elevator is inserted between the root being removed and the wall of the socket or roots of the upper molars. The concave part of the cheek should face the root, the convex part should face the wall of the hole. By pressing on the handle and simultaneously rotating it around the longitudinal axis, first in one direction, then in the other, move the elevator cheek deeper into the hole (Fig. 6.15). In this case, the periodontal fibers holding the root are partially torn and the root moves slightly to the opposite wall of the socket. By inserting the cheek of the elevator by 4-5 mm and using it as a lever resting on the edge of the hole, the root is finally dislocated. If the tooth root becomes mobile, but does not come out of the hole, then it is easily removed with forceps.
Removing tooth roots using a corner elevator.
An angular elevator is used to remove the separated roots of the lower large molars, and rarely the roots of other teeth of the lower jaw. The elevator handle is held with all fingers and the palm of the right hand, sometimes the first finger is placed on the connecting rod. The placement of the fingers of the left hand is the same as when removing the lower teeth with forceps. The elevator cheek is inserted into the periodontal fissure with its concave surface towards the root being removed or into the space between the roots of a large molar. The handle and connecting rod of the elevator are located on the buccal side. The cheek is inserted deep between the root and the wall of the hole, pressing with the right hand on the handle, and with the first finger of the left hand on the connecting rod near the cheek. In this case, the cheek of the elevator acts like a wedge, displacing the root in the opposite direction and expanding the space between the root and the wall of the hole. Simultaneously with the advancement of the cheek, the elevator is rotated along its longitudinal axis. At this time, the concave part of the cheek pushes the root out of the hole (Fig. 6.16, a). After one of the roots of a large molar is removed, the cheek of the elevator is inserted into the empty socket with the concave surface towards the root being removed. By rotating along the longitudinal axis of the instrument in the direction opposite to the root, a significant part of the interroot septum is first broken off, then the remaining root is removed with a similar movement (Fig. 6.16, b). You can use another technique: dislocate the root towards the empty hole. To do this, take another corner elevator and rest the convex surface of the cheek against the adjacent tooth, and the concave surface against the root being removed. By rotating the handle, the root (sometimes with a section of the interradicular septum) is shifted into the hole of the previously removed root. Removal of the root apex can be carried out using a curettage spoon, a special screw, or a metal ligature (Fig. 6.17).
Tooth extraction using a bayonet elevator (Lecluse).
It is designed to remove the third lower molar when the first and second teeth are stable. In the absence of a third large molar, this elevator can be used to remove the second large molar of the lower jaw if the teeth adjacent to it are sufficiently stable, but this is very rarely resorted to. When removing a tooth with this elevator, the position of the patient, the doctor and the fingers of his left hand is the same as when removing the lower molars with forceps. The elevator is held by the handle with the right hand, the 11th finger is placed on the connecting rod near its bend. The pointed end of the elevator cheek is inserted into the interdental space between the second and third large molars so that its flat part faces the tooth being removed, and the rounded part faces the abutment tooth (Fig. 6.18). By rotating the elevator along the longitudinal axis, the cheek is gradually moved deeper into the interdental space. During rotation, the upper edge of the cheek rests against the adjacent tooth, the lower edge against the one being removed, displacing it upward and backward. When working with this elevator, significant force can be developed, so it is not recommended to use the second large molar as a support if the first one is missing. In addition, one should remember about the possibility of a fracture of the body of the lower jaw in the area of its angle. A tooth dislocated by an elevator is held with the fingers of the left hand to avoid accidentally getting it into the pharynx or trachea. Tooth extraction using a direct elevator.
In addition to the roots of the teeth, the third lower molar or teeth that have erupted outside the dentition can be removed. When removing the third lower molar, the cheek elevator is inserted from the buccal side, just like a bayonet elevator - into the interdental space between the second and third teeth. The groove of the elevator cheek should be facing the tooth being removed. By introducing the elevator deep into the interdental space and making small rotational movements with it, the tooth is dislocated. The method for removing teeth that have erupted outside the dentition using a direct elevator is the same as for tooth roots.
Did you like the article? Share with friends
0
Similar articles
Next articles
- Removing tooth roots using a drill
- Wound healing after tooth extraction
- Accurate impressions using Panasil film and materials - fast and stress-free
- Sandwich technique in restoration technology with ceramic veneers
Previous articles
- Means for effective local prevention of dental caries
- Laser teeth whitening
- Microbiological evaluation of photoactivated disinfection in endodontics
- Application of laser in dentistry
- Removing tooth roots with forceps
Add a comment
Contraindications
In some cases, ultrasonic tooth extraction is contraindicated. The method is not used if the patient:
- diseases of the cardiovascular system;
- pathologies of the central nervous system;
- respiratory diseases: bronchial asthma, emphysema, asthmatic bronchitis;
- diseases transmitted by airborne droplets - tuberculosis, herpes;
- HIV infection;
- hepatitis.
The procedure is carried out faster by 15 - 20%.
Important! It is also not recommended to use piezosurgery during a change in the primary occlusion, with a weakened immune system, diabetes mellitus, or demineralization of enamel.
Removal method
The basis of a surgical operation in which an elevator appears in the instrumentation is the principle of leverage. Thanks to the shape of the cheek, the working part fits perfectly into the periodontal gap, breaking the ligaments, and is fixed between the socket and the tooth.
CAREFULLY! We must not forget that when introducing an elevator or forceps into the periodontal fissure, it is necessary to hold the alveolar process with the index finger and thumb. Next, having installed it in the required position, the doctor applies force pressure to the end of the handle, which is transmitted to the tooth itself. As a result, it dislocates from the socket and it comes out.
Wisdom teeth on the lower jaw are removed in a similar way. The only caveat is that when removing connected roots, they are first sawed with a fissure bur.
- When applying the elevator to the required position, its cheek should rest on the adjacent tooth. In order not to dislocate it, you need to hold it with two fingers. If the doctor feels that this tooth is already unstable and there is a risk of its retraction, then the operation continues with the use of forceps.
- It is advisable to remove the third molar chewing tooth of the lower jaw using an elevator only if there is a seventh tooth tightly fixed in the socket. And even better if it’s the sixth. Then almost ideal conditions are created for using this tool. But again, it all depends on the specific clinical case.
- When working with a drill, cooling with water is a prerequisite. It is very important not to overheat the tissue at this stage.
Ultrasound tooth extraction technology
Ultrasound tooth extraction refers to piezosurgery, which allows manipulation using ultrasonic waves. In dentistry, technology is actively used in implantation and bone grafting, maxillofacial surgery and, of course, tooth extraction. This is a modern, safe and painless alternative to classic forceps, elevators and drills.
The piezosurgical device is an expensive and multifunctional device. It consists of a workstation, a water container and tips, which in professional environments are often called ultrasonic pointers. Due to their design, these pointers can be used even in the most difficult to reach areas of the jaw.
Advantages of piezosurgery
- High precision and minimal invasiveness.
Ultrasonic waves do not require direct contact with the surface and provide very high precision in the surgical area, which allows you to preserve the maximum volume of healthy tissue and significantly reduce bleeding and the invasiveness of the entire procedure. - Without pain and discomfort.
Unlike a drill, an ultrasonic scalpel does not heat the tooth tissue, so the operation is as comfortable as possible for the patient and often does not require the use of anesthesia. - The procedure goes quickly.
Treatment time is reduced by 15-20%. - Without consequences.
Minimal risk of complications.
Tooth canal removal
Pulpitis is one of the most unpleasant dental diseases, resulting from injury, gum disease or bacterial penetration. Without timely treatment, the infection spreads through the root canals into the peri-root tissues, damaging the bone at the base of the tooth. One of the methods of treating this disease is depulpation - removal of the nerve in the root and coronal parts.
Tools for tooth extraction allow the procedure to be carried out efficiently, achieving the least amount of tissue trauma. The correct choice of a particular device can radically change the course of the procedure, as well as recovery and possible complications after it.
We suggest you familiarize yourself with How to provide first aid for acute pain in the gums
When is ultrasonic removal used?
Despite the advantages of the method, piezosurgery is usually used for complex extractions. The usual method is quite effective. In addition, not all dentists are equipped with special equipment.
Ultrasonic tooth extraction is used for:
- improper growth of chewing units - for extraction of dystopic and impacted teeth;
- limited access: difficult location, soft and hard tissues cover the bone fragment;
- pregnancy;
- diseases that impair blood clotting - in such cases this is the only method of surgical intervention;
- subsequent implantation.
Piezosurgery is usually used for complex extractions.
Important! The only disadvantage of piezosurgery is its high cost. So, if complex removal using the usual method in Moscow clinics costs an average of 2,500 – 3,000 rubles, then ultrasound – from 5,000 rubles.
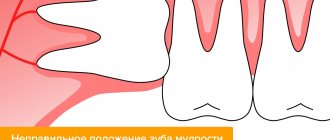
Simple removal of wisdom teeth in the upper jaw
Simple removal is done without cutting the gums or other surgical procedures requiring the use of a scalpel. Use ordinary hand tongs or an elevator.
Simple removal is prescribed when nothing prevents the tooth from being pulled out of the socket:
- the upper “eight” has completely erupted, its coronal part protrudes above the level of the gum, which allows it to be grasped with forceps;
- the tooth has one or more fused roots;
- The tooth root is straight, not very long and not twisted.
Since it is difficult to reach the uppermost molar, the doctor uses curved S-shaped forceps. If the enamel is severely damaged by caries, bayonet-shaped (bayonet) instruments are used. They are also great for extracting roots.
The picture shows a “figure eight” that needs to be removed
Bayonet pliers have elongated, pointed cheeks that close completely, unlike other types. They are convenient for fixing and pulling out the remains of the crown or root.
Operation stages
- Applying forceps to the crown of the tooth.
- Deepening the cheeks of the forceps under the edge of the gums.
- Tool fixation.
- Luxation is the swinging of a tooth towards the cheek and its dislocation.
- Traction is the extraction of the figure eight from the alveoli.
Immediately after tooth extraction, the doctor applies a sterile gauze pad to stop bleeding. The duration of the removal procedure is no more than 10 minutes.
Bayonet forceps for wisdom tooth removal
Auxiliary Tools
Forceps and elevators are the main tools of a surgeon. But in addition to them, scissors, scalpels, raspators (thin “spatulas” for separating gums from bone tissue), tweezers, clamps and all kinds of hooks are also used. A chisel (to separate bone tissue and expand the hole if the root is very deep) and a hammer can also be used. Patients are often horrified by the thought of having a chisel manipulated in their mouth, but there is nothing scary about such a procedure. With the right anesthesia, you will not feel anything. In addition, when removing teeth, a drill can also be used - the device will be required if the tooth has several roots and they will need to be separated before removal. This will significantly facilitate the process of extracting the tooth, because the doctor will not extract it entirely, but in parts.