3889
This term originates from Latin and means “closure.”
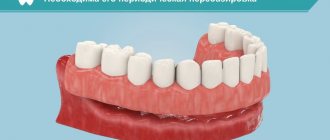
Central occlusion is a state of evenly distributed tension of the jaw muscles, while ensuring simultaneous contact of all surfaces of the elements of the dentition.
The need to determine central occlusion is to correctly manufacture a partial or removable denture.
Central occlusion and central jaw relation
The concepts of centric occlusion and centric relation are often generalized, but their meanings are completely different.
Occlusion is the closing of teeth. No matter how the patient closes his mouth, if at least two teeth touch, this is occlusion. There are thousands of occlusion options, but it is impossible to see or determine them all. For a dentist, 4 types of occlusion are important:
- Front
- Rear
- Lateral (left and right)
- and Central
This is occlusion - uniform closure of the teeth.
Central occlusion is the maximum intertubercular closure of the teeth. That is, when as many teeth as possible for this person come into contact with each other. (Personally, I have 24).
If the patient has no teeth, then there is no central (or any) occlusion. But there is a central relation.
Ratio is the position of one object in relation to another. When we talk about jaw relationship, we are talking about how the mandible relates to the skull.
The centric relation is the most posterior position of the mandible when the head of the joint is correctly located in the glenoid fossa. (Extreme anterosuperior and midsagittal position). There may be no occlusion in the centric relation.
In the centric relation, the joint occupies the most superior-posterior position
Unlike all types of occlusion, the centric relation does not change throughout life. If there were no diseases or injuries to the joint. Therefore, if it is impossible to determine the central occlusion (the patient has no teeth), the doctor recreates it, focusing on the central relationship of the jaws.
To continue the story, two more definitions are missing.
Planning for prosthetics
The manufacture and fixation of prosthetic structures for pathological bite heights have certain features and require careful planning and preparation.
Preparatory measures for prosthetics differ somewhat depending on the identified pathology of the relationship of the upper and lower jaw.
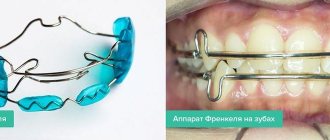
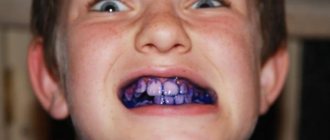
Thus, the main action in determining a low bite is the production of special aligners and bite plates, with the help of which complex orthodontic treatment is carried out.
These designs are made individually for each patient, taking into account the impressions of his oral cavity. The purpose of this procedure is to bring the occlusal height indicator to a state of physiological norm.
The duration of use of bite blocks and mouthguards depends on the severity of the pathology, as well as the anatomical features of the structure and functioning of the bone and muscle structures of the human oral cavity.
If a low bite is detected, the following preparatory measures for subsequent prosthetics can be used:
- Application of Dahl's construction. A special orthodontic fixed plate, fixed in the patient’s oral cavity for a period of 2-3 months, helps create interspatial occlusion.
- Lengthening crowns using artificial methods. In this situation, orthodontic stretching of a certain element of the dentition without correction of the remaining teeth is used.
If it is not possible to correct the height of the bite using orthodontic devices, specialists resort to more radical methods, in particular surgical intervention.
In this case, the root system of one or more teeth is exposed and the gum tissue is given the required shape and relief.
The video provides additional information on the topic of the article.
Resting height and bite height
Bite height is the distance between the upper and lower jaws in the position of central occlusion
Bite height - the distance between the upper and lower jaws in the position of central occlusion
Physiological rest height is the distance between the upper and lower jaw when all jaw muscles are relaxed. Normally, it is usually 2-3 mm greater than the height of the bite.
Normally, it is 2-3 mm greater than the height of the bite
The bite can be high or low. Overbite due to improperly manufactured prosthesis. Roughly speaking, when artificial teeth are higher than their own. The doctor sees that the bite height is 1 mm less than the resting height, or equal to it, or greater than it
The lower third of the face is significantly larger than the middle third
Underestimated - with pathological abrasion of teeth. But there is also the option of incorrectly manufacturing the prosthesis. The doctor sees that the height of the bite is greater than the resting height. And this difference is more than 3 mm. In order not to underestimate or overestimate the bite, the doctor measures the height of the lower part of the face.
In the photo on the left, the lower third of the face is smaller than the middle third
Now you know everything you need, and we can return to the doctor.
2) He received wax bases with bite ridges from the technician. Now he carefully examines them, assessing their quality:
- The boundaries of the bases correspond to those drawn on the model.
- The bases do not balance. That is, they fit tightly to the plaster model throughout.
- The wax rollers are made with high quality. They do not exfoliate and are of standard size (in the area of the anterior teeth: height 1.8 - 2.0 cm, width 0.4 - 0.6 cm; in the area of chewing teeth: height 0.8-1.2 cm, width 0. 8 – 1.0 cm).
3) The doctor removes the bases from the model and disinfects them with alcohol. And he cools them for 2-3 minutes in cold water.
4) The doctor places the upper wax base on the jaw and checks the quality of the base in the mouth: does it hold, does the boundaries correspond, is there any balancing.
5) Next, the dentist forms the vestibular surface of the wax roller. He trims or extends it so that the patient's lip looks normal. That is, it did not stick out and did not sink.
6) After this, it forms the height of the roller in the anterior section. Here everything depends on the width of the red border of the patient’s lips. If the lip is medium, then the upper incisors (and in our case the ridge) stick out from under it by 1-2 mm. If the lip is thin, the doctor makes the roller stick out 2 mm. If it is too thick, the roller ends up to 2 mm under the lip.
The length of the incisor protruding from under the lip is about 2 mm
7) The doctor proceeds to forming the prosthetic plane. This is a rather difficult stage. We will dwell on it in more detail.
Physiological rest
Dentists call the position of the upper and lower jaws relative to each other with maximum relaxation of the muscles of the maxillofacial apparatus physiological rest. Their retention is based on the anti-gravity reflex.
As a rule, in a state of relaxation, which is characteristic of the human oral cavity outside of eating and communicating, the teeth do not come into contact with their antagonists.
Dentists consider the distance between opposite jaw rows to be no more than 2-5 mm as a normal option.
Experts distinguish two variants of bite pathology, depending on the degree of its height:
- Overpriced. The cause of this phenomenon is an incorrectly designed prosthesis.
As a result of overbite, the antagonist teeth are constantly in contact, and the difference between the location of the teeth in central occlusion and at rest does not exceed 1-2 mm or is completely absent.It is difficult for the patient to close his lips tightly, causing discomfort during communication. The danger of the pathology lies in systematic injury to the prosthetic bed, prolonged tension in the masticatory muscles, which can lead to damage to the joint.
- Understated. The cause of this occlusion pathology is increased wear of the tooth surface or an incorrectly fitted prosthetic structure.
Dentists diagnose underbite when the difference between the resting state and central occlusion is more than 3-4 mm. The patient's appearance changes significantly.The corners of the mouth drop down, the nasolabial and chin folds become more pronounced. The lack of proper closure of the jaw rows and lips leads to increased salivation, which entails the development of angular cheilitis.
Formation of the prosthetic plane
“To draw a plane you need three points”
© Geometry
Occlusal plane
- a plane that passes through:
1) the point between the lower central incisors
2) and 3) points on the external posterior tubercles of the second chewing teeth.
Three points: 1) Between the central incisors 2) and 3) Posterior buccal cusp of the second molar
If you have teeth, then there is an occlusal plane. If there are no teeth, then there is no plane. The dentist's task is to restore it. And restore correctly.
Prosthetic plane
Like the occlusal plane, only on a denture
- this is the occlusal plane of a complete removable denture. It should run exactly where the occlusal plane once was. But the dentist is not a psychic; he cannot see the past. How will he determine where she had a patient 20 years ago?
After many studies, scientists have established that the occlusal plane in the anterior jaw is parallel to the line connecting the pupils. And in the lateral section (this was discovered by Camper) - a line connecting the lower edge of the nasal septum (subnosal) with the middle of the tragus of the ear. This line is called the Camper horizontal.
The doctor’s task is to ensure that the prosthetic plane - the plane of the wax ridge on the upper jaw - is parallel to these two lines (Kamper’s horizontal and the pupillary line).
The doctor divides the entire prosthetic plane into three segments: one frontal and two lateral. He starts from the frontal section. And makes the plane of the frontal ridge parallel to the pupillary line. To achieve this he uses two rulers. The doctor places one ruler at the level of the pupils, and attaches the second to the wax roller.
One ruler is installed along the pupillary line, the second is glued to the bite block
He achieves parallelism between the two rulers. The dentist adds or cuts wax from the roller, focusing on the upper lip. As we described above, the edge of the roller should evenly protrude from under the lip by 1-2 mm.
Next, the doctor forms the lateral sections. To do this, the ruler is installed along the Camper (nose-ear) line. And they achieve parallelism with the prosthetic plane. The doctor builds up or removes wax in the same way as he did in the anterior section.
The ruler along the Camper horizontal is parallel to the occlusal plane in the lateral section
After this, he smoothes the entire prosthetic plane. It is convenient to use for this
Naisha apparatus.
The Naisha apparatus is a heated inclined plane with a wax collector.
The base with bite rollers is applied to the heated surface. The wax melts evenly over the entire surface of the roller, in one plane. As a result, it turns out perfectly smooth.
The melted wax is collected in a wax collector, which is shaped like a blank for new rollers.
 Next, the doctor proceeds to determine the height of the lower part of the face. And again a little theory.
Errors allowed
When measuring orthopedic parameters of the face, a doctor may make a number of mistakes. All of them are classified into groups:
Overbite
If the parameter is incorrectly determined , the patient's teeth will constantly come into contact with each other, causing overstrain of the masticatory muscles.
In this state, the prosthetic bed is also subject to overload. The patient will have difficulty speaking. A dangerous consequence after installing dentures for an overbite is injury to the jaw joint .
You can determine that the value of the lower third is overestimated by the symptoms:
- the difference between the state of physiological rest and CO is less than 2 mm;
- the patient feels constant tension in the lips;
- absence of nasolabial fold.
To correct the error, the dentures are removed from the lower jaw , and a new cushion is created. The proportions of the face are determined anatomically and physiologically.
If the maxillary prosthesis is not positioned correctly, the structures of both jaws are removed and 2 new products are made.
By mistake, the doctor may underestimate the bite. In this case, all complications in the patient will be associated with insufficient load on the masticatory muscles. The main signs of underestimation of the upper third of the face:
- lip retraction;
- excessive expression of the nasolabial fold;
- pushing the chin forward.
Defects are eliminated using the same algorithm as in the case described above.
Formation of permanent occlusion and causes of pathology development.
In this publication we will tell you in what cases an orthodontic consultation is required.
Here https://zubovv.ru/ortodontiya/prikus/tortoanomaliya-i-kak-borotsya.html you will find detailed information about tortoanomaly and its treatment.
Errors in the transversal plane
The doctor may make a mistake when fixing the CO by determining anterior or lateral occlusion. It will be difficult for the patient to wear the denture due to the fact that the product is constantly moving in the oral cavity.
If the anterior occlusion is incorrectly fixed, there is a lack of closure between the incisors. To eliminate the defect, teeth are removed from the lower ridge and the necessary orthodontic parameters are re-fixed.
A competent specialist can correctly determine central occlusion. At the same time, he takes into account the anatomical and physiological characteristics of the patient.
After determining the CO and rechecking the data obtained, the doctor plasters the resulting wax models and sends them to the laboratory for the manufacture of prostheses.
The video provides additional information on the topic of the article.
Determination of the height of the lower part of the face
Dentists divide the patient's face into thirds:
The upper third is from the beginning of hair growth to the line of the upper edge of the eyebrows.
The middle third is from the upper edge of the eyebrows to the lower edge of the nasal septum.
The lower third is from the lower edge of the nasal septum to the very bottom of the chin.
The lower third of the face is significantly larger than the middle third
All thirds are normally approximately equal to each other. But with changes in the height of the bite, the height of the lower third of the face also changes.
There are four ways to determine the height of the lower part of the face (and the height of the bite accordingly):
- Anatomical
- Anthropometric
- Anatomical and physiological
- Functional-physiological (hardware)
Anatomical method
Determination method by eye. The doctor uses it at the stage of checking the teeth setting to see if the technician has overestimated the bite. He looks for signs of overbite: whether the nasolabial folds are smoothed, whether the cheeks and lips are tense, etc.
Anthropometric method
Based on the equality of all third parties. Different authors have proposed different anatomical landmarks (Wootsword: the distance between the corner of the mouth and the corner of the nose is equal to the distance between the tip of the nose and the chin, Jupitz, Gisi, etc.). But all these options are inaccurate and usually overestimate the actual height of the bite.
Anatomical and physiological method
Based on the fact that the height of the bite is 2-3 mm less than the resting height.
The doctor determines the height of the face using wax bases with occlusal ridges. To do this, he first determines the height of the lower third of the face in a state of physiological rest. The doctor draws two dots on the patient: one on the upper jaw, the second on the lower jaw. It is important that both are on the center line of the face.
The doctor draws two dots on the patient
The doctor measures the distance between these points when all the patient's jaw muscles are relaxed. To relax him, the doctor talks to him about abstract topics, or asks him to swallow his saliva several times. After this, the patient’s jaw takes a position of physiological rest.
The doctor measures the distance between the points in a position of physiological rest
The doctor measures the distance between the points and subtracts 2-3 mm from it. Remember, normally it is this number that distinguishes physiological rest from the position of central occlusion. The dentist trims or extends the lower bite ridge. And measures the distance between the drawn points until it becomes as it should (rest height minus 2-3 mm).
The inaccuracy of this method is that some people need a difference of 2-3 mm, while others need 5 mm. And it is impossible to calculate it accurately. Therefore, you just need to assume that it is 2-3 mm for everyone and hope that the prosthesis will work.
Whether the doctor has correctly determined the interalveolar height is checked using a conversational test. He asks the patient to pronounce sounds and syllables (o, i, si, z, p, f). When pronouncing each sound, the patient will open his mouth to a certain width. For example, when pronouncing the sound [o], the mouth opens 5-6 mm. If it is wider, then the doctor determined the height incorrectly.
When pronouncing the sound “O”, the distance between the teeth (ridges) is 6 mm
Functional-physiological method
It is based on the fact that the masticatory muscles develop maximum strength only in a certain position of the jaw. Namely, in the position of central occlusion.
How does chewing force depend on the position of the lower jaw?
If there are bodybuilders among you, you will understand my comparison. When you pump your biceps, if you extend your arms halfway, it will be easy to lift a 100 kg barbell. But if you straighten them completely, then lifting it will be much more difficult. The same is true for the lower jaw.
The thicker the arrow, the greater the muscle strength
This method uses a special device - AOCO (Apparatus for Determining Central Occlusion). Hard individual spoons are made for the patient. They are edged and inserted into the patient's mouth. A sensor is attached to the lower spoon, into which pins are inserted. They make it difficult to close your mouth, i.e. set the bite height. And the sensor measures chewing pressure at the height of this pin.
AOCO (Apparatus for Determining Central Occlusion)
First, a pin is used that is significantly higher than the patient's bite. And record the force of jaw pressure. Then use a pin 0.5 mm shorter than the first one. And so on. When the bite height is lower than optimal even by 0.5 mm, the chewing force is reduced by almost half. And the desired bite height is equal to the previous pin. This method allows you to determine the bite height with an accuracy of 0.5 mm.
Our dentist uses the anatomical and physiological method. It is the simplest and relatively accurate.
9) Next, the doctor fits the lower roller to the upper one. They should fit snugly against each other. There should be no steps.
10) The doctor determines the central relationship of the jaws.
NeoStom – Dentistry website
Production of wax bases with occlusal ridges. A plaster model with drawn boundaries, previously moistened with water, is pressed with a wax plate, which is trimmed along the marked boundaries. Having secured the wire arch on the oral slope of the alveolar process, occlusal ridges are prepared from durable wax and modeled according to the shape of the jaw.The base of the occlusal ridge should be located exactly in the center of the alveolar process. Its width in the anterior section is 3.0-5.0 mm, in the lateral sections - 8.0-10 mm. The ridges end at the anterior edge of the alveolar tubercles with a bevel towards the distal side. The anterior section of the upper ridge is located at a distance of 8.0-10 mm anterior to the incisive papilla.
The height of the upper ridge in the area of the anterior teeth is 15-20 mm, the lower one is 10-15 mm (the point of measurement of the height of the ridges in the anterior area is the place of attachment of the frenulum of the upper and lower lips). In the distal sections, the height of the ridges decreases. In the area of the last molar it is 0.5-0.8 cm. This is explained by the fact that the height of the crowns of natural teeth gradually decreases in the direction from the incisors to the molars. Then they begin to model the vestibular and oral surfaces of the occlusal ridges, achieving a smooth transition into the surface of the wax base. The angle formed by the vestibular (oral) surface in relation to the occlusal plane should be clearly defined and amount to 90°-100°. The occlusal surface of the ridges should be given the appearance of a flat plane.
Wax bases with occlusal ridges for the upper and lower jaws
The clinical stage of determining the central ratio for prosthetic restoration of edentulous jaws consists of the following substages: 1) Preparation of occlusal ridges. When preparing occlusal ridges, the following operations are performed: a) clarifying the boundaries of the wax templates; b) formation of the vestibular surface and thickness of the upper ridge; c) determining the height of the upper occlusal ridge; d) formation of a prosthetic plane; e) fitting the lower roller to the upper one. 2) Clarifying the boundaries of the occlusal ridge is to eliminate obstacles to its fixation on the prosthetic bed and prevent deformations of the upper lip. To do this, you should check all the boundaries of the wax template, freeing from it the frenulum of the lips, cheeks and tongue, the lateral folds of the mucous membrane, the pterygomaxillary folds, and sometimes shorten the base along line “A”. 3) The formation of the vestibular surface and the thickness of the upper occlusal ridge in the anterior section is dictated by the following circumstances. Atrophy of the alveolar part after tooth loss does not manifest itself in the same way everywhere. Thus, in the lower jaw, the bone decreases primarily from the apex and lingual surface of the alveolar ridge. On the upper jaw, on the contrary, the bone decreases from the top of the ridge and its vestibular surface. At the same time, the alveolar arch narrows, the conditions for setting teeth worsen, and in the anterior part a retraction of the upper lip occurs, giving the face an senile appearance. Therefore, the occlusal ridge in the anterior part of the upper jaw must be made taking into account the changes in the alveolar process that have occurred. In order for the patient’s appearance to be restored, sometimes it is not enough to position the occlusal ridge along the alveolar arch, but it is necessary to increase its vestibular surface in the anterior section. 4) When determining the height of the upper occlusal ridge, be guided by the following. When the mouth is closed, the cutting edges of the central upper incisors coincide with the line where the lips close, and when speaking, their edges protrude from under the upper lip by 1.0-2.0 mm. A person looks older than his age if the cutting edges of the upper incisors are not visible when smiling. Guided by these considerations, the height of the upper occlusal ridge is determined. After inserting the template into the oral cavity, ask the patient to close his lips. In this position, a line of lip closure is applied to the roller and its height is established along it. If the edge of the roller is located below the closure line, it should be shortened, if higher, it should be extended with a strip of wax. In this case, its edge should protrude 1.0-2.0 mm from under the upper lip.
5) Formation of the prosthetic plane. After determining the height of the upper occlusal ridge, they proceed to the formation of a prosthetic (occlusal) plane, which corresponds in the anterior part to the pupillary line, and in the lateral part to the nasal line. For this, two rulers are used. To determine the prosthetic plane in the anterior region, one ruler is installed on the occlusal surface of the roller, the other on the pupillary line. The parallelism of these rulers indicates the correct formation of the occlusal (prosthetic) plane in this section. Then a prosthetic plane is formed in the lateral sections, running parallel to the Camper horizontal, which on the face corresponds to the nasal line connecting the base of the nasal wing with the middle of the tragus of the ear. To check the correctness of its direction, as in the first case, use two rulers. One is installed on the occlusal surface of the roller, the other along the nasal line. The parallelism of the rulers indicates the correctness of the prosthetic plane. If there is no parallelism, then it should be created by adding or removing wax, depending on the need. The prosthetic plane serves as a guide for the dental technician for the correct installation of the staging glass, which will later be used to construct the upper dentition. After the formation of the prosthetic plane, the upper roller becomes untouchable. 6) Fitting the lower roller to the upper one. In this case, they achieve tight closure of the ridges in the anteroposterior and transversal directions and the location of their buccal surfaces in the same plane. Corrections that may be necessary in this case are made only (!) on the lower roller. With well-fitted rollers, the occlusal surfaces fit tightly to each other throughout their entire length. When closing the mouth, they simultaneously come into contact both in the anterior and lateral sections. Non-simultaneous closure is eliminated by building up or removing wax in the corresponding sections of the lower roller. The buccal surfaces of the roller should lie in the same plane.
All noticed deficiencies are eliminated, and corrections are made only on the lower, and not on the upper, roller. The latter is not corrected, since its prosthetic plane and orientation lines subsequently serve as landmarks for setting teeth. After fitting the occlusal ridges, they proceed to determining the interalveolar height. 7) Determining the height of the bite or the lower part of the face affects the appearance of the patient. The best aesthetic and functional effect of prosthetics is achieved by optimally setting the height of the lower part of the face. To determine the height of the lower part of the face, there are three methods: anatomical, anthropometric and anatomical-physiological. The anatomical method is based on restoring the correct configuration of the patient's face. The anthropometric method is based on the principle of proportionality of parts of the human body and, in particular, individual parts of the face. The height of the lower section is established, according to this method, using Heringer’s “golden” section compass, as well as the Wadsworth-White and Gysi method. The golden section compass consists of two compasses. They are connected in such a way that the legs of the large compass are separated in the extreme and middle ratios. Only on one leg the larger segment is located closer to the hinge, and on the second - further from it. Whatever distance is measured with this compass, the middle leg always divides it in extreme and average ratios. There are several points on the face that divide it in extreme and average respects. A Heringer compass helps to find these points. If you ask a patient who has front teeth to open his mouth wide and place the outer leg of a compass on the tip of the nose, and the middle one on the chin tubercle, then the distance thus obtained will be divided by it in the extreme and middle ratios. A large value will correspond to the distance between the indicated points, but with closed teeth or occlusal ridges. Using this technique, it is easy to determine the interalveolar height.
The Wadsworth-White method of determining the height of the bite is based on the equality of the distances from the middle of the pupils to the line of closure of the lips and from the base of the nasal septum to the bottom of the chin. According to the Gisi method, the height of the lower part of the face is determined by the severity of the nasolabial folds. Anthropometric methods for determining the height of the lower part are acceptable for the classic profile of the face and allow you to get the correct answer only in 10-15% of cases, and generally give an overestimation of the size of the lower part of the face. Therefore, these methods can be recommended for practical use with certain restrictions or as additional methods. The best results when establishing bite height are obtained using the anatomical and physiological method. The anatomical and physiological method is based on the use of the relative physiological rest height of the lower jaw in combination with anatomical data or functional speaking tests. From the anatomy course we know that with the correct shape of the face, the lips close freely, without tension, the nasolabial and chin folds are slightly pronounced, the corners of the mouth are slightly lowered. The basis of this method is the relative physiological rest position of the lower jaw and the fact that the occlusal height is 2-3 mm less than the height of the lower part of the face in a calm state. Physiological rest is a free position of the lower jaw, in which the distance between the teeth is 2-3 mm and the masticatory muscles are relaxed. So, to determine the height of the bite, two points are marked on the patient’s face with a pencil: one above the oral slit, the other below. Most often, one point is placed on the tip of the nose, the other on the chin, and the distance of the lower part of the face is measured in a state of physiological rest. The distance between the points is recorded on paper or a wax plate. 2-3 mm are subtracted from this distance so that when the jaws are closed, the distance between the marked points is less than the height in a state of physiological rest and, thus, the desired bite height is obtained.
The control for correct determination of the height of the lower part of the face is the interalveolar height, which on average in the area of the front teeth is 2.5-3.0 cm, and in the area of the lateral teeth - 1.5-2.0 cm. Fixation of the central relationship of the jaws. The following method of fixing the central relationship of the jaws is most often used. On the upper ridge in the area of the first premolars and molars, two non-parallel cuts are made with a spatula, and a well-heated strip of wax is applied to the lower occlusal ridge. The doctor asks the patient to close his jaws, after making sure that the closure occurs in central occlusion. Heated wax enters the notches of the upper occlusal roller, creating locks, and the heated strip of wax is squeezed out from under the rollers, as a result of which the height of the lower part of the face does not increase. In order to prevent overbite, before applying a strip of wax to the lower roller, you must first cut off the wax from it to the thickness of the new wax strip. Then the wax bases with occlusal ridges are removed from the oral cavity, cooled, excess wax is cut off and the correct fixation of the central relationship of the jaws is checked several times. At this stage, phonetic tests can be carried out for control: when pronouncing vowels, the distance between the upper and lower occlusal ridges should be 2 mm, and when speaking - up to 5 mm. 9) Drawing guide lines for setting the front teeth. Based on these lines, the technician selects the size of the teeth. On the upper roller it is necessary to apply the median line, the line of the fangs and the smile. The midline is drawn vertically - as a continuation of the midline of the face, dividing the groove of the upper lip into equal parts. This line cannot be drawn along the frenulum of the upper lip, which is quite often shifted to the side. The midline runs between the central incisors. The line of fangs, passing along the tubercles of the latter, descends from the outer wing of the nose.
The smile line is horizontal, drawn at the level of the red border of the upper lip when smiling. Artificial teeth are placed in such a way that their necks are above the marked line: when you smile, they will not be visible, like the artificial gum. If the patient has dentures, they are used to determine the bite in a state of physiological rest and the thickness of the vestibular surface for correct orientation. If there is significant atrophy of the alveolar processes of both the upper and lower jaws with poor fixation of wax bases with occlusal ridges, it is advisable to determine the central ratio of the jaws on rigid bases (made of plastic), which are better fixed, do not deform or shift on the jaws. On these bases, artificial teeth are subsequently placed. After these stages of work, wax bases with occlusal ridges are removed from the oral cavity, applied to the model and fixed in the central occlusion. In this position, the models with wax bases and occlusal ridges are transferred to the dental laboratory for further work.
You might be interested in:
- Relining dentures
- Volumetric modeling technique
- Modeling bases
- Aesthetic aspects when installing artificial teeth
- Setting the dentition for different jaw ratios
Related materials:
- Limits of complete removable dentures
- Functional impressions
- Anatomical landmarks when designing prostheses
- Anatomical and physiological features of the oral cavity
Determination of the central relationship of the jaws
At this stage, you cannot simply tell the patient, close your mouth correctly. Even my grandmother often complained that these words were confusing: “And you don’t know how to shut your mouth. It seems that no matter how you close it, everything is right.”
To close the mouth “correctly,” the doctor places his index fingers on the bite ridges in the area of the chewing teeth of the lower jaw and at the same time pushes the corners of the mouth apart. Next, he asks the patient to touch the posterior edge of the hard palate with his tongue (It is better to make a wax button in this place - not all patients know where the posterior edge of the hard palate is.) and swallow the saliva. The doctor removes his fingers from the chewing surface of the roller, but continues to move the corners of the mouth apart. When swallowing saliva, the patient will close his mouth “correctly.” They repeat this several times until the doctor is absolutely sure that this is the correct central ratio.
11) Next stage. The doctor fixes the rollers in a central ratio.