Alexander Grigoriev.
active member of the American Dental Academy
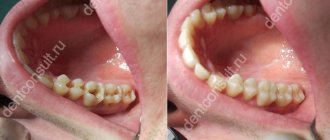
In practice, we often encounter the need for functional rehabilitation after endodontic treatment. Unfortunately, the procedure for treating a tooth's root canal involves significant excision of the tooth's dentin. At the same time, we excise the interaxial dentin and dentin of the pulp cap.
These two areas of tooth tissue are the most important in determining the strength characteristics of the treated tooth. Our task is to restore these elements. This is a stump root tab.
Restoring a tooth stump with a pin
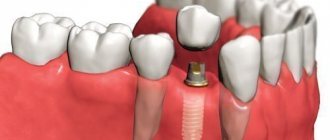
Modern dentistry has a large arsenal of tools for its restoration. The most popular way to restore a tooth in such a situation is restoration using pins.
With the help of pin structures, it is possible not only to restore the destroyed supragingival part of the tooth, but also to normalize its position if the tooth was not level.
With the help of pin structures, it is possible to normalize the bite, in cases where significant grinding of the dental tissues is necessary due to their incorrect position.
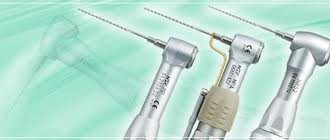
In the photo: a pin for tooth restoration
The main myth associated with pinned teeth
There are several fears associated with restoring teeth with pins.
Some of them arise while reading information on the Internet, some are due to the uncertainty of a doctor who has insufficient experience in restoring teeth with a pin.
The main fear is the possibility of tooth root destruction from the pressure of the pin.
Can a pin destroy the root or walls of a restored tooth?
The answer is simple: this method of tooth restoration, like any treatment method, has its indications and contraindications. A properly restored tooth with a pin by an experienced dentist will last for decades or more.
This can be compared to building a house. The metal beams also put pressure on the foundation of the house, causing the house to collapse? Of course not, even at the planning stage the pressure exerted and the number of those same metal structures are calculated.
Likewise, the dentist, at the stage of treatment planning, evaluates the possibility of restoring a damaged tooth with pin structures.
In order to fully and reliably restore a tooth stump using a pin structure, the tooth root must meet a number of strict requirements:
- The root canal must be of sufficient length
- The root canal should not be too narrow or curved
- The walls of the tooth root should not be thinned
- The tissues of the tooth being restored should not be subject to caries.
- Tooth tissues should not be fragile and should be able to withstand stress.
Depending on the anatomy of different groups of teeth, the tooth stump can be restored not with one, but with several pins at once.
Now let's look at the basic requirements that pins for restoring teeth must meet:
- Pin structures must have a long service life and have sufficient wear resistance.
- The shape of the pin must match the shape of the root canal.
- The length of the pin must be sufficient for reliable retention.
- The material from which the pin is made must be bioinert, not subject to corrosion, and must not adversely affect tooth tissue.
- The pin should create a tight seal and prevent infection from entering the tooth.
- The material of the pin must have a good connection with the cement on which it is fixed.
- It should be possible to remove the pin if re-treatment of the root canals is necessary.
Restoring a tooth stump with a fiberglass pin or a cast inlay?
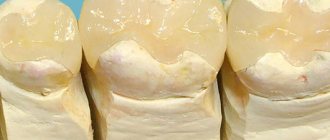
An important element in the restoration of severely damaged teeth (“destroyed to the ground”), i.e.
at the gum level - this is the presence of a section of tooth tissue above the gum level of at least 1.5 mm (an element called a ferrule), precise fitting of the intra-root pin, and fixation with adhesive cements. Individual cast metal stump inlays have extensive historical experience in use. However, as noted in the literature: “Cast cores also exhibit a high rate of root fracture due to rigidity, taper, and precise adaptation to the dentin walls.” Pathways of the pulp; 8th Edition,2002 (Fig. 1)
The stress that develops due to the high-energy potential of the molecular structure of the metal is higher than the rate of irreversible deformation of the dentin of the tooth root.
A tooth stump is a prepared tooth, reduced in size, onto which a crown is subsequently installed. Its restoration is carried out in two ways. One of them involves the use of an onlay or a pin cast stump insert. The doctor uses this method if the tooth is partially preserved. The second method, in turn, involves the use of composite materials and anchor pins. It is prescribed when it is necessary to completely restore a tooth. It is very important that the pins are: - strong and reliable - fully consistent with the shape and width of the canal - not subject to cementation
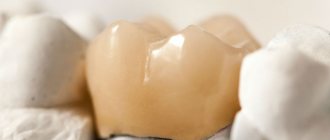
Advantages of glass ionomer. Why is it used to restore tooth stumps? To restore the tooth stump, many modern dentists recommend using glass ionomer. It is an adhesive material consisting of glass powder with a high fluorine content and polyacrylic acid. Fluoride is used to stop the development of caries, and acid is used to create an ionic layer between the tooth tissue and the GIC.
Glass ionomer has gained unprecedented popularity for the following reasons: 1. This product is famous for its high strength. This means that the crown installed on top will last a long time. 2. It completely lacks toxic substances that could negatively affect a person’s well-being. Glass ionomer is hypoallergenic. 3. This product has a “battery” effect, since it is able to adsorb fluoride ions from toothpastes and release them into tissues. 4. Glass ionomer is famous for its excellent chemical adhesion to most materials (metal, composite, cement and eugenol materials). 5. Glass ionomer does not require significant preparation of hard dental tissues. 6. This product has an antibacterial and anti-caries effect. This is due to the fact that fluoride is released during cement hardening. 7. Glass ionizer has a relatively low cost. 8. This material is offered in a variety of colors.
Stages of applying glass ionomer cement. Before using the glass ionomer, shake the jar well and begin mixing the liquid and powder. The liquid is dosed using a dropper, and the powder is dosed with a measuring spoon. The material must be mixed on a pad or glass using a spatula for 30 seconds. Before applying glass ionomer, the physician must prepare the oral cavity. To do this, he must rinse it completely, dry it with air and apply a conditioner to the area, which provides the material with good adhesion to the hard tissues of the tooth. At first, glass ionizer is not resistant to moisture, so it is often coated with a special varnish.
Cost of recovery at the clinic on Leskova:
| 215 | Restoration of tooth stump with glass ionomer | 2 000,00 |
Consultation with a specialist is FREE!
Make an appointment:
Telephone;; +7 (925) 701-51-51
Moscow, st. Leskova, 10
E:mail
Polymer tab
With a polymer inlay, these stress and deformation indicators are as close as possible and, as a result, the percentage of vertical tooth root fractures when using fiber pins is virtually reduced to zero.
But there is another problem here. When producing metal cast core inlays, we achieved precise adaptation to the lumen of the root canal. When fixing the fiber post using the adhesive technique, we compensated for this discrepancy with composite cement.
It would seem that everything is fine, BUT the root canal has one of the highest C-factor indicators (the ratio of bonded to free surfaces). The higher this indicator, the higher the stress at the ligament boundary. And the shorter the service life of the adhesive bond.
There is a solution - making an individual
Restoring a tooth stump: how does it happen?
Let's consider what is tooth stump restoration? First you need to understand what a tooth stump is. So, this is a dissected and also a reduced organ. A crown will be installed on it in the future. As a rule, the prepared chewing element itself has a gingival ledge on which the coronal edge rests well.
If the tooth is severely damaged, then in this case only one root remains, the root canal itself becomes wider, and to create a special additional type of support, a special device called a pin is carefully screwed into it. The dentist himself knows what size and type of pin should be, since his choice depends entirely on the width, depth and length of the canal.
Note: In a dental clinic, the dentist must treat the canal, if necessary, fill it, and also pay special attention to the fact that there should be no inflamed areas at its top.
The walls of the root should be as thick as possible so that when the pin is screwed in they do not split. Moreover, the root itself must be as motionless as possible in order to resist the chewing function with maximum strength.
Pin requirements
- Full compliance with the width and shape of the channel in which it will be installed.
- Have maximum strength.
- Interaction with dental tissues should not be allowed.
- Complete absence of leaks.
- Should be lightly processed.
In order for the restoration of the tooth stump to be as successful as possible, you need to select a pin for each individual molar. The pins themselves can have different shapes - cylindrical or conical. The surface of the pins can be smooth or threaded. Various materials are also used for their manufacture:
- composite;
- titanium;
- metal made from carbon fiber.
In order for the restoration of the tooth stump to be successful, the dentist first fills the canal and expands it if necessary. The molar can also be carefully ground off, after which the dentist will rinse, dry and degrease the surface. After this, the pin is carefully installed on the cement and the stage of creating the supragingival part of the chewing element approaches.
In some cases, professionals resort to restoration of the tooth stump under a crown using a special anchor therapeutic pin, as well as a composite type material. But here the doctor independently looks on the spot whether such a procedure is possible for the patient or not.
Fixing fiberglass pins
I want to offer you a technique for creating, individualizing and fixing fiberglass pins (stump inlay) directly at the workplace in a direct way.
This will make it possible to obtain a mechanically fitted polymer pin, reduce and actually level out the adhesive-composite stress of the ligament. Obtain a reliable adhesive connection.
Transluma pins (manufactured by Bisco) are excellent for these purposes (Fig. 3). This is an export version of radiopaque fiber pins specially developed by the company for the European and world markets. These pins are made from a homogeneous solid prestressed fiberglass (long-lasting cyclic loading), they are classified as light transmitting, they have a simple tapered design, and they come in 3 sizes (this is a very old advert).
Method of placing a fiberglass pin:
The root canal is opened.
From root cement and gutta-percha at a distance of minus 5 mm from the apex or, if we are dealing with a curved shape of the root canal, then 6 mm from the mouth is sufficient for the adhesive fixation technique.
The prepared lumen is thoroughly cleaned with ultrasonic instruments or Sonic-Air. The canal lumen must be clean.
We introduce a water-soluble gel into the lumen of the root canal
(Fig. 4).
Glycerin may be suitable for these purposes, but the best consistency is a water-soluble lubricant (you can buy it in the personal care section of the pharmacy).
It is applied into the root canal quite generously using a root needle or microbrush.
Preparing the fiberglass pin.
The Transluma pin (it is advisable to take a smaller size in order to minimize the removal of root dentin with a drill when preparing the bed for the pin) is degreased in alcohol or anhydrine, dried, and then the One-Step adhesive system (Bisco) is applied to the pin in one or two layers.
We evaporate the solvent of the adhesive system for 5 seconds and carry out polymerization (Fig. 5).
We take a composite hybrid material of light shades,
You can use A2 or Clear shades and cover the prepared fiber pin with the material.
WE DO NOT POLYMERIZE!
We obtain a fiber pin with a composite coating made of durable material (Fig. 6).
We insert our fiberglass pin into the root canal,
we remove obvious excess material or form the supra-root part of the tab and carry out trans-pin polymerization for no more than 10 seconds.
This will allow you to easily remove the resulting polymer insert, even if there are retention elements in the lumen of the root canal (Fig. 7).
We remove the pin-composite structure.
After that, within 40 seconds. At a lamp power of 500 mW/cm2, we carry out additional polymerization of the resulting core inlay.
Then we try it on again in the lumen of the root canal and, if necessary, adjust it to an exact fit (Fig. 8).
Root canal thoroughly for 1 minute. rinse with distilled water.
It is very convenient to use Sonic-Air for this. The file is set to the usual amplitude as during endodontic work, with the only difference being that it does not touch the walls, a plentiful flow of water is supplied and the canal is washed for 1 minute.
Add acid and etch the root canal
and dentin - the enamel of the crown part of the tooth for 20 seconds. We wash off the acid from the surface of the tooth and wash the lumen of the root canal for one minute.
Use Sonic-Air for these purposes.
We remove excess moisture from the root canal until the paper pin is dry.
Mix A and B of the All-Bond 3 adhesive system (Bisco)
and using a root needle with cotton wool, apply it generously into the root canal and saturate the dentin of the tooth tissue.
Immediately evaporate the solvent and thin the adhesive layer. Using paper pins, we remove excess adhesive system in the lumen of the root canal and carry out polymerization for 10 seconds.
The use of the All-Bond 3 adhesive system at this stage is an extremely important aspect:
- This system has a self-curing polymerization phase without a light source, which occurs after 90 seconds. after mixing. And bringing light to the terminal point of the root canal is the most critical!
- the components of this adhesive system are the most hydrophobic, which ensures longer hydrolytic stability of the adhesive bond.
- All-Bond 3 is a universal adhesive system that provides excellent adhesion to all composite materials, both light and chemical curing, not to mention dual curing systems.
The individual fiberglass pin itself is degreased
and the choice of adhesive system OneStep or One-Step plus or All-Bond 3 is applied to it.
I prefer to use One-Step plus for this purpose. It's convenient, fast and this adhesive system is versatile.
1-2 layers of adhesive are applied, the solvent evaporates, the adhesive becomes thinner and polymerization is carried out for 10 seconds. onto the surface of the individual pin.
That's it - the channel and the pin are ready.
Dual-curing composite cement is injected into the canal on the canal filler,
such as Duo-Link (Bisco) or chemically cured Bisfill 2B (Bisco).
Installation of fiberglass pin. An individual fiber post is passively inserted into the root canal and polymerization of the composite cement is carried out. Next, we use the resulting stump core for prosthetics or direct restoration techniques.
Stages of restoration of a tooth stump for a crown
Stage 1. Preparing the tooth core
Preparation of the tooth stump consists of a small preparation in order to remove unreliable fragments of the composite core material.
After this, according to the adhesive protocol, the acid was applied for 15 seconds, rinsed off generously, the surface was left slightly moistened, and the adhesive system was applied.
I used All Bond 3 adhesive (Bisco IL, USA). This is a universal dual-curing adhesive; it has a modified structure of the polymer matrix and is maximally stable on the dentin substance after polymerization due to its hydrophobicity. After preparation and polymerization, the dentin surface has a shiny appearance. This is good.
Stage 2 Crown preparation
The inner surface of the crown is covered with insulating material. I used PRO-V-COAT (BISCO, IL USA)
This material creates a completely inert surface that prevents the fixation of any composite. In addition, it is highly washable and was originally intended to isolate the surface of the tooth structure from the temporary composite material in InLay & Overlay cases. But you can also use glycerin or water-soluble gel lubricant.
Materials used for the adhesive fixation technique: All Bond 3 adhesive, primer for zirconium oxide, aluminum and metal Z-PRIMER PLUS, light-curing composite cement Choise2.
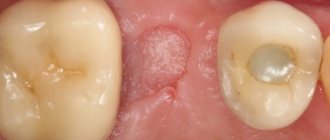
Prepared tooth stump for restoration
Stump restored along the crown.
The crown is carefully removed from the restored tooth stump. This process is accompanied by light effort. The crown is very clearly fitted to the restored tooth stump. The use of release agents (in my case, PRO-V COAT) makes this procedure always predictable.
Stage 3 Fixing the crown on the tooth
I use an adhesive bonded aluminum oxide crown. To do this, the inner surface of the aluminum oxide crown is sandblasted using aluminum oxide powder 50 microns at a pressure of up to 2 atm. at an oblique angle to the surface.
Degrease in alcohol or acetone and dry. A primer for zirconium oxide and aluminum Z-PRIMER PLUS (BISCO,IL USA) is applied to the inner surface of the crown for 30 seconds. Drying. The surface of the crown is ready.
The inner surface of the framework ceramics is treated with the primer Z-PRIMER PLUS (BISCO, IL)
The newly created tooth stump is subjected to an adhesive protocol: etched, All Bond 3 adhesive is applied, and polymerized.
We add light-curing composite cement to the crown.
The crown is adapted to the tooth stump. Excess cement undergoes 2 second polymerization. are removed from the edges of the crown and transcoronal polymerization is carried out on each side for 30 seconds.
Some comments and clarifications on cement for fixing dental crowns:
- When working with metal-ceramics, I use chemical or dual-curing composites (Luxa-Core (DMG), Core-Flo, Bisfill 2B (Bisco)) as core materials.
- The surface of the tooth stump when using chemical or dual-curing materials must be coated with adhesive systems compatible with such materials.