One-step impressions with alginate impression materials
Single-stage impressions save time, but obtaining impressions cannot be rushed, but excessive slowness can also cause an unforgivable error, which is especially applicable to alginate impression materials. Prolonged mixing of such materials by an inexperienced doctor will lead to the material becoming elastic before it is introduced into the oral cavity. Therefore, the time for mixing alginate should be limited to 30-45 seconds (depending on the instructions of the material manufacturer), which is achieved by active movements in which the powder and water are rubbed into the sides of the rubber flask, which, for the convenience of such movements, lies with its side surface in kneader's palms.
After filling the tray with impression material, it is inserted into the oral cavity at an angle, retracting the cheek, and positioned so that the center line of the tray and jaw coincide, and the dental arch corresponds to the center of the arch of the impression tray. After the tray is positioned, it is applied to the tissues of the oral cavity, while on the upper jaw, the distal part is first applied and, pushing back the cheeks and upper lip, they continue to be applied in the medial direction, while observing that excess material extends beyond the sides of the tray , adapted to the gum and transitional fold. While the material is in the plastic phase, the edges of the impression are shaped using active and passive movements and functional tests.
| Retracting the cheek with a finger, a spoon with impression material is inserted at an angle into the patient’s oral cavity |
Next, the impression must be removed from the mouth so that it is safe for both the patient and the impression. Since alginate is quite elastic, its separation from tissues is not difficult. To minimize deformation, the impression is removed from the tissues of the prosthetic bed with a finger placed behind the distal edge on one side, pressing on the impression and separating it from the mucous membrane and teeth, or the patient is asked to cover his mouth and the resulting movements of the mucous membrane can disrupt the vacuum between the tissues and the impression, making it easier to pull it out by the handle of the spoon.
One-step impressions with elastomeric impression materials
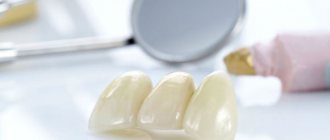
One-stage impressions with elastomeric impression materials and the technique used to work with them pose a more complex task than making impressions with alginate materials. This is primarily due to increased quality requirements, since elastomeric materials are mostly used to make impressions for fixed structures, implant-supported structures or complete removable dentures, which are more sensitive to impression inaccuracies, and sometimes are not at all forgiving of mistakes.
However, obtaining one-stage impressions is less difficult than two-stage ones, and at the same time they have a quality that is sometimes superior to that of the latter.
Most often, two-phase impressions are obtained from one-stage impressions, in which the polymerization of the base and corrective layers of the impression material occurs simultaneously. In this case, the corrective impression mass can be applied either directly to the teeth and surrounding tissues, or on top of the base impression material.
A-type silicone materials and low-viscosity polyester impression materials (corrective), in addition to the standard form of release in tubes, are produced in cartridges with separate sections for the base portion of the material and the catalyst paste. To work with such cartridges, special dispensers are used. With the help of a thin nozzle tip and an easy-to-use dispenser, a corrective portion of the material can be applied not just directly to the teeth and soft tissues, but purposefully and dosed in the most inaccessible places: in the periodontal sulcus and cervical area with the preparation border and in the interdental spaces. After application on top of the base layer, which has a high viscosity, the corrective material adheres even more precisely to the tissues and the polymerization processes in two layers of material occur simultaneously. The fact that the polymerization processes in the corrective and base masses occur simultaneously has valuable functional significance. In this case, the materials at the moment of contact and change in the spatial dimensions of each other are in a fluid state and do not have the property of elasticity, so the materials harden in the newly obtained shape, which is why the final picture is not distorted. The opposite can happen when receiving a two-stage impression, when the corrective layer, with a lack of space between the tissues and the hardened base material, begins to press down, including the latter, which, after removing the impression from the oral cavity, restores its previous spatial parameters, but deforms the impression, which is why it makes it the quality is unsatisfactory for further work.
| When choosing an impression tray, first of all, it is determined whether it belongs to the upper or lower jaw and whether it corresponds to the jaw size of each individual patient. | ||
| When mixing by hand, it is important to achieve homogeneity of consistency and color. | |
| The tray is filled with impression material a couple of millimeters above its sides. | |
Regardless of the method of obtaining a one-stage elastomeric impression, as well as a two-stage one, it must be remembered that the method of applying a tray with material to tissue differs significantly from that with alginate impression material. When applying a tray with alginate impression material, the tray is applied unevenly in such a way as to track the release of excess impression material and not cause inconvenience to the patient and accurately remove the transitional fold. When applying a spoon with an elastomeric material, the logic is radically different. Elastomeric impression materials, and in particular high-viscosity base materials, which are always present in the tray, have significantly less elasticity than alginate ones, as a result of which deformations during insertion and removal of the material are more significant for elastomeric materials. In addition, taking impressions with elastomeric materials primarily aims to accurately depict the dentition and soft tissues adjacent to the teeth, and the display of the transitional fold does not play a role, except in the case of taking impressions from edentulous jaws using an individual tray and a corrective (rather than the basic) impression material. Also, elastomeric materials are not as fluid as alginate materials and are not introduced into the oral cavity in such quantities. All this affects the process of applying the material to the tissue of the prosthetic bed.
When applying elastomeric impression material, the planned route of insertion of the prosthesis is important, since taking this parameter into account, the residual deformation of the impression can be significantly reduced. The material is introduced according to the route of insertion of the prosthesis, which is determined by the inclination of the teeth holding it. Although the principles of preparing teeth for fixed structures imply the absence of undercuts, they can be caused by the inclination of the teeth, which is why in bridge-like or splinting structures it is so important to maintain the parallelism of the axes of the prepared teeth, but these undercuts can also be caused by the deformation of the impression material, which does not yet have elasticity, and Even with sufficient and adequate force applied to the impression tray, the base impression material may not fully press the corrective mass into the empty spaces. Therefore, you should not rush to quickly apply the material to the tissue in order to avoid its hardening, but, on the contrary, foresee in advance the most favorable and simplest route for introducing the material and only then advance the spoon to the tissues of the prosthetic bed.
| You should not put pressure on the tray during the entire time of taking the impression, but simply hold it with your fingers after application. Excessive pressure will be uncomfortable for the patient and will negatively affect the quality of the impression. | |
After the material has cured, it is necessary to properly separate the impression from the tissues and then remove it from the oral cavity. The finite rigidity of elastomeric materials sometimes adds additional difficulties in this process, and can also cause inelastic deformation, which will lead to unsatisfactory print quality. To avoid such a mistake, it is also necessary to take into account the inclination of the teeth and the path of application of the prosthesis and separate the impression in such a way that deformations in this area are minimal, since they cannot be avoided 100%. To do this, in the absence of a pronounced inclination of the teeth, the impression should be evenly separated from one side and the other in turn. If there is a pronounced lingual or palatal inclination of the tooth, the impression must first be separated from the side of the prepared tooth or several teeth, since with such separation of the impression, like a lever with a support on the opposite side, it will tilt towards the lingual side, which to some extent compensates for the resulting deformation. When the teeth are inclined buccally, the opposite side should be separated first, since the rotation of the fulcrum, which in this case will fall on the area of the prepared teeth, will also be directed to the buccal side. The same logic applies to the labial or palatal and lingual inclination of the frontal group of teeth, when it is preferable to apply force to the handle of the spoon with a palatal or lingual inclination, or first separate the tray with impression material in the area of the chewing group of teeth with a labial inclination.
Designs and impression material
An impression tray is a device in the shape of a dental arch, which is intended for taking impressions of the jaws for prosthetics or orthodontic treatment.
A tray filled with impression material is inserted into the patient’s mouth, who clenches his jaws, imprinting his dentition on it. After some time required for the polymer to harden, the jaws unclench and the tray, along with the impression, is removed from the mouth.
The configuration and size of the tray is determined by the shape, width and extent of the defect replaced by the prosthesis, as well as the height of the teeth.
In shape and size, impression trays can be complete, covering the entire dentition, or incomplete, segmental, installed on some area of the dentition . Full spoons are better positioned and fixed on the jaws than incomplete ones.
They are made of metal (usually stainless steel, less often of duralumin) or plastic. Metal spoons can be used repeatedly after disinfection. Plastic structures, as a rule, are disposable.
Spoons can be perforated (with holes) or solid. Perforation makes the structure lighter and provides higher retention of the impression material in the tray.
Depending on the manufacturing technology, spoons are divided into standard and individual. The first ones are manufactured industrially and have average sizes.
Individual designs are used in cases where for some reason a standard spoon is not suitable. Such reasons may be a jaw without teeth, single teeth, non-standard position of teeth and implants, too large or small jaw sizes.
In some cases, the use of individual trays may be necessitated by the need to use a very fluid impression material.
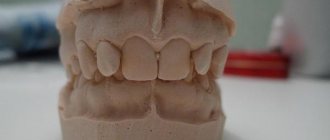
To make an individual spoon, a plaster model of the jaws is required. It is used to determine the dimensions and configuration of the individual design.
There are different methods of making individual spoons, one of the most common is casting the product from acrylic in a pre-made mold. A suitable standard spoon can be used as the latter.
Sometimes custom designs are made from standard ones, filling the excess space with a high-viscosity polymer.
An important parameter of the spoon is the distance from the teeth and its inner wall, that is, the lateral thickness of the resulting impression. There is a general rule that says that the distance from the teeth to the wall of the tray should be at least 2 times the undercut of the teeth.
Too small a thickness creates the risk of disturbing the configuration of the impression when it is removed if the limit of elastic deformation is exceeded (the latter turns into plastic).
Impression materials
Impression materials used for taking impressions must meet the following requirements:
- be non-toxic, hypoallergenic;
- accurately reproduce surface shapes;
- recover from deformation (have sufficient elasticity);
- have thixotropy (spread only under mechanical influence, and in its absence, maintain the shape of a drop);
- have the necessary tensile strength;
- be hydrophilic.
Today, orthopedists have many brands of impression materials at their disposal: alginate, zinc oxide eugenol, polyester, polysulfide, silicone.
All of them have certain parameters (imprint accuracy, tensile strength, hardening time, working time, etc.) that determine their choice in a specific clinical situation.
Currently, A-silicone (polyvinylsiloxane) materials are considered the most suitable in terms of their combination of properties , which are better suited than others for taking precision impressions. Their advantages include:
- high precision reproduction of details;
- good combination of viscosity and fluidity;
- dimensional stability;
- low shrinkage (less than 1%);
- resistance to deformation.
Their main disadvantage is their relatively low tensile strength.
Two-stage impressions
Two-stage impressions essentially differ from single-stage impressions not so much in that the impression tray is brought into the oral cavity twice, but in the rule that a larger thickness of the layer of polymerizing material has a greater degree of shrinkage than a smaller thickness of such a layer. Therefore, the two-stage technique offers a smaller layer of impression material, which gives less shrinkage, and the high fluidity of the corrective mass determines the high quality of the resulting impression. In this case, an impression using only the base impression material, the production of which is the first stage, is a kind of individual impression tray, which makes it possible to reduce the thickness of the simultaneously polymerizing layer of impression material, which will be the corrective impression mass.
The first stage and the principle of obtaining the base layer of the print are half similar to the method of obtaining a one-step print. Half because it is more important to correctly place the tray with the impression material on the tissue, while separating and removing it does not require such care to avoid deformation - only for the patient’s comfort. In addition, you should not wait for complete polymerization of the material, since, while maintaining plasticity, deformations will help create additional space for the corrective layer of impression material. Plus, at this stage you can further loosen the impression a little to create more space for the impression material.
| At the stage of obtaining the base layer of a two-stage impression, the correct location of the teeth relative to the sides of the tray is important, and not the accuracy of the display |
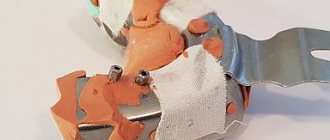
In the resulting impression, using a sharp instrument, the interproximal septa are removed and additional grooves are created for the outflow of excess corrective material. At this stage there is a danger of creating insufficient space for the flowable impression material. From a theoretical point of view, what complicates the situation is that different studies provide different conclusions: some of them indicate that creating grooves to remove excess material does not affect the quality of the impression, but in practice these same excesses can cause the inferiority of the impression. In addition, the need to create additional space is indicated by the fact that in practice it is extremely difficult to position the print exactly in the same place. The quality of the two-stage print is also indicated by the uniformity of the color of the correction layer, without pressing through the base layer, which will indicate a high probability of deformation. Therefore, the operator’s experience in creating both sufficient and not excessive space for the correction layer is important at this stage.
| There is no need to remove thick interdental septa in the base layer, since a thick layer of corrective mass will lead to large deformations when taking an impression and casting models |
At the second stage, it is important to apply the primary impression with the corrective mass added to it as accurately as possible. This is sometimes difficult, for which you should not spare any effort, but you must be careful not to injure the patient.
After complete polymerization of the material, separation and removal of the impression from the oral cavity are similar to those with a one-step technique.
| After extracting the print, it is necessary to assess its quality |
The importance of a functional impression in complete removable prosthetics
D. V. Serebrov
Ph.D., member of the Dental Association of Russia (StAR), orthopedic dentist, surgeon
Currently, many articles and other materials on prosthetic dentistry have been published on precision impressions. A separate list contains publications devoted to the working impression for complete removable prosthetics.
In the specialized literature, in numerous studies, the authors emphasize the importance of precision impressions for the manufacture of high-quality complete removable dentures, characterized by high aesthetic and functional characteristics. Nevertheless, many controversial issues related to the technique of obtaining an accurate impression with complete removable prosthetics served as the basis for writing this article.
With complete loss of teeth, functional disorders develop and atrophy of the facial skeleton and soft tissues covering it occurs. Due to these circumstances, prosthetics of toothless jaws is a method of restorative treatment that affects the delay of further atrophy.
Despite the presence of many methods for determining the height of the bite, the central relationship of the jaws, and the dental manufacturing of the structure in the articulator, the working impression is still the basis of high-quality work. Accurate reproduction of the microrelief of the transitional fold and mucous membrane of the alveolar process without deformation will make it possible to produce a precision complete removable denture.
The procedure for obtaining a functional impression is divided into two stages. The first is fitting and shaping the edges of an individual impression tray. The second is to obtain a functional decompression impression.
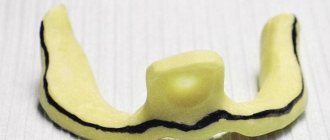
The first thing to consider when making a custom tray is to isolate the undercuts that are often present on the alveolar ridges in the areas adjacent to the transition crease. This is due to the mushroom-shaped shape of the alveolar process. Most often, the alveolar process of the upper jaw has this shape. The lack of isolation of undercuts on plaster models during the manufacture of an individual impression tray leads to the inability to adequately apply the tray to the prosthetic bed, pain during insertion of the tray and an increase in working time during fitting.
The second is the choice of construction material for the manufacture of an individual impression tray. Today, the most common are cold-cured acrylates and light-curing plates.
When using cold-cured acrylates to make custom impression trays, be aware that these materials are characterized by a high degree of shrinkage. Therefore, in order to avoid thinning the walls of an individual spoon, it is necessary to apply the plastic mass in excess. After polymerization, it is necessary to process the spoon in such a way that the thickness of its walls is at least 2 and no more than 4 mm.
When using light-curing plates for the manufacture of individual trays, you must remember that after polymerization of the material, an inhibited layer remains on its surface, the adhesion of the impression material to which will be minimal. Therefore, after polymerization of the material, it is necessary to remove the inhibited layer from the surface of the individual tray.
The subsequent stage of fitting and shaping the edges of the individual tray depends on the impression material chosen by the doctor. The choice of technique and the impression mass itself is especially important in those clinical cases when we have a thick and loose submucosal layer.
In our clinic, we use Detaseal® function from DETAX to obtain a functional impression. This material has an ideal soft-plastic consistency with an extended curing phase in the oral cavity, which, combined with minimal shrinkage, allows the doctor to obtain a high-quality functional impression even in difficult clinical cases.
When using Detaseal®function we suggest the following procedure. An individual impression tray is fitted in the oral cavity in such a way that the edges of the individual tray do not reach the transitional fold by 1-1.5 mm. The spoon should not have primary stability. When applying the spoon to the underlying soft tissue, the patient should not feel painful or unpleasant areas.
After drying the spoon, it is necessary to treat its inner surface with adhesive for A-silicones or apply multiple perforations. The Detaseal®function mass is added to the individual tray in such a way that the entire inner surface of the tray is covered with impression mass, and the edges of the tray are simultaneously built up. After this, the tray with the Detaseal® function mass is introduced into the oral cavity, adapts to the soft tissues of the alveolar ridge with minimal pressure, the edges of the impression are formed by the soft tissues of the lips, cheeks and tongue. If necessary, subsequent correction of the impression is made using Detaseal® mono material from DETAX.
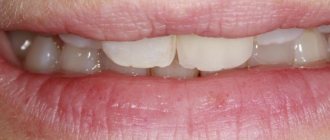
Clinical case
Patient D., born in 1933, with a diagnosis of third-degree chronic periodontitis of the teeth of the upper jaw, complicated by partial absence of teeth in the upper and lower jaws, mobile mucous ridge of the upper alveolar process, hypermobility of the soft tissues of the alveolar process of the upper jaw in the lateral sections.
Rice. 1. Initial situation. Rice. 2. Mobile teeth of the upper jaw were removed. Bone-forming material is introduced into the sockets of the extracted teeth. The holes are sutured. Rice. 3. Two weeks after the stitches are removed. Rice. 4. Two weeks after the stitches are removed. Rice. 5. Perforation of the surface of an individual impression tray. Rice. 6. Using the Detaseal® function material, a functional impression is obtained. Rice. 7. A functional impression is obtained using Detaseal® function material. Rice. 8. The impression was corrected using Detaseal® mono from DETAX. Rice. 9. The impression was corrected using Detaseal® mono from DETAX. Rice. 10. Using a facebow and a gnathometer, the centric relation was determined. Rice. 11. Using a facebow and a gnathometer, the centric relation was determined. Rice. 12. The impression with the 3D fork was sent to the dental laboratory. Rice. 13. Finished prosthesis. Rice. 14. Finished prosthesis. Rice. 15. Result.