When and why do you fill a tooth at home?
Most people avoid going to the dentist. Some even dare to install a filling on their own. It is accessible and safe if you know what material is best to use and how to carry out the procedure correctly.
Independent attempts to install fillings on teeth can be caused by many reasons:
- Sometimes it is not possible to get to the dentist when the patient lives in a remote area or is on a long-term trip or trip.
- Some practical citizens consider paying a significant sum to the dentist a waste of money. This has a negative impact on the family budget.
- There are long queues in public clinics, and the level of treatment is not always of high quality.
- Another reason is panic fear of the dental office and the sound of the drill.
All these factors lead to the search for ways to fill a tooth yourself without unnecessary problems. A special powder for filling is purchased at the pharmacy. Its instructions are carefully studied and you can begin the procedure.
Dmitry Sidorov
Orthopedic dentist
Important! Whatever the reason for wanting to install a filling yourself, for safe treatment it is recommended to have at least minimal skills in this area and basic knowledge from the field of medicine.
Prevention
To prevent caries, you need not only to brush your teeth correctly and periodically. If you take a competent approach to maintaining the good condition of your teeth, you can forget about temporary and permanent fillings and frequent visits to the dentist. The following measures must be observed:
eat less sweets and starchy foods. Eat dairy products, fish, fresh vegetables and fruits more often;- monitor the condition of the body during seasonal changes - avoid vitamin deficiency;
- Buy drugs with a high fluoride content at the pharmacy and use them according to the instructions with the approval of the dentist. You should also eat food and drink water that contains fluoride;
- systematize your diet - avoid night snacks;
- somatic diseases (not congenital) need to be eradicated as quickly as possible, as they weaken the immune system, which contributes to the development of caries;
- eat not too cold, but not too hot dishes - monitor the temperature. This causes microcracks to appear, which also causes carious lesions;
- you need to choose the right and suitable toothpaste for brushing your teeth;
- It is recommended to use conditioner balms. They are also good for gums;
- After eating, you should use dental floss, and if you don’t have it, use toothpicks. Dental floss is more effective at removing food debris, which dramatically reduces the likelihood of tooth decay;
- Additionally, you can chew gum to finally get rid of food residues or plaque after smoking.
To prevent caries, it is recommended to visit the dentist once every six months for preventive purposes. It is better to stop its development in the early stages than to treat an already advanced case. The dentist will advise: how best to carry out prevention at home, which toothpaste is best to choose, which vitamin preparations to take. If you need to get a filling at home, your doctor will tell you which set is best and how to properly care for it and how best to apply it.
You can do the filling yourself, or in a clinic. The main thing is not to start the disease and not lead to negative consequences. Sometimes the teeth are in poor condition - in this case, you need to immediately consult a doctor, since a home filling will not help.
Pros and cons of the procedure
The decision to treat at home is made after carefully studying all the pros and cons.
The advantages of installing a filling yourself are:
- The money savings are noticeable. Buying a filling kit will cost several hundred rubles.
- You can save time, you don’t have to stand in queues or travel by transport to another area.
- In many cases, it is possible to save a tooth when doctors insist on removing it.
- When treating at home, there is no risk of contracting infections (such a danger exists when performing manipulations in a clinic).
- There is no nervousness and stress associated with a visit to the dentist. There is no need to drill your teeth with a drill.
The negative side of filling teeth at home is the fragility of the installed fillings. Still, this is a temporary measure. And even if the result of treatment lasts for several years, then you will have to go to the clinic.
Dmitry Sidorov
Orthopedic dentist
Important! There is a risk of developing inflammatory processes under fillings if the carious process continues to develop or the cavity is not sufficiently disinfected.
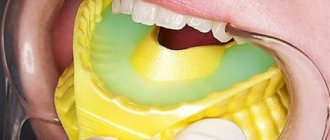
Example of filling
Highly specialized stores currently stock materials for home fillings. Usually, along with some powders, a special spatula is included in the kit for applying the mixture. First you need to treat the enamel with a special oxidizer, which comes in the kit. The following rules must be observed when applying:
Do not compact the filling material with your finger;- You should not take a lot of material - this will make it unstable. It is better to make several small fillings - it is reliable and saves material consumption.
The channel should contain material slightly less dense than on the surface. The strength is adjusted with a spatula. During installation, you need to periodically remove saliva using cotton wool. You should wait a little for the aroma of the oxidizing agent to dissipate a little, which takes about four hours. After all this, the procedure can be considered complete. It is necessary to remind you that such an operation can be performed at home only in the absence of pain.
In all cases, it is possible to prevent the development of the disease at an early stage. Then your teeth will be in perfect order all the time - you just need to carefully monitor their condition.
Indications and contraindications
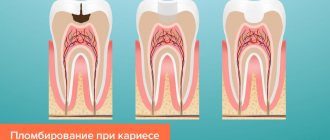
A filling at home is installed only at the initial stage of tooth decay, when there is no pain, the nerve remains intact, and the canal is not damaged.
If the nerve is open, installing a dental filling at home is sometimes allowed, but alcohol should not be used before installation. Under the influence of alcohol, the nerve dies, under the filling it will begin to rot and more serious treatment will be required.
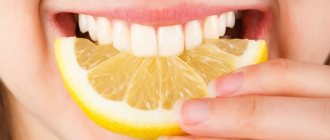
To clean the cavity, instead of a drill, acid (usually citric acid) is sometimes used. But you need to work with it very carefully.
Contraindications to self-filling include gumboil, advanced caries, and acute pain. In addition, you cannot put a filling yourself if you have a tooth cyst, abscesses, pulpitis, or damaged canals.
Conditions for installation
At home, a dental filling is installed under the following conditions:
there should be no pain caused by irritation of nerve endings;- the canal should not be affected by caries.
When installing, you need to lubricate the affected area so that the pain disappears. There is an opinion that you can use alcohol to numb the nerve. But this will kill it and decomposition will begin, which will require urgent dental attention.
You should also ensure that the mixture can adhere to the tooth, and caries does not interfere with this. In dentistry, a drill is used to clean enamel from caries, but at home you can use acid, but carefully.
Tooth filling technique
The main problem is how to fill a tooth at home in order to avoid complications and subsequent treatment in the clinic. To do this, filling is preceded by actions to eliminate pathogenic microflora and relieve pain. The filling powder comes with a special liquid – an oxidizing agent. It is used for disinfection.
Filling begins after preparing all the ingredients and tools. You need a plastic spatula, cotton wool, a hair dryer and access to an outlet. Teeth are thoroughly cleaned in the usual manner: with toothpaste and brush.
Then the following actions are carried out:
- First, the tooth is disinfected. You can lubricate the cavity with an oxidizing agent or use Chlorhexidine. Sometimes disinfection takes several hours; for this purpose, a disinfectant is placed in the hollow 4-5 hours before filling. The cotton wool is changed several times.
- The tooth cavity is dried.
- The powder is diluted with liquid without the formation of excess moisture; the consistency of the resulting composition should resemble a white paste. Mix for 15-20 seconds.
- The filling is installed and given the desired shape.
It is recommended to place a filling on a tooth at home in 2 stages: first, at the bottom of the open cavity. Then, after drying with a hairdryer, apply to the rest. This increases its strength. The paste quickly hardens and looks like a natural tooth.
The lower filling is made a little more liquid. It is inserted and compacted with a spatula. Then a new ball, harder in consistency, is mixed and placed on top.
Dmitry Sidorov
Orthopedic dentist
Important! The smell of oxidizing agent disappears after 20 minutes. All this time it is advisable to leave your mouth open.
It is necessary to prepare large cotton swabs to avoid saliva getting on the surface of the filling. Dry without covering your mouth for 10 minutes. But it takes 6 hours for final hardening.
How to replace a filling at home from a pharmacy if you can’t get to a pharmacy in the near future? Sometimes you can put a filling from ordinary plaster:
- After thoroughly cleaning the tooth, it must be disinfected with alcohol or vodka using a cotton swab.
- Then roll a ball slightly larger than the size of the tooth cavity from plaster of Paris with water and install the ball using your index finger. Press firmly to remove all voids.
- When the plaster begins to dry, carefully shape it into the desired shape.
- Then place another rolled plaster ball on top, place it on top of the filling and squeeze the jaws so that an imprint remains.
- You need to sit with your mouth open for 10 minutes. Then dry with a hot hairdryer.
Next, you can treat the filling with natural-based glue, for example, PVA. This makes the dental filling at home more airtight and stronger. This filling usually lasts about 2 months.
In extreme cases, beeswax is used. If a small chip appears, you need to lubricate the sharp edges with wax, then roll a small ball and insert it into the resulting cavity.
Dmitry Sidorov
Orthopedic dentist
Important! This is a very short-lived product and falls out quickly. But it will help avoid injury to soft tissues.
Soothe the pain
In order to clean the cavity of the hole from bacteria and thereby soothe the pain, purchase the drug “Santedents”. It is easy to use, and the results in the initial stages of caries can be pleasing. Finding this drug in a regular pharmacy is quite problematic. But you can buy everything on the Internet.
Application of the drug:
- Santedents powder is sold complete with a special solvent. Following the instructions, mix both components until you obtain a mixture that resembles clay in consistency.
- Brush your teeth thoroughly with regular toothpaste. Pay special attention to the location of the future filling. It will be better if you clean them several times.
- After this, brush your teeth with a mixture of baking soda and toothpaste.
- Place a small amount of mixture into the hole to close its cavity. Gently compact it with your fingers or a special spatula.
- In order for the product to stick and not be influenced by harmful microorganisms, cover the “sealed” tooth with thick petroleum jelly or vegetable oil.
- Now the hardest part awaits you. You will need to walk with your mouth open for 30 minutes. This is not very easy to do, but the result is worth it. During this time, the mixture is compacted into the tooth.
- After 6-8 hours, the “seal” can be removed. You cannot eat during this time. Therefore, we recommend performing this procedure at night.
- If after using Santedents the pain subsides, you have done everything right. It happens that after a while she returns. Then put the “seal” again.
Now you can give yourself a permanent filling. We will discuss below how to fill a tooth at home.
Filling using the Tsivinsky method
S. V. Tsivinsky is a scientist, inventor who made several discoveries in medicine. The disadvantage of the traditional dental filling system is that a fairly large cavity must be drilled out before the filling can be placed. This has always raised many questions for the thoughtful scientist. The solution to the problem was found in the 80s.
Stanislav Tsivinsky created a unique material based on ceramics using environmentally friendly substances, which allows you to do without drilling teeth or other treatment of carious cavities. This is Belokor powder, which is sold in pharmacies. It consists of two materials: SVTs-4 (for preparatory filling) and SVTs-5 (for installing a permanent filling).
The recipe for the powder is a secret; a patent has been issued for it. The package contains 2 vessels with powder and 2 bottles with oxidizing agent. Attached are detailed instructions on how to fill a tooth yourself. .
Dmitry Sidorov
Orthopedic dentist
Important! It is advisable to install fillings at night. If you follow all the conditions and instructions, the result will last more than 3-4 years.
Preparation for the procedure
Before starting the procedure, you should make sure that the nerve is not inflamed and there is no deep caries damage. If at the time of filling the tooth hurts slightly, apply toothpaste with fluoride to the painful area, this helps relieve pain.
How to put a filling yourself when a large carious cavity has formed? First, it is treated with acid. Immediately before installing the filling, you need to brush your teeth with a regular toothpaste and brush, and rinse with cool water. The mouth must be open during the entire procedure.
It is not recommended to take too much material at one time; this makes the filling at home less stable. It is better to install 2-3 small fillings on top of each other.
Before the procedure, rinse your mouth again with cold water to wash away saliva. Place several cotton turundas near the diseased tooth. During the procedure, you need to constantly remove saliva with a cotton swab.
Stages of the procedure
Carry out the procedure strictly according to the instructions included with the pharmacy product. For example, you can fill a tooth at home using Belokor.
SVTs-4 is slightly diluted with water so that the dough reaches the consistency of clay. To do this, you need to pour the powder on a saucer and add a couple of drops of water. Knead the dough with your fingers. Using both hands, form the dough so that the pea is dense and without pores. When kneading with one hand, the dough crumbles.
Stages of the procedure:
| Stages | Actions |
| First | Rinse your mouth with cold water again to wash away saliva, and dry the treated area with a hairdryer. |
| Second | The prepared cavity is filled with the prepared paste, then compacted with a spatula, and the excess is removed. |
| Third | Dental fillings at home are lubricated on top with vegetable oil or Vaseline. This prevents saliva from getting on the surface of the filling. |
| Fourth | You need to stay with your mouth open for 30 minutes. Make sure that saliva does not reach the filling. To do this, the turundas need to be changed. Do not rinse with anything. |
After 6-7 hours, the filling is removed with a paper clip or pin. It is recommended to leave it on at night and remove it in the morning. During this time, it does not have time to completely harden, but the tooth cavity is completely cleaned, so there is no need to use a drill.
Dmitry Sidorov
Orthopedic dentist
Important! Sometimes such cleansing can eliminate toothache. When removed, the filling pulls out all the affected areas.
After removing a dental filling at home, you must immediately replace it with a permanent one. The permanent can be made from common materials used by modern dentists. Or use SVTs-5 material.
The SVTs-4 material is also allowed for installing permanent fillings using ordinary water as a hardener. The disadvantage of this material: curing takes a long time, at least 1.5-2 days. They are often installed on molars.
Santedents fillings last quite a long time and, according to the inventor, are used by many people. This remedy helps preserve teeth even in the final stages of decay, when doctors require removal.
Stage 1. Installation of a therapeutic filling on the tooth
Filling made from Santedex powder at home
Filling a damaged tooth at home should be preceded by actions aimed at relieving pain and destroying pathogenic microbes in the hole. “Santedex” will help with this - a special powder mixture patented by the Russian scientist S.V. Tsivinsky more than 30 years ago. It is used to make a temporary filling for dental treatment. If you have the Internet, there will be no problems purchasing this material.
To get a good result, you must strictly adhere to the rules for each stage of the procedure:
- Preparation of filling composition. Using the solvent that is sold complete with the powder, you need to prepare a thick paste that resembles clay in consistency.
- Tooth preparation. The sore tooth should be thoroughly cleaned with paste and dried with a hairdryer.
- Filling. You need to carefully fill the void with the prepared composition, and then apply a layer of Vaseline or any vegetable oil to the treated area. The greasy coating will protect the temporary filling from destruction. You cannot close your mouth for the next half hour. After 6-7 hours, during which the sealed tooth should be in absolute peace, the composition must be completely removed.
Note! Santedex powder is used only for the purpose of relieving minor inflammation and disinfection. After its removal, the immediate installation of a permanent filling should follow, but only if there is an absolute absence of pain.
Acrodent filling
How else can you fill a tooth at home ? Acrodent (Acrylic oxide) is a structural material for temporary prosthetics at the stage of manufacturing permanent dentures. Also used for:
- restoration of bite height;
- restoration of the chewing surface of artificial plastic structures when they are abraded;
- relining of plastic crowns;
- restoration of the corners of the anterior tooth.
It is a plastic material in the form of dough. For the first 5 minutes it can be given any shape, then the polymerization process begins and it hardens. Therefore, it is necessary to calculate the time correctly.
Due to its increased plasticity and ease of processing, many people use Acrodent to fill their teeth at home. In addition, it polishes well and does not have a sand stage during polymerization.
How to make a filling from Akrodent at home:
- The surface is treated with abrasive and moistened with disinfection liquid. It is possible to use Chlorhexidine.
- Dry with a hairdryer.
- The tooth is covered with cotton wool to protect it from saliva.
- Mix the powder with the liquid in a 2:1 ratio.
- The filling is installed in a permanent place.
Dmitry Sidorov
Orthopedic dentist
Important! All manipulations must be carried out in 1.5-2 minutes, then the material loses its plasticity. Curing time is 8-10 minutes. Then the surface is polished with an abrasive material.
How to care for a home filling to avoid relapses?
The most important step is to go to the dentist regularly. Only he will be able to identify the disease in the early stages and give correct recommendations for treatment and prevention of diseases. If necessary, you should take vitamin complexes.
A knowledgeable doctor can even advise how to put a filling on a tooth yourself, what material is best to use so as not to harm your health.
Recommended:
- choose a medium-hard brush and toothpaste with fluoride;
- maintain a balanced diet;
- Carefully monitor oral hygiene and use dental floss.
In addition, a fluoride-containing gel is additionally recommended, which strengthens teeth and prevents the formation of new caries, as well as a dental rinse to normalize the acid-base balance in the mouth.
How to loosen a child's baby tooth
For some children, losing a baby tooth is a big deal, especially if the child believes in the Tooth Fairy and wants to exchange the tooth for a gift. For others it is incredibly stressful and fearful. Parents can help their child cope with a loose tooth and speed up the process of tooth loss. We will tell you about the most famous methods for tooth extraction.
pixabay.com
The first method is clean hands.
Before putting anything in your child's mouth, wash your hands thoroughly under warm water using soap and antibacterial products. This step should not be skipped because you risk getting an infection with dirty hands. If a dental problem finds you outside the home and requires urgent attention, and there is no water nearby, then at least treat your hands with disinfectants. They must contain alcohol and be labeled “antibacterial.” If the child refuses the help of adults, then explain to him that he can only touch the tooth with clean hands so that he does not introduce an infection into the wound on his own.
You can loosen a tooth with your hands. Touch it with your index finger and press lightly. Look how hard he moves. Take a piece of gauze and soak it in an alcohol-free antiseptic (for example, chlorhexidine). Have your child open their mouth while you grab the tooth with gauze and move it back and forth for 2 minutes. After a few days or a week, the tooth will give in and fall out.
The main thing is not to swing the tooth left and right, as this can damage the gums. You should also not rotate the tooth around its axis, especially if this causes pain to the child. Most likely, the time for the drop has not yet come, and you need to wait a while. You can return to loosening when the baby stops feeling pain and the tooth moves freely in the mouth. In this case, you can safely move it back and forth and quickly pull it out.
pixabay.com
Method two - toothbrush
You can get rid of a baby tooth imperceptibly and painlessly using a toothbrush. Try this procedure with your child in a playful way. Go to the bathroom together to brush your teeth. Take a baby brush, moisten it with water, add a pea of toothpaste and invite your baby to brush his teeth. There is no need to press hard on your teeth or rub them. If the tooth is already “on the verge”, then standard cleaning will be enough to make it fall out on its own. Does your baby complain of pain and discomfort? So, put this method aside until next time.
Method three - crispy foods
To make the tooth looser more unnoticed by your child, offer him a crunchy snack. Fruits such as pears or apples are great. Let your child take a bite and chew it thoroughly. Just do not push the tooth with a piece of fruit in your mouth - this can damage the gums. Some parents use boiled corn instead of fruit. Prepare a vegetable and treat your child to a crispy cob.
Another trick from parents is baked goods. They may be soft on the inside, but should have a crispy outside. A crust of bread, bagel or bagel is perfect. The big advantage of using baked goods is that they are less traumatic for children's gums. But this option is not always able to loosen the tooth well if it holds tightly. You can speed up the process by frying the product until crispy.
Not all adults are able to pull out a tooth from their child. Some are afraid of hurting the baby, while others are afraid of getting an infection. If this is your case, then seek help from your dentist. He will quickly and painlessly solve your problem: remove the tooth and stop the infection.
pixabay.com