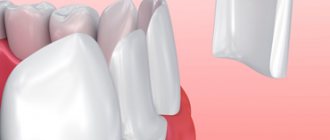
What is a clasp?
A clasp is one of the parts of a removable denture that is responsible for fixing (fastening, holding, whatever you want) the denture in the mouth. This is its main function. I'll tell you about others below.
(The picture shows a prosthesis with clasps)
The clasp can be obtained in 2 ways:
- Or cast - often together with the rest of the prosthesis frame
- Or bend it out of wire
The method depends on the type of prosthesis and, accordingly, on the type of clasp. Since it is customary to use certain clasps in certain prostheses:
- – plate prosthesis – retaining clasp – arching method
- — clasp prosthesis — support-retaining clasp — casting method
conclusions
There is a misconception that the constant use of silicone is harmful, and the presence of damage to the mucous membrane is an inevitable consequence of wearing an orthodontic device that must be accepted.
However, silicone protection, like other modern materials and devices, are designed to minimize discomfort during the treatment of occlusion, eliminating negative sensations in the process of straightening teeth. The modern process of correcting dental abnormalities does not have to be inconvenient.
What types of clasps are there?
There are 3 types in total, of which 2 main ones:
- holding;
- support-holding
(3rd type - support clasp, used as an auxiliary clasp together with the support-retaining one)
(The figure shows an example of a support clasp)
Retaining clasps are needed only to hold the denture in the mouth. They are used in plate prostheses.
Support-retaining clasps, unlike support clasps, transfer part of the chewing load to the tooth.
A prosthesis with this type of clasp is called semi-physiological . Such dentures are more comfortable and easier to get used to. (Read more in our article)
Features of using wax for braces
When applying protective agents, you must adhere to the following rules:
- the procedure should be performed only with clean hands,
- before installation, you need to carry out comprehensive hygiene, be sure to brush your teeth and braces,
- Before fixing wax or silicone on braces, the surface of the plates must be dried with a napkin or cotton swab,
- When eating, wax and silicone must first be removed from the braces so as not to swallow the product along with food.
Fixing wax or silicone is quite simple - you need to break off a small piece from a solid plate, knead it with your hands so that it warms up and becomes soft, and then fix it on the protruding surfaces of the braces with your thumb and forefingers. Press a little, give the desired shape, but without effort.
The cost of protective equipment is quite low - from 150 rubles for one package, which consists of five plates. Of course, prices vary depending on the manufacturer, as well as additives - fruit flavors tend to be more expensive.
When planning orthodontic treatment, you need to be prepared for additional expenses (naturally, if it was not paid for on a turnkey basis, which includes all consumables and manipulations during the entire period of treatment). If you don't think about it in advance, the need to purchase aids can come as an unpleasant surprise.
Before concluding a contract and installing the system, be sure to ask your doctor what exactly is included in the quoted price, what components will have to be paid for separately, and what services will be required during the entire period of orthodontic treatment.
| Name | Cost, rub. |
| Elastics | from 150 rubles / pack, 100 pcs. |
| Buttons for braces | from 100 rubles |
| Orthodontic miniscrew | from 50 rubles |
| Functional device for braces | from 10,000 rubles |
| Replacing ligatures | from 2000 rubles |
| Replacing the metal arc | from 1000 rubles |
| Activation of self-ligating braces | from 3000 rubles |
| Activation of lingual braces | from 1500 rubles |
| Reflective adhesive for fixing braces | from 3000 rubles / syringe |
| Reflective cement for fixing braces | from 2000 rubles/syringe |
| Wax and silicone to protect braces | from 150 rubles / package |
| Fixed retainer for 1 row of teeth | from 3000 rubles |
| Retention mouthguard | from 4600 rubles |
| Retention plate | from 4000 rubles |
| Individual trainer | from 2000 rubles |
The use of an orthodontic device is not limited by a person’s age or health characteristics. The absence of a direct effect on the body allows you to do without a comprehensive study of the patient’s condition, and also does not require correction of any negative consequences.
In the following cases, silicone mouthguards are indicated for wearing:
- Children. Since this category of patients is characterized by increased activity, which often leads to falling, jumping, sudden movements, and tasting various foreign objects, complex metal structures of conventional braces with a complex system of locks, ligatures, and plates are not recommended. The danger lies not only in the breakdown of the device, but also in the risk of ingestion of rebound elements. The advantage of a silicone device is its incredible strength, and there is absolutely no risk of swallowing the device.
- Teenage years. Correcting the bite and straightening the dentition at a young age is simpler and easier, because The bone tissue is not yet fully formed. The use of conventional braces is limited by the great claims teenagers have about their appearance. Teenagers refuse to wear bulky braces so as not to be ridiculed by their friends. The silicone version can not only cure the bite, but also will not spoil the child’s appearance.
- Popular personalities who often come under the spotlight of public attention. In such a situation, standard braces are not suitable due to their visibility, and lingual braces will cause discomfort and difficulties with diction. Devices made of silicone are completely invisible and will not cause the slightest discomfort.
- Patients who refuse to spoil their appearance due to wearing conventional braces. Aligners can influence the formation of a correct bite unnoticed by others. It should be taken into account that the skeletal system of 40-year-old patients and older people is already formed and is highly durable, which makes the use of a silicone device for straightening teeth impossible and useless.
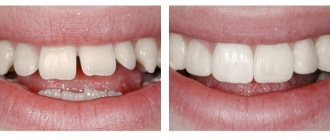
DETAILS: I had lingual braces installed
What does a clasp consist of?
Let's start with retention clasp, as it is simpler. It has 3 parts:
- 1 – shoulder – holds the clasp on the tooth
- 2 - body - connects the shoulder and process
- 3 - process - holds the clasp inside the prosthesis
support-retaining is more complex .
We will analyze it using the example of the classic Acker clasp (1st clasp of the Ney system) in which the following parts are distinguished
- shoulder;
- occlusal pad;
- clasp body;
- clasp extension.
The shoulder is the part of the clasp that holds the clasp on the tooth.
The occlusal pad (foot) is the third short arm of a triangular (oval) clasp. It lies on the occlusal surface of the tooth and is needed to transfer the chewing load to the tooth.
The body of the clasp is the junction of all its elements.
The clasp extension (connecting rod) is the rod with which the clasp is connected to the prosthesis. The length and shape of the process depends on the type of connection between the prosthesis and the clasp.
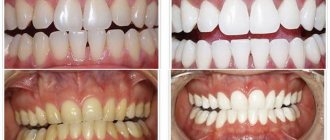
Silicone braces - soft dental treatment
It is not necessary to correct your bite with unattractive metal braces. Today there is an improved analogue - silicone braces. These are transparent aligners that are worn over the entire dentition. They are invisible when talking and smiling.
The treatment process with silicone braces has many stages.
First, the patient comes for an examination, then a photo of his teeth and an impression are taken.
Based on the data obtained, models of the dentition are created using computer modeling. They are sent to a company that produces mouth guards.
The company makes 20-30 sets of mouth guards. The amount will depend on the severity of the bite problems.
Each pair of aligners is worn for approximately 14 days. After this, a new pair is put on and so on throughout the entire course of treatment (from 6 months or more).
Clasp functions
Each clasp must provide 4 main functions : support, retention, coverage and counteraction.
- Support - the clasp rests on the tooth and transfers part of the chewing pressure to it
- Retention - the clasp prevents the denture from falling off the tooth or falling off while eating.
- Coverage - the clasp prevents the lateral displacement of the prosthesis.
- Counteraction - 2 shoulders clamp the tooth, while each shoulder prevents movement in its direction
- Clasp system Ney
Now Ladies and Gentlemen, we will present to your attention a brief description of each of the 5 types of clasps of the Ney system.
Occlusal veneers for distal teeth
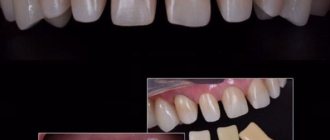
The book Porcelain Laminate Veneers by David A. Garber, Ronald E. Goldstein and Ronald A. Feinmann has had a major impact on prosthetic and restorative techniques in modern dentistry, as it greatly expanded clinicians' understanding of the relative promise of adhesive techniques and minimally invasive iatrogenic techniques. In 1990, the private postgraduate dental training institute Westerburger Kontakte developed the world's first course on ceramic crowns, inlays and veneers. Today, 30 years later, experience shows that ceramics perform just as well in dentistry as gold alloys. In a study conducted by A. Krummel, A. Garling, M. Sasse and M. Kern at Christian-Albrechts-Universitaet Kiel (Kiel University), it was found that occlusal veneers for distal teeth with a thickness of 0.3-0.6 mm are a fairly reliable method of orthopedic treatment.
In our practice, we increasingly resort to occlusal veneers or partial crown designs ranging from 0.5 to 7.0 mm in thickness, made from monolithic IPS Empress or LS2 blocks, which are fixed with an adhesive bond. Unlike gold, which is easily deformed, and metal-ceramic crowns, which often chip, all-ceramic structures are practically indestructible. Thus, ceramic prosthetic restorations meet high quality standards with regard to their functioning in a static or dynamic relationship.
Diagnosis and treatment planning
As a result of the existing parafunction and biocorrosion, the frontal teeth of a 23-year-old patient were characterized by the presence of pronounced signs of pathological abrasion. The enamel on the palatal surface of the upper teeth was almost completely absent (photos 1-2). A small amount of residual enamel was noted in the area of the distal teeth.
Photos 1 and 2. Initial situation. Loss of length of teeth and enamel on the palatal side.
Functional analysis, wax-up and preparation planning
The maxillary model was fixed into the articulator in accordance with the principles of orientation of the maxilla at the base of the skull. Articular landmarks were used to determine the position of the lower jaw model, and to fix it in the articulator, the movements of the lower jaw were previously recorded. Wax reproduction modeling was performed on duplicate models (photo 3).
Photo 3 a,b,c. Diagnostic wax reproduction.
The purpose of the wax-up was to increase the vertical height to the required level. The required length of the teeth was determined by a composite reproduction, which was tried on in the oral cavity to check phonetic, functional and aesthetic parameters. Regarding lateral jaw movements, the treatment goal was to achieve immediate disocclusion of the distal teeth. Those cusps that limited jaw movement were repositioned in the structure of the restorations. As a template for preparation, the dental technician marked on the model the working (red line) and non-working cusps (green line) on the vestibular surface of the teeth. Next, marking was carried out in the projection of the gums on the models in order to indicate the new position of the cusps. The mold for duplicating the wax reproduction was made by thermoforming. After the material had cured, the mold was removed. Correction of reproduction regarding phonetic, functional and aesthetic parameters was carried out together with the patient (photo 4) before the start of the preparation stage.
Photo 4. Composite reproduction of provisional crowns.
1st phase of treatment: temporary restorations in the upper teeth and permanent restorations in the lower teeth
The distal teeth of the upper and lower jaws were prepared, after which the jaw models were fixed in the articulator (photo 5). The support pin was adjusted according to the planned vertical bite height. The distal teeth of the lower jaw were modeled in wax, after which the wax was melted and ceramics were packed into its shape. The crowns were fixed using an adhesive protocol (self-etching method Adhese Universal, Variolink and Monobond Etch & Prime). Temporary restorations were secured to the distal maxillary teeth. Composite reproductions were bonded to the unprepared anterior teeth (Figure 6). Thus, the upper jaw was somewhat expanded in the buccal direction, and the crowns of the anterior teeth were somewhat lengthened. After this, minor corrections of the temporary restorations were made.
Photo 5 a,b,c,d. Models of prepared teeth.
Photo 6. Anterior teeth of the upper and lower jaw: lengthening due to composite; distal maxillary teeth with temporary restorations; distal mandibular teeth with permanent partial crowns.
2nd phase of treatment: permanent restorations in the area of the upper and lower anterior teeth
Preparation and production of temporary restorations
The preparation of the teeth of the upper and lower jaw was carried out in accordance with the principles of minimally invasive intervention (photo 7-8).
Photo 7 a,b,c,d,e,f. Minimally invasive preparation protocol.
Photo 8 a, b. View of the anterior teeth after preparation.
Stage 1: First, the preparation depth was marked along the incisal edge with a special marking bur (usually from 1.0 to 1.5 mm).
Stage 2: Then the preparation depth was marked on the vestibular side (0.5 mm).
Stage 3: The cutting edge area was prepared by tilting the bur 30 degrees towards the palatal surface.
Step 4: Preparation of the proximal surface area (0.3 mm) with a highly abrasive or flame shaped bur (014).
Stage 5: Removal of wax reproduction and reduction of enamel thickness on the vestibular side according to the existing markings. The depth of preparation on the palatal side ranged from 0.3 to 0.5 mm. In those areas where enamel loss was noted beyond the cusp border, the teeth were prepared for 360-degree veneers.
Stage 6: Before final contouring of the preparation boundaries, the retraction cord was packed. Preparation was carried out with a contra-angle handpiece with red markings at a speed of 4000 rpm to the level of gingival retraction. This type of preparation can be carried out with air cooling.
The silicone matrix, which was made from a diagnostic wax reproduction, was filled with hydrocolloid material. Thermoforming method could also be used to produce the mold from the wax reproduction. Thus, using the existing form, we checked whether a sufficient volume of hard tissue was reduced during preparation. If the thickness of the hydrocolloid was less than 0.3 mm, the area was marked for further preparation. After receiving the impression, we began making a model from quickly curing plaster (Whip Mix Snap-Stone) to check the prepared surfaces. The silicone matrix (diagnostic wax reproduction) was transferred to the dental technician, who produced the provisional structures using the indirect method.
Photo 9 a,b,c. Checking the volume of preparation using hydrocolloid mass.
Preparation of the lower anterior teeth and making a model
The preparation of the lower anterior teeth was carried out similarly. The preparation depth did not exceed 0.3 mm. Before impressions were taken, a No. 000 retraction cord was packed, over which a No. 0 cord (impregnated with ViscoStat Clear, Ultradent) was packed. The latter was removed a few seconds before the impression was taken. The 000 thread kept the intragingival sulcus area dry and open. Impressions were obtained using a two-stage technique. The articulator was programmed in accordance with the parameters of the movements of the lower jaw.
Wax reproduction to evaluate phonetic, functional and aesthetic parameters
After the wax reproduction of the anterior teeth was prepared, the doctor and patient checked it for phonetic, functional and aesthetic parameters (Figure 10). All corrections were made only with the consent of the patient. After this, ceramic restorations were made from the resulting corrected wax reproduction.
Photo 10 a,b,c. Verification of phonetic, functional and aesthetic parameters using wax reproduction.
Determining tooth color and making crowns
The final appearance of very thin veneers and crowns depends largely on the color of the remaining tooth structure. Thus, it was necessary to determine the color of each prepared tooth. Additionally, the technician produced dies with matching shades of IPS Natural Die Material. Before glazing, the crowns were checked in the oral cavity. The thickness of full-circuit structures ranged from 0.3 to 0.5 mm (photo 11).
Photo 11 a,b,c. Trying on restorations.
Adhesive fixation
If possible, a rubber dam should be installed before fixation begins. As an alternative, a pack of No. 00 retraction cord can be placed around each prepared tooth to visualize the preparation margin (Figure 12). In this case, adjacent teeth were isolated using Teflon tape. The crowns were fixed in pairs. After etching the surface of the teeth, it was confirmed that the edge of the preparation was within the boundaries of the enamel. In some areas, dentin was visualized, which was exposed even before treatment as a result of parafunctional disorders. After fixing the permanent crowns, minor corrections were made in the area of the occlusal surfaces of the temporary crowns on the upper jaw.
Photo 12 a,b. Adhesive fixation of restorations.
3rd phase of treatment: permanent crowns in the area of the distal teeth of the upper jaw
After removing the temporary crowns from the distal teeth of the upper jaw, impressions were taken from the upper and lower jaws. The central ratio was recorded using thermoplastic plates (GC Bite Compound, GC). The positioning of the maxillary model in the articulator was based on the facial bow registers. Based on the register of thermoplastic strips, a comparison was made between the models of the upper and lower jaw.
Application of ReFu wax
Initially, maxillary partial crowns were made from ReFu wax (Reference Function wax, Keydent), which allowed occlusal contacts to be checked using carbon paper. The wax softened a little in the oral cavity, and we asked the patient to make several movements that should provoke parafunctional activity (photo 13). If any of the tubercles limited movement, this was immediately visible on the occlusal surface, on the basis of which further corrections were made. The permanent structures were made from lithium disilicate (IPS e. Max Press) by pressing, after which they were contoured and glazed (photo 14). After fixing the restorations, there was no need for additional corrections. The average thickness of partial crowns in the distal maxillary teeth was 0.5 mm.
Photo 13 a,b. Checking dynamic and static occlusal relationships.
Photo 14. View of restorations before fixation.
Adhesive fixation
After fixing the rubber dam and isolating adjacent teeth with Teflon tape, the adhesive fixation of the crowns began (photo 15). After fixation, the state of dynamic occlusion was checked using Occlusal Indicator Wax (Kerr) (Figure 16). No areas of supracontact were found.
Photo 15 a,b. Fixation of ceramic restorations.
Photo 16 a,b. Checking occlusal relationships using wax.
Brux Checker
The patient was given a Brux Checker to use for two nights (Figure 17). This approach makes it possible to establish the participation of restorations in parafunctional activity during sleep.
Photo 17 a,b,c,d. Brux Checker (left: initial situation; right: post-treatment situation).
Summary
Minimally invasive restorations with a thickness of 0.3 to 0.6 mm, fixed with an adhesive bond, are a reliable method of prosthetic treatment. We have been using this method in our practice since 1993. Especially in young patients with signs of enamel loss, this approach provides long-term and predictable results with a minimally invasive volume of interventions.
Note
The manufacturer does not recommend the use of IPS e.max Press and IPS e.max CAD for patients with bruxism. However, our experience shows that with proper consideration of all functional and parafunctional aspects, the use of these materials is not characterized by the development of any complications.
Authors: Diether Reusch Jan Strüder
Ney clasp system:
- Type 1 - Acker clasp;
- Type 2 - Roach double-sided T-clasp;
- Type 3 - combined clasp (Acker-Roach);
- Type 4 - rear (reverse) action clasp;
- Type 5 - ring clasp..
(Figure 5 types of clasps)
Acker's clasp (Ney I).
The Acker clasp consists of an occlusal pad, a body and two arms. In this case, the onlay is located on the occlusal surface of the tooth.
Usage: The most common type of clasp, used in standard situations (when the clasp line divides the tooth roughly)
Roach's Clammer (Ney II)
The clasp consists of 2 T-shaped arms, an occlusal pad, a body and a process
: Used for high clasp lines and deep undercuts. They are also more emthetic because their shoulders are closer to the gums.
Clasp with Acker and Roach shoulders (Ney III).
A combined clasp consists of a rigid arm with an occlusal pad (like an Acker clasp) and a T-shaped arm of a Roach clasp.
Use : The clasp is used on premolars, molars and canines at different levels of the clasp line on the tooth surfaces.
The Roach shoulder, as you remember, is used for large undercut depths.
Reverse action clasp (Ney IV)
It consists of one almost circular arm on which the occlusal pad is located.
Use : It is used more often on the premolars of the lower jaw with the end defect of the dentition.
This is interesting! This clasp is called so because under chewing load the tooth tilts not in the direction of the defect, but back , towards the neighboring tooth. This fact prevents the tooth from tipping over and as a result the tooth is not injured.
Ring clasp (Ney V)
The clasp consists of one (two) occlusal pads, a long arm that almost completely surrounds the tooth, a body and a process.
Usage : Ring clasp is used on single standing molars
Conclusion : I hope you were interested in learning what a clasp is and why it is needed. And also about 5 types of Ney clasp system. These concepts come up more than once in the work of a dentist and understanding them is very important.
I really hope that I have helped you at least a little on your difficult life path. Read other articles, develop, learn new things. Good luck!
Subtleties of determining central occlusion and possible errors
All movements of the lower jaw are regulated by the neuromuscular system. The temporomandibular joint ensures a fixed position of the jaws and when there is a balance between the jaws, the temporomandibular joint and the muscles of mastication, optimal functioning of the neuromuscular system occurs.
If one component of the chewing system does not function correctly, this affects the condition of the remaining structures.
A striking example of such a disorder is the uneven distribution of chewing pressure after dental restoration, orthopedic intervention or orthodontic treatment.
In such cases, excessive stress occurs on individual teeth and occlusal disharmony occurs. It should be noted that occlusion can occur for various reasons (local and general causes).
Occlusal pads.
Most often, occlusal overlays are placed on the supporting surfaces of the tooth crowns and placed in places that do not interfere with the occlusal movements of the lower jaw.
For this purpose, supporting teeth, standing nearby or far away, are used. In some cases, special recesses are created on the supporting surfaces of the crowns of natural teeth and occlusal overlays are placed there.
It is known that the occlusal pad is a structural part of the clasp, but it can also be an independent functioning link in the design of the clasp prosthesis. Thanks to the occlusal overlay, such problems as settlement of the prosthesis under load, distribution of the chewing load, unloading the abutment tooth, creating contact between the prosthesis and the abutment tooth (prevents food from entering), restoration of impaired occlusal contact with the antagonist, and restoration of the height of worn crowns are solved.
It should be noted that the distribution of the load on the abutment tooth through the occlusal pads is carried out in different ways. Here, a significant role is played by such factors as the size and shape of the occlusal pads, location, and the shape of the bed for the occlusal pads. When occlusal pads cover the entire supporting surface of the tooth, the load on the pad is transmitted along the long axis of the tooth, distributing it evenly.
A similar effect is achieved by two occlusal pads located opposite each other. If the onlay is located on one side (on the aproxal side of the tooth, on the side of the dentition defect), the periodontal load changes.
Occlusal plane.
The occlusal plane is the surface passing through the cutting edges of the first incisors of the lower jaw and the distal buccal cusps of the wisdom teeth.
It is important to understand that the position of the occlusal plane has great functional and diagnostic significance. The bone relationship of the jaws changes all the time and to achieve optimal function, compensation is carried out by developed dentoalveolar ridges. The orthopedic occlusal plane is the surface between the incisal edge of the lower incisors and the distal cusps of the first lower molars.
It is important to understand that during treatment it is necessary to restore each tooth, recreate the cusps and fissures of the teeth, this guarantees the absence of further problems associated with disruption of the occlusal interactions of the jaws, pathological abrasion and a decrease in occlusal height.
Today, there are quite a few methods for restoring the anatomical shape of teeth; for this I use silicone splints. Since, under pathological conditions, the masticatory apparatus does not function fully, occlusal splints are used in the treatment of complex pathologies, such as TMJ dysfunction, dental anomalies, increased abrasion of hard dental tissues, periodontal disease, etc.
| Consequences of TMJ dysfunction | ||||
| The movement of the lower jaw is provided by the TMJ. This is a complex activity of the body, which is presented in the form of chewing, swallowing, talking, yawning. The harmonious functioning of the masticatory muscles (providing precise movement of the joint) is carried out only if there is no dysfunction (TMJ dysfunction) | ||||
| Neurological clinic | ||||
| headache | dizziness | clicking and crunching of the joint | muscle tension | spasms in the head, neck, throat |
| Otological clinic | ||||
| noise in ears | ringing | stuffy ears | hearing loss | |
| Hidden and long-term consequences of TMJ dysfunction | ||||
| Cervical lordosis | Curvature in the sacroiliac joint (pelvic bones) |