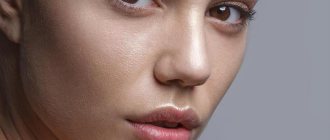
Little children grow so quickly that you don’t have time to keep track of them. So he turned over for the first time, smiled, said “mom”, went... got married. And I really want to remember every pleasant moment of this charming child’s life, to capture the little hands and feet in my memory. Today, newfangled trends are coming to the aid of young mothers, thanks to which they can make casts of the arms and legs of their little children. Let's look at several ways to “freeze the moment” and capture the tiny, adorable limbs of a child.
There are a lot of offers on the Internet for creativity kits, with which you can make prints of your baby’s arms and legs with every visible fold on the palm and foot. After all, you must admit that making a collage of photographs, arms and legs in 3D format is an exclusive art, looking at which you will be illuminated with a smile every time.
It is very popular today to bring such gifts to christenings or buy a certificate for this service as a gift. After all, when the godson grows up, he will probably remember his godparents with gratitude. What else can you give to your godson? Read the article: “What to give for christening? Traditional and modern gifts. What do godparents and ordinary guests give?” Parents can also order hand impressions on a Hollywood Walk of Stars style stand. You can make casts of arms and legs yourself, but how? See below.
How to prepare a baby model for “work”?
It is best to carry out work on making casts of arms and legs when the small model is calm. Pick a moment. This could be a dream or watching your favorite cartoons. You can find cartoons by following the link: "Cartoons for the little ones." There are sleepy children with whom you can do anything in this state. There is an interesting article about a child’s sleep: “Does your child sleep poorly? We are looking for possible causes and finding a solution to this problem.”
If you decide to carry out the work of making a cast while the child is awake, then be sure to make sure that the baby is in a good mood, he is not hungry and joyful. Does the baby move his fingers slightly during the impression? It doesn’t matter, it won’t spoil the final result, since the mass will better get into all the folds and the handle or leg will be more prominent. In this matter, the main thing is calmness; holding someone in a position will not give the desired result.
If the baby is still very small, then during the process, in order to calm him down, sing a lullaby. You can see options for lullabies in the article: “Lullabies for babies.”
Why is a dental impression made?
A cast is an image of teeth, bones, soft tissues on a special mass designed specifically for this purpose. It shows the contours of the masticatory units, frenulum, palatal sutures, alveolar cords and other structures.
What is a dental impression? Strictly speaking, this is the basis for the future prosthesis, because it is used to make plaster models, which, in turn, serve as the basis for the manufacture of the entire orthopedic structure.
They are used for the production of:
- braces that eliminate malocclusion;
- trainers who also struggle with malocclusion;
- removable or fixed dentures, care of removable dentures, rules;
- crowns;
- bridges;
- individual abutments.
An impression is the basis for making a prosthesis.
Impressions can be:
- Anatomical – depicting the oral cavity at rest. They do not take into account the characteristics of those tissues that are located on the border of the structure. Typically used when one or two artificial chewing units (for example, crowns) are required.
- Functional - reflecting parameters during movement - stretching lips, talking, chewing, opening the mouth and others. They are used if there are significant defects in the dentition.
Making functional impressions is necessary for the complete removable prosthetics procedure. Anatomical ones can be used, among other things, for aesthetic procedures - for example, for the production of whitening trays.
How to make casts of arms and legs from sand?
The method is quite simple and does not require any special “troubles”. Any mother can cope with this task, even if she is completely unfamiliar with the art of creating sculptures. Such a cast can be made decorated, then in addition to the tools and materials listed below, decorative elements are needed, which can be shells, chains, buttons or small toys.
Required accessories
To work on the cast you will need:
- · container, a round tin cookie box is perfect for this idea;
- sand, preferably fine;
- · alabaster, it is easy to buy at the construction market (store);
- ·a brush, usual for painting radiators.
Stages of work
1. Pour fine sand into the selected container and level it. It should not be compacted too much.
2. In the center of the prepared sand, make an imprint of your child’s hand or foot. If you want to make a decorated cast, then make decorations around the print from pre-prepared objects.
3. Now you need to work on alabaster. Don't forget that this material hardens very quickly, so you need to work quickly. The powder is diluted with plain water. The mass needed for work should be like sour cream.
4. After the alabaster is diluted, pour it in a small stream, so as not to spoil the sand mold, into the container. The thickness of the alabaster above the sand should be 2–4 cm.
5. Leave the container for at least 20 minutes. Preferably longer, but if you can’t bear it, then you can get it.
6. Carefully remove the cast and use a brush to clean off the grains of sand. Next, act as your imagination dictates: paint, decorate, decorate with drawings, write inscriptions.
Taking an impression of the model
To begin with, I will describe the simplest, homemade methods of taking an impression, as they say - on the knee. They are quite functional, although they do not guarantee a perfect cast. But the maximum defect that threatens you is a few air bubbles, which on the wax will turn into pimples (the so-called beads). In most cases, they can be easily removed with the tip of a sharp blade, unless they fall on a very important part with a filigree relief - in which case the cast will have to be redone.
——————
Moved from the topic “Small casting...”
There are a great variety of impression materials, and this is still a rather expensive part of the project. Dental impression compounds are very expensive (calculated per kilogram), but are sold in small packages (from 100 grams) and are more common - because they are sold in any city in a medical equipment store, etc.,. But their main disadvantage is that they are very expensive compared to, say, jewelry masses. It makes sense to buy them either in case of urgent need “right now”, or on occasion from companies selling materials for dentists, expired and discounted mass. Well, for those who have a relative/friend who works in orthopedic dentistry, first you can ask for a little...
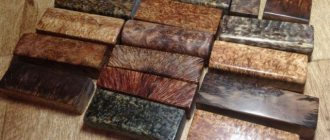
Almost three years ago, on occasion, I bought five large packages of expired Optosil mass for a third of the price (pictured)
and I still use it (for my small items it will last me another year). It may no longer be suitable for the oral cavity, but I have no complaints.
Using Optosila as an example, I’ll tell you briefly about dental compounds. All of them are two-component - the mass itself and the activator. Some have completely moronic instructions in what proportions to mix the mass with the activator, but the average ratio for all is approximately 50:1. There are two types of masses - for the basic impression and for fine correction, the set usually includes a jar of the base and a tube of the thin one, or is sold simply thin tube. The thin mass is approximately similar in consistency and fluidity to jewelry masses. The application is clear from the name. The base mass is similar to fatty dough for puff pastries, it can be easily kneaded by hand. Add the required amount of activator from the tube to it, knead for a minute and stick to the model. Within two to five minutes, the mass turns into rubber, which is easily separated from any material of the model. It is suitable for taking impressions of products that do not require the finest elaboration of all the smallest details, even scratches.
If you need high precision and even removal of roughness from a part, then you use mass for thin parts. It is also in a tube, the consistency is usually thinner than toothpaste, and after adding the activator, it is not kneaded with your fingers, but stirred on some plastic or metal plate (for larger quantities, in an appropriate container). This liquidity of it is sometimes inconvenient, especially when taking impressions of three-dimensional models - before it sets, the mass constantly drains and you have to correct it. (But for dental purposes, this is exactly the consistency that is needed - first, an impression is taken with the base mass, then a thin mass is placed inside this impression and the impression is taken again.) This technology is not very suitable for us, and here’s why: in dentistry, the model is cast into an impression 1 -2 times, and that’s it, but we need to have a more durable cast - you never know. The problem is that these two layers do not adhere well to each other, and with frequent use, the layer of the finishing mass peels off from the base and breaks through, especially in thin places. It may even be that in some places the thin mass will be pressed down to a micron thickness and will not withstand more than one or two pours of wax.
Of course it is possible. make a thicker finishing layer by mixing several portions in a row and spreading a new layer on the one that has not yet fully set, but (considering the high cost of the mass) this is uneconomical.
Therefore there are three methods. First, if the prayer is small and we manage to coat it with the mixture in a minute, then add one and a half doses of the activator and off we go!
Second - add a little base mixture to the finishing mass to the desired thickness, then add the activator and knead/stir - spread/stick.
Third - apply a thin layer of finishing mass. Adjust it so it doesn't drip until it starts to set. As soon as it stops flowing around, we immediately knead the pre-prepared base layer with an activator and sculpt it on top of the finishing layer with the required thickness.
When sticking/coating with the finishing mixture, we work mainly with a narrow spatula and a toothpick for the indentations so that there are no voids. Particular attention to deep depressions.
Jewelry impression compounds are usually more fluid, and the model is not coated with them, but poured into a frame. But their operating principle is the same - the mass is mixed with an activator, the model is poured in and left until polymerization. Another type of mass is for hot vulcanization under pressure. I have never used them, because my prefabricated models are not subject to heating.
Nowadays, quite decent jewelry impression materials can be bought for 350-400 rubles/kg.
It’s good, of course, to have a small vibrating table for these things - the quality of the impressions is significantly improved, and there is less risk of leaving bubbles. There are a lot of options - anything that vibrates finely will do.
You can make it from an old electric razor that goes back and forth (I forgot what it’s called), or from an old shearing machine. I have one like this, I specially bought the cheapest Chinese one on the market. Of course, it doesn't cut hair at all, but I don't care - but its protruding tongue vibrates a lot and there is the possibility of adjusting the vibration - there's a huge screw sticking out on the side.
Another version of a vibrating table, more professional - based on any small motor. The schematic diagram is in the photo.
The essence of the design is that the motor is rigidly attached to the table itself, which is made of plywood or thick plastic and covered with soft rubber so that the model does not slip. The table is connected to the frame through springs or rubber spacers. We attach an adjustable eccentric to the motor axis - the vibrating table is ready. All that remains is to experimentally adjust the strength of the vibration so that air bubbles come out of the mass, but at the same time it does not slide off the model in three seconds and in general the model does not jump off the table. Vibration is not needed for the entire coating cycle. Once everything has been coated, turn on the vibration for half a minute so that the mixture gets into all the corners and air bubbles come out. Then you turn off the vibration and do the rest without it. We only need the closest layer of mass adjacent to the model to flow around it as it should.
An almost irreplaceable thing when taking an impression is a vacuum pump. The vacuum very quickly, in 1-2 minutes, sucks out air bubbles from the impression mass - this guarantees the quality of the impression. Partially, to some extent, the pump can be replaced with a vacuum cleaner with the filters removed (to reduce resistance).
In any case, when working with dental masses, it is quite difficult to work with a pump (or vacuum cleaner) - the mass sets too quickly, and you need to work very quickly and smoothly with your hands. With more complex models, combining stoma mass with vacuum is generally unrealistic.
All of the above applies mainly to models that are either flat, such as a medallion, or convex, but have some kind of base. That is, having some kind of plane through which wax will then be poured. For full-volume models such as rings, etc. everything is a little more complicated.
Firstly, you need to glue the so-called to the model before taking the impression. sprue through which wax will be poured. Secondly, you will need a wax injector. We will not disassemble the design of jewelry injectors for now, we will focus on the simplest option - a regular medical syringe with 20 cc. (It can be 100 cc, depending on the volume of the model. But I’m talking about small models for now, so a 20 cc syringe will be enough for your eyes).
We will work in parallel with several types of parts: a medallion, a small gear, a small plastic mouse and a hefty (as big as a fist) big guy.
I’ll say right away that I won’t cast a lump, I don’t have such conditions now, I’ll tell you only as an example of a large-scale hollow casting. Modified on July 27, 2010 by desti
How to make casts of arms and legs from plasticine?
Such material as plasticine has been familiar to us since childhood. After all, each of us began to create our first “sculptures” from it in kindergarten. If you are going to make casts of your child’s arms and legs from plasticine, then you need to remember the skills you learned in kindergarten.
Required accessories
For work you should prepare the following materials:
- plasticine, today the choice of such material is quite wide, children's soft one is best suited;
- regular PVA glue (stationery);
- gypsum, it can be different: for decoration, construction, medical. You can take any;
- if you want to decorate the cast, then decorative elements.
Step-by-step instruction
1. In order for the imprint to be of high quality, the plasticine must be thoroughly kneaded until soft.
2. Make an imprint of a hand or foot with a depth of at least 1.5 cm. If you want, you can make decorative indentations.
3. We put the resulting print in the freezer to set the contours.
4. Prepare plaster. The standard proportion involves 1 cup of powder + 0.5 cups of cold water. Do not forget to prevent the plaster from forming lumps; water should be poured into the plaster, and not vice versa. Pour a small amount of PVA glue into the resulting mixture.
5. Remove the impression from the freezer and fill all cavities with plaster.
6. Leave the impression to harden for 12–18 hours.
7. Plasticine can be removed quite easily if you hold it over warm air (battery, boiling kettle) for several minutes.
8. The resulting cast is polished and decorated according to your wishes.
Elastic materials
You can make an impression of your teeth from elastic materials. Alginate substances are actively used. The advantages include: accessibility, good display of the structures of the oral cavity, color change during the mixing of the material, which is evidence of its readiness to be placed in a spoon.
Disadvantages include severe deformation of the cast. It is necessary to quickly cast plaster models. Alginates may not be suitable. Some crowns and bridges require precise mapping of the gingival portion of the teeth to produce an accurate model. Such impressions are used for stamped crowns, inlays, complete removable dentures, and partial dentures. A popular representative among dentists is the material “Stomalgin”.
How to make casts of arms and legs from salt dough?
Casts of arms and legs made from salt dough are the easiest way to capture baby's fingerprints. But it should be remembered that the dough is a short-lived product and varnish applied on top in several layers will help preserve the original appearance of the cast.
Required accessories
To prepare the dough for work you need to have:
- ·wheat flour;
- · salt, it is better to choose fine salt;
- water.
Step-by-step execution
1. Prepare the dough, it should be elastic. To do this, mix one glass of flour with the same amount of fine salt. Add half a glass of water to the resulting mixture and knead the dough. If you see that there is not enough water, then add a little.
2. Roll out the resulting dough into a 3-5 cm flat cake. You can give the cast a different shape.
3. Push the child’s hand or foot onto the cake. This material is good because if you don’t get the desired result the first time, you can roll out the dough again.
4. Around the print you can write inscriptions, draw patterns or beautiful designs.
5. Place the impression with the imprint in a hot oven for two hours. The optimal temperature for drying the dough should be 100–120 degrees. Depending on the thickness of the cake, the baking time also depends.
6. After baking (drying) the cast of the hand or foot, let it sit for a day and only then apply a decorative coating (varnish, paint, etc.), decorate with drawings and inscriptions.
Advantages and disadvantages
The advantage of alginates is the viscosity of the structure, provided, of course, that the prescribed proportions are observed. Also, the accuracy of conveying the relief of the prosthetic dental bed. The material is elastic to obtain an impression of the undercut. Alginate material is stored indoors, but in tightly closed packaging.
Alginate materials have a relatively low cost, but if used correctly, high-quality plaster models can be obtained. Thus, these materials not only accurately represent the prosthetic bed and are easily separated from the plaster model, can be disinfected to a limited extent and are quite elastic in structure, but also, most importantly for dentists, they are easy to use.
When casting plaster models, it is recommended to use them as quickly as possible. This leads to difficulties with disinfection of the material.
The hardening reaction begins immediately when the powder and water are mixed. The result of the reaction is a material with an irreversible three-dimensional structure. Therefore, alginates are unable to return to their previous state and are used once. They also do not adhere well to a spoon, take time to shrink, and have low tensile strength. However, the latter is quite relative. Sometimes it even turns, on the contrary, into an advantage.
Moreover, the time during which the alginates harden will directly depend on the mass fraction of free calcium ions in the mixture. Thus, by adjusting this ratio, it is possible to change the rate of hardening of the impression mass. Typical working time for alginate materials is two to five minutes.
Design options for impressions
Making a cast of the arm and leg is half the battle. It still needs to be beautifully decorated. In addition to making a cast, it also needs to be beautifully designed. There are many design options, because it all depends on your imagination. Here are some design options:
1. In the form of a figurine. To do this, cover the resulting cast with silver or bronze spray paint and place it on the base. Sign and date the base and receive a miniature figurine.
2. Photo frame with a cast. Glue a photo of your child and a cast of a hand and foot into a regular photo frame. In addition to these things, you can put a tag from the maternity hospital, a pacifier and other paraphernalia of the newborn “under the glass”.
3. In the form of a pendant.
Make a hole during making. After the casts of the arms and legs have hardened, thread a beautiful ribbon through this hole and hang it on the wall in the children's room. You can read about decorating a room for a newborn in the article: “Children’s room for babies.” Author of the publication: Zoya Kiseleva
Why is the withdrawal performed?
Dental impressions are required for:
- Braces. These systems correct various dental pathologies. Lingual braces are usually made using customized impressions.
- Trainers. Thanks to soft elastic tires, anomalies are eliminated. Since the facial aesthetics of teeth closure is different for everyone, an impression is made before installing the products.
- Records. You can eliminate imperfect bite in childhood with plates. In order for the product to be put on in one movement, it is made on the basis of an individual cast.
- Removable dentures. When there is no possibility of prosthetics with fixed elements, removable dentures are created. They can be different, but they are all performed on the basis of dental impressions.
- Single crowns. If one or more teeth are lost, crowns are installed. To obtain a high-quality impression, two methods are used: polyester mass and an open tray.
- Bridge prostheses. Impressions are made from the jaw several times. The first is for creating the frame of the prosthesis, the second is for the body.
- Individual abutments. Before the implant is inserted into the gum, an impression is taken. The type of abutment is selected based on the impression.
Impressions are also needed for crown inlays, retention trays, and aligners. Performing this procedure allows you to make high-quality dental devices.
Contraindications and rules of use
Both in the salon and at home, an alginate mask is used and applied in approximately the same way. The method of application is a little more complicated due to rapid plasticization than with conventional masks. They have a small number of contraindications and require caution if you have certain diseases :
If psoriasis and dermatitis worsen, you should refrain from using masks.- Individual intolerance and allergy to the components of mixtures.
- For any cancer, the use of alginates is strictly prohibited.
- If you have conjunctivitis, the mask should not be applied to the area around the eyes.
- If you have cold symptoms such as cough and nasal congestion, leave the skin around your mouth and nose free.
- Owners of eyelash extensions should not apply the product to the skin around the eyes and eyelids.
The procedure for using alginate masks is as follows:
- Preparing the face. You need to remove makeup from the skin and treat it with lotion or tonic. To enhance the cosmetic effect of the procedure, you can apply a care product under the alginate mask. This can be any serum - with hyaluronic acid, vitamins or with a lifting effect. Treat eyebrows, eyelashes and the border with the scalp with a thick cream or Vaseline - this guarantees that part of the hair will not be removed along with the mask being removed. Instead of cream, you can apply castor oil to your eyelashes. It will not only protect the eyelashes, but will also promote their growth and strengthening.
- Preparing the mixture. Commercial alginate mixtures are available in either gel or powder form. Gel-like products should be applied to prepared skin immediately after opening the package. The powdered preparation is diluted with water (thermal or mineral without gas), achieving uniformity of the mass, without lumps. If you decide to make an alginate mask with your own hands, the procedure will be slightly different.
- Apply the finished mixture with a cosmetic spatula or spatula in a very thick layer on the face, neck and area around the eyes. It is easier to distribute the mass on the skin if you have an assistant. If you apply the mask yourself, then, while in front of the mirror, tilt your head back slightly, and immediately after application, take a horizontal position.
- The exposure time of the mask should be 20-30 minutes. If you're doing it without an assistant, set a timer so you don't miss out on time. Feelings of coldness, tightness, and slight numbness are normal. The mixture should feel like a rubber film on your face.
- Removing the plasticized mass. Correctly remove the frozen mixture in the direction from the neck to the forehead. You need to grab it by the bottom edge and pull it up sharply to remove it from the skin in one motion. The mask may come off in pieces and tear in your hands. In this case, carefully remove each piece, paying special attention to the border with the hair growth area, the area around the eyes and nasolabial folds. The remaining particles can only be thrown into the trash bin. Disposing through the drain will cause a clog.
- At the final stage, treat the skin with moisturizer.
Primary requirements
In order for removable or non-removable structures to be securely held in the oral cavity and not to rub or press, impressions must be made with high quality, in full compliance with a number of requirements.
These include:
- The impression must exactly follow the relief of the oral cavity and not be deformed when removed.
- The print should not shrink while working with it and should not change over time.
If you use a material that shrinks, the prosthesis will be made poorly. Algite masses and silicone can be modified. That is why they should be kept moist, but it is better to send it to the laboratory immediately. - After removing the impression from the mouth, it must be washed and dipped in a disinfectant solution. This requirement is due to the fact that the material is in close contact with the patient’s saliva. Disinfection is required to protect laboratory workers from infections.
When creating dentures, especially fixed ones, several impressions are required. Most often, alginate materials are used first to create temporary structures. To make permanent dentures, impressions are taken using silicone compounds.
To obtain a high-quality design, the print must also meet some other requirements:
- Accurately reflect the structure of the dentition, transverse palatal folds, cords of the bucco-alveolar region, transitional fold of the oral cavity and frenulum. These are the main structures of the oral cavity.
- There should be no pronounced deformations or pores on the surface of the impression.
If there is a porous surface or poor-quality reflection of structures, it is necessary to make a new impression, since the reliability and convenience of the future design will depend on its quality.
Reasons for prosthetics of children's teeth and used designs.
This material is dedicated to CBW prosthetics.
At this address https://zubovv.ru/protezirovanie/nesemnyie-p/koronki-np/skolko-v-rossii-stoit-vstavit-iskusstvennyiy.html we will tell you how much it costs to insert a tooth.