Any items made from porcelain suffer various losses over time. For example, the glaze crumbles, chips appear, gouges, sometimes individual parts and large fragments fall out. Repairing porcelain products and replacing lost fragments is a labor-intensive and complex process. In ancient times, both unfired and baked clay, as well as gypsum, were used for this. In the modern world, gypsum mixed with PVA glue, called gypsum polymer, is used to restore porcelain. In addition, materials such as cyanoacrylate composites, mastics such as Remoset or Milliput, epoxy resins are used, which are filled with talc, glass microspheres, dry pigments and other fillers. Dental materials are also used to restore porcelain products. The last stage of restoration is mixing the components with paints that match the tone of the given piece to fill in the missing fragments. Nowadays you can freely buy any paints and varnishes. Professional restorers pay special attention to manufacturing defects. As a rule, it can indicate the time of manufacture of a given porcelain product and its affiliation with a particular company. More common manufacturing defects included: deformation, glaze peeling or cracking, blisters, bubbles, floaters, paint and gilding defects. But products with such flaws still entered the market. Drawings were applied to them, and the flies were camouflaged with painted small flowers, insects or leaves. Any old things, as well as porcelain dishes, even with good storage, lose their former appearance. It becomes worn out, scratches appear, gouges, chips caused by a knife, fork or spoon. Inside porcelain vessels there are deposits from coffee, tea, wine, as well as lime deposits that are in the water. Are such defects considered beyond restoration? If a professional restorer gets down to business, he will do everything in such a way that it will not even be possible to determine where and what the defect was. They have at their disposal not only modern methods and materials, but also extensive experience. To determine the presence of a repaired crack, you need to lightly tap the product, for example, with a fork or something metal. If the sound is clear and continues, then the item has no cracks, but if there is an invisible crack, the sound will be dull. To find it, you need to use an ultraviolet lamp or magnifying glass. When buying a well-preserved antique porcelain product, you can run into a handicraft fake. But in factories they can also produce items with a false brand. You should not undertake restoration on your own, as the result can be very disappointing. Such repairs to porcelain products most often cause additional damage to them. There may be unsuccessful gluing, the use of short-lived adhesives, careless processing of replenishments, the use of abrasive materials, and much more. Elimination of new defects is added to old defects and will not only take more time, but will require significant financial expenses. Museum restorers use materials to repair porcelain that can be replaced with others if necessary. When using restoration techniques, they work according to the principle: the repaired defect is invisible from a distance of 180 centimeters, but at a distance of 15 centimeters, it should be clearly visible. But this only applies to museums. In a commercial restoration, no defects should be visible at any distance. Any restorations, as well as porcelain dishes restored using commercial technology, will not be cheap. But it's worth it, because a broken item cannot be distinguished from a new item. In addition, the work of commercial restorers is very complex and requires great skill. They also work painstakingly and for a long time with expensive materials. Therefore, before sending a porcelain item for restoration, you need to inquire in advance about the cost of its repair and look at the work of the master. When restoring porcelain yourself, for example, gluing some parts, you need to remember to degrease the places where the glue will be applied, that is, wipe them, for example, with a solvent. For gluing, it is better to use PVA, epoxy resins or cyanoacrylate glue, which dries very quickly. Tableware intended for eating is glued together with harmless special glue. After all the preparations, you need to apply a small layer of glue to both parts of the porcelain and attach them tightly to each other. Then they need to be tied, for example, with a bandage, and excess glue must be removed. Now the tableware can be placed in a warm place for several days. If there are small chips, you can simply fill them with epoxy resin. It is better to tint with acrylic paint.
Restoring porcelain and ceramics is a complex and labor-intensive process that requires patience and accuracy. In addition, you must have certain skills in working with such products. If you do not have experience in restoration, then it is better to entrust the work to professionals, especially if we are talking about an antique item.
Features of adhesive dental restoration
A distinctive feature of adhesive restoration is the work of a dentist in tandem with a dental technician. This gives a double effective effect. The technician is engaged in a model of the patient's mouth, so his participation is required when carrying out indirect adhesive restoration, which is closely related to work in the laboratory.
Damage to teeth can affect not only the chewing surface, but also the lateral, proximal surface, which is in contact with neighboring teeth. It is very difficult for a dentist to create a complete clinical picture of such defects, because the proximal surfaces of the teeth are difficult to access. The technician works with a collapsible model of the oral cavity. The technician selects an adhesive material for each defect and passes it back to the dentist.
Adhesive prosthetics of teeth without turning adjacent teeth
Adhesive dental prosthetics without grinding adjacent dental units is the latest effective technique that allows you to preserve healthy teeth intact and at the same time effectively replace lost ones. Today, two technologies of such prosthetics are used:
- Fastening the prosthesis using microscopic notches on the enamel of supporting dental units, into which a fiberglass thread and a special adhesive composition are placed.
- Fastening the prosthesis using onlays made of medical metal alloys (Maryland bridge).
These technologies make it possible to replace both single and multiple defects in the dentition with equal quality.
Depending on the chosen technology of orthopedic treatment, the type of design and the number of defects to be replaced, the price for adhesive dental prosthetics will differ markedly. At the same time, in comparison with other types of prosthetics, the cost of this technology is considered low.
If you have the symptoms described in this article, be sure to make an appointment at our clinic.
Don't self-medicate! Even the smallest problem, if not treated correctly, can significantly complicate your life.
By contacting us, you can be sure that:
- Get high-quality and free consultation .
- You will receive the best prices for treatment and the opportunity to receive a special promotional price.
- Only modern equipment and materials will be used.
- You will be treated by professional doctors with many years of experience.
- We offer treatment on credit or in installments. There is also the possibility of obtaining a tax deduction.
- We work seven days a week and without a lunch break, from 9 a.m. to 10 p.m.
+7 (495) 132-02-96
Make an appointment
Direct adhesive dental restoration
Direct adhesive dental restoration is carried out when small defects are detected on the tooth surface. It is done in just one step. After examining the patient’s oral cavity, the doctor prepares the tooth for restoration (grinds the surface) and prepares the composite composition. After preparation, there begins a period of direct application of the material to the defective area or its insertion into the tooth cavity, its fixation and hardening.
Direct adhesive restoration, in addition to taking little time, is also a very budget-friendly and economical option for dental restoration.
The degree of damage to the tooth will be determined by the dentist at the first appointment. You will be offered several options for restoring defects, including adhesive restoration. You can choose the one that suits you according to the cost. All options suggested by the doctor will be effective, you can be sure of that. Make an appointment with the dentist now by calling 8 (495) 221-21-18 or using the online appointment form. We work seven days a week. We are located near the Shchelkovskaya metro station (literally a 5-minute walk).
Modern methods of ceramic restoration
Currently, several options for ceramic restoration are used in dentistry. Each of them has its own characteristics and is being improved as new high-quality and safe materials become available. According to the execution option, there are two main methods:
- direct ceramic restoration of teeth using composite materials;
- indirect restoration using special overlays.
The first method belongs to the category of budget and economical options. It is performed in one visit and takes little time. The second, on the contrary, involves a longer process to eliminate defects and give a perfect appearance. Its duration can vary from several days to a week.
Direct restoration with composites
The method of direct restoration with composite materials is indicated when small minor defects are detected on the surface of the tooth. During the examination, the doctor must identify the extent of its damage and perform preparatory manipulations.
If there are carious lesions, it is necessary to prepare and place a filling.
Microabrasion techniques are used to hide cosmetic defects such as chips, cracks, and erosions. Surface treatment is performed to improve the adhesion of the composite material. Next comes the period of applying the finished composition, its fixation and curing.
Thanks to the availability of this technique, it has become possible to restore the damaged or missing crown of a tooth. In this case, the missing part of the organ is recreated artificially, and it is as close as possible to the natural organ in shape and color.
If the tooth is more than half destroyed, pins are used to restore it, which are screwed into the root. Photopolymer material is applied layer by layer to this durable rod, and each layer is thoroughly dried. After completion, the surface of the new formation is covered with a protective fluorine varnish.
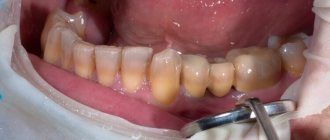
Indirect restoration using onlays
The indirect restoration technique is carried out in several stages and is used to eliminate large defects. After examining the oral cavity and assessing the condition of the teeth, the doctor grinds the surface (if necessary). Next, he takes impressions and sends them to the laboratory to make special onlays. After their manufacture, the cementing procedure begins (connecting the crown to the surface of the prepared organ using a special composition).
The indirect restoration option allows you to preserve the structure of the tooth without damaging its soft tissues. The procedure is performed under local anesthesia, so the patient does not experience pain or discomfort.
Indirect adhesive dental restoration
With indirect adhesive dental restoration, designed to relieve the patient of large defects, several stages of preparation for the procedure are carried out. After examining the patient’s oral cavity and, if necessary, grinding down the tooth, the doctor takes impressions of the dentition. These impressions are sent to the laboratory, where a dental technician works with them, who selects the shape and composition of the adhesive system for a particular tooth.
While preparing the final result, the patient may be offered to wear transparent plastic plates (veneers), which protect the prepared tooth from mechanical stress.
If the goal is achieved, and the option proposed by the technician is ideal for the patient’s dental surface, then a cementing procedure is carried out - attaching the inlay to the tooth itself.
With indirect adhesive restoration, there is no damage to the soft tissues of the tooth, while the tooth structure is preserved as much as possible. When performing adhesive restoration, the patient experiences virtually no pain.
How can you restore a frying pan in a short time?
If the reason why the frying pan has become unusable has been established, it is not necessary to purchase a new product that will be properly cared for; you can try to revive the familiar device. To do this, you need to take coarse salt, pour it onto the bottom of the dish so that the ceramic is completely hidden, and put it on medium heat.
We recommend: Do I need to iron my bed linen after washing?
After a couple of hours of such calcination, remove the salt, and pour vegetable oil over the bottom and inner walls of the frying pan, which we run over the surface for some time. Then we wash off the product and carefully treat the item with a neutral gel and a soft sponge.
The recommendations listed above help in the vast majority of cases. They only do not work when working with defective products or items consisting of ceramics with various unwanted impurities.
Types of inlays for adhesive dental restoration
When carrying out adhesive dental restoration, depending on the overall clinical picture, one of three types of inlays is used.
Inlays
If we translate this name from English, we get the phrase “lies inside.” Indeed, the inlays seem to lie inside the dental crown, without affecting the cusps of the tooth. The inlay type tab has the shape of a rectangle or box. Inlays accurately follow the shape of the tooth and the occlusal (contact chewing) surface.
Online
Onleys, unlike inlays, affect the cusps of the tooth. Onleys are T-shaped, closing the cavity of the tooth and covering its chewing surface.
Veneers
This is a porcelain inlay that is attached directly to the surface of the tooth. Unlike inlays and onlays, which are most suitable for lateral teeth, veneers are used for aesthetic restoration of anterior teeth. Veneers are made in laboratory conditions. Veneers have increased strength and an unsurpassed aesthetic effect, thanks to a material that is as close in appearance as possible to the natural color of the teeth.
Advantages of ceramic restoration
Today, adhesive ceramic dental restorations are popular with both dentists and patients. This is due to a number of their undeniable advantages:
- Long term. Modern materials retain their functional properties for many years. So the life of a filling today is at least 6 years.
- Safety. The composites have a hypoallergenic composition and therefore do not cause reactions during use.
- Functionality. With the help of ceramic compounds or inlays, you can change both the shape of one tooth and the bite.
- Aesthetic properties. Restored teeth take on a natural appearance and are therefore invisible to others.
After ceramic restoration, the patient receives strong, healthy teeth and a beautiful snow-white smile, which ultimately affects his psycho-emotional state.
How is adhesive dental restoration performed?
When carrying out restoration with adhesive materials, regardless of the method (direct or indirect), the attending physician carries out several standard procedures.
First, the doctor needs to prepare the tooth surface for the procedure. To carry out dental restoration, the tooth surface must be rough and moist. Roughness ensures a tight fit of the adhesive material, and light moisture gives the composition additional softening qualities.
Secondly, the material used for direct adhesive restoration must be slightly flowing in composition in order to penetrate well and deeply into the microporous dental surface. After this, the composition is cured.
When performing dental restoration using adhesive materials, the accuracy of the movements of the attending physician is important, because we are talking about durable, but nevertheless thin enamel. To ensure that the procedure is performed correctly, the dentist uses special instruments - magnifying glasses or a microscope.
How to properly care for the device to extend its service life?
There are many limitations when working with ceramic cookware, especially when it comes to handling it after use. There are several secrets that will help you quickly clean the product from carbon deposits and not damage its coating.
- If the food is not burnt, any remaining residue can be removed with a soft cloth soaked in olive oil. Then rinse the pan with water and dry.
- Minor stains can be soaked in warm water with a drop of detergent for a few minutes. After this, problem areas need to be cleaned with a sponge.
- Stains remaining on the surface after deep frying are best treated with alcohol. Just soak the cloth in it and go over the stains.
- For quick and high-quality treatment of the outer walls of dishes, it is recommended to use a melamine sponge. You need to rub thoroughly, then after a few minutes the product will shine like new. This option is not suitable for surfaces in contact with food!
- If the soot is very dense, you should try the boiling option. To do this, place the entire frying pan (without a handle) in a container of water, pour a few tablespoons of gel into the liquid, add a little soda and boil for half an hour.
The use of specialized gel products that neutralize fat gives good results. But they should be used only as needed.
Advantages of adhesive restoration
A clear advantage of adhesive dental restoration is that the materials used do not cause any discomfort in patients, since they do not produce the “shrinkage” effect that is typical for conventional fillings.
The next advantage of adhesive restoration is that the adhesive components are long-term. For example, the service life of the most modern filling is six years. The adhesive system has the same degree of abrasion as other teeth.
With the help of adhesive dental restoration, you can change your bite if it is slightly crooked. With adhesive restoration, tooth wear is compensated and the position and shape of the tooth changes, which changes the bite and corrects it.
Finally, the aesthetic advantage of the adhesive system is that it is completely invisible to others when smiling or talking, since it is as close as possible in color and composition to natural teeth. Moreover, some cases of tooth restoration using an adhesive system are so unnoticeable that the dentist can determine whether the restoration has been carried out only with the help of a special “dental record” of the patient.
Restoring a chip on the wall
A chip or crack in ceramic tiles on the wall can be restored using the same methods as on the floor: grout, epoxy resin with pigment and putty using ceramic paint.
Using decorative stickers
Vinyl stickers are suitable for restoring wall tiles. This method takes little time and allows you to creatively approach solving the problem.
The chipped area must be degreased before applying the sticker. No reconstruction is required as the sticker will completely hide the crack.
To eliminate damage to tiles in the bathroom, you need to choose stickers that are resistant to moisture, steam and cleaning agents.
You can also find self-adhesive bathroom film in rolls on sale. It is more difficult to work with than with stickers, as bubbles may appear during decoration. In order to avoid this, the film must be stretched when gluing.
Using disguise accessories
If, when using one of the methods, the repaired area is too noticeable, then it is worth showing design savvy and decorating the area with interior items. For example, hang a beautiful towel holder, put a laundry basket, hang a mirror, place a vase of flowers.
Replacement of damaged tile elements in case of cracks and large chips
In cases where local restoration is not possible, the only option is to replace the tiles. This method is more effective.
Replacing damaged tiles on the floor or wall is done as follows:
- Cleaning seams. The seams are cleaned down to the base with a special stitcher or a sharp object.
- Removing tiles. To do this, you need to pry it and forcefully tear it off the surface. If this cannot be done, then the adhesive composition must be moistened with a soap solution.
- Stripping the glue. First, remove the old adhesive from the base of the floor or wall. If it is very dense, you can soften it with a solvent.
- Inspect adjacent elements. If adjacent tiles are damaged or the quality of the masonry is compromised, it is better to remove them and re-lay them.
- Installation. The new coating is laid on glue. The adhesive composition is prepared according to the instructions. It is more convenient to apply it to the tile itself.
- Alignment. After laying the tiles in the prepared place, crosses are inserted into the joints along its perimeter. Using a building level, leveling occurs.
- Grouting joints. Perform after the glue has completely dried. You need to choose a grout of the same shade as on the other seams. If this is not possible, it is recommended to update them completely.
Tiles can crack due to voids in the mortar. Damaged elements can be identified by tapping. They need to be moved.
Disadvantages of adhesive restoration
The most obvious disadvantage of adhesive dental restoration is the cost of the procedure. The use of the most modern and durable materials has a significant impact on pricing. Of course, filling is a cheaper procedure compared to adhesive dental restoration.
If we evaluate the result from a long-term perspective, then making adhesive restoration is more profitable than filling. Don’t forget that a filling stays in the tooth cavity for a maximum of several years, and an adhesive restoration will last you many times longer. Therefore, it makes sense to choose an adhesive restoration once and forget about the defects that bother you for a long time.
The disadvantages of adhesive restoration include the time it takes to complete the restoration. But this, again, is compared to filling. Filling takes only one hour and does not require a second visit to the doctor, while restoration takes longer, and there is a high probability that you will have to visit the doctor more than once. First, an examination of the oral cavity is carried out and a picture is taken, then in a laboratory setting, a technician reproduces an adhesive material, which is attached to the tooth surface at a dentist’s appointment.
But, on the other hand, the adhesive inlay, thanks to its precise technique and strength, will serve you for a long time and will hide all the imperfections of your smile. A consultation with a dentist during treatment at the clinic is absolutely free.
Important points in using a frying pan with a ceramic coating
According to experts, a frying pan with a ceramic coating, if the rules of its operation are followed, can last at least 1-2 years without creating any problems. After which specific cleaning is carried out and you can count on the device for at least another year. Then it is better to change the dishes, by which time they will have already worn out quite a bit.
Such parameters are possible subject to the following recommendations:
- You should not immediately put the device into operation. First, the new item must be thoroughly washed using a neutral washing gel and a soft sponge, then dried with a towel. After that, the coating needs to be lubricated with a small amount of vegetable oil and after a couple of hours you can start cooking.
- The frying pan should not be exposed to temperature changes. It is strictly forbidden to place it under cold water immediately after use or place frozen (or even just cool) ingredients on the ceramic coating. Violation of this rule will lead to the formation of cracks, as a result of which burnt food will need to be scrubbed constantly.
- If the device needs to be cleaned, you can only use a neutral gel and a soft sponge. Any abrasives are prohibited; even such a gentle component as soda will help wash away dirt along with the non-stick layer.
- Do not allow the cookware to overheat. It is highly not recommended to pre-heat a frying pan and then pour oil on it or lay out the ingredients.
Tip: Cooking in such a cookware should only be done over low or medium heat. Ceramics conduct heat well, so even with such indicators, the ingredients will quickly reach the desired degree of readiness. An additional advantage of the approach is the uniform development of the components. And it’s easier to clean up leftover food before it burns.
- During the cooking process, you need to use silicone, plastic or wooden spatulas. No metal, it scratches the ceramic coating too easily.
Recommended: Can you use baking soda to brush your teeth?
Following these simple rules will protect your functional cookware from premature wear. If the recommendations no longer apply and the quality of the device’s performance is rapidly declining, this may be a sign of wear on the frying pan. There is no point in doing anything here; you will have to purchase a new product.
Return of the Blue Cup: Porcelain Restoration
“...The fragments lay on the floor illuminated by the setting sun, it seemed that a playful breeze had scattered them away from each other, and I didn’t want to believe that what had been my mother’s favorite cup last night, even this morning, had turned into blue porcelain petals...” who doesn’t remember the sad story about the blue cup told by Arkady Gaidar. The feeling of hopeless, irreparable loss mixed in my memory with a childhood fear of broken dishes. This story, of course, would have ended completely differently if it had happened today and if its heroes had had the last issue of our magazine.
Mom's favorite blue cup would undoubtedly be restored, so much so that mom would hardly notice anything special. Dishes break at all times; their fragments are either hastily thrown away or clumsily glued together with BF glue.
Now we will talk about the restoration of porcelain according to all its classical rules.
First of all, let us warn restoration extremists - if you are the happy owner of Meissen or Gardner porcelain, moderate your restoration ardor and reassure yourself that you really have at your disposal a museum piece that can only be entrusted to a highly qualified specialist.
Our advice applies specifically to “blue cups,” i.e. those vases, figurines, teapots and cups dear to the heart and memory, which, nevertheless, do not have museum collection value. Our teacher in such an important matter as porcelain restoration was Sergei Bobrov, the most famous Moscow restorer. He gained his professional experience working at the All-Russian Art Scientific and Restoration Center named after I. Grabar and the Tsaritsyno Estate Museum.
Belonging to a narrow, select circle of elite restorers in Russia, the master has a high professional reputation among colleagues, collectors and antique dealers. His works adorn private and state museum collections; they were also presented at the largest exhibition “250 years of Russian porcelain” at the State Tretyakov Gallery.
The restorer's workplace should have natural daylight, which is especially important when tinting and reconstructing porcelain. It would be good to protect the table with cork or any other elastic covering, which will weaken the impact if an object falls. You should pay attention to the fact that all the actions you take and their consequences must be reversible, that is, what professionals call the reversibility of the process. Under no circumstances, even with the best intentions, should you drill, grind, or scratch the original.
Let's look at the restoration process in detail using the example of restoring a broken porcelain menagerie. First of all, the object is carefully examined; Cracks, chips, and places of old gluing are revealed. Then, depending on the nature and extent of damage, a restoration plan is determined, i.e. order and sequence of restoration work. If the product is broken, you need to try to combine its pieces without gluing, find out the possibility of their coincidence, identifying the most difficult places.
Next, you need to wash the product in hot (50-600C) water, using any soap with a low alkali content, this could be, for example, regular baby soap. Dishwashing detergents and soda are not suitable for this, as they can contribute to leaching or peeling of the glaze. Washing should be quite gentle; instead of a brush, it is better to use a bristle brush or shaving brush. To remove contaminants in cracks, a compress is used - in this case it is a cotton band moistened with a 10% solution of citric acid or a 3% solution of hydrogen peroxide - applied to the darkened crack. The compress is kept until it is completely whitened. To prevent the solution from evaporating too quickly, cover the compress with cellophane or place the entire product in a plastic bag. If the product was previously glued, it must be dismantled after washing.
Use a stream of boiling water directed at the previous gluing area to heat the seam. After sufficient heating, without using much mechanical force, try to separate the glued fragment. If this does not bring success, pour boiling water over the product and leave for a while. You can do this several times until the fragments easily separate from each other. Carry out dismantling over a plastic basin with water so that if it accidentally falls, the product or its fragment will not break.
The fragments obtained after dismantling must be cleaned of old glue with a scalpel or sharp knife. The glue heated with boiling water softens and should easily separate from the chips. If removing the glue is difficult, you can use acetone or alcohol. To avoid damage to the glaze, it is better not to use thinners, solvents or concentrated acids. When the old glue is completely removed, put the cleaned fragments together to determine the order of the new gluing - small fragments are glued together first.
After degreasing the surfaces of the chips with alcohol or acetone, carefully coat the chip of a smaller fragment with glue.
As glue, you can use two-component epoxy resin EPOXYGLUE from BONDO, BIZON or the like; in the worst case, you can use publicly available superglue, the disadvantage of which is that it “sets” too quickly.
To more accurately match the fracture relief, the glue should be applied in a uniform, extremely thin layer. When the fragments are coated with glue and pressed tightly against each other, secure the gluing area with tape, plasticine, or adhesive tape. In any case, even if it seems that the product is tightly glued, it should be left for a day to dry completely, since “setting” and complete polymerization of the glue are not at all the same thing. After you are sure that the gluing is complete and the fragments are held firmly, remove the glue that has protruded along the seam using sliding movements of the scalpel.
If fragments of an item are irretrievably lost, you can make them yourself, but only if the item is symmetrical or is a figure of rotation. Then, from a part similar to the lost fragment, first remove the mold using base wax produced by the Kharkov plant of dental materials "STOMA" in the form of 17080mm plates.
The plate heated in hot (50-60C) water is placed on the preserved surface and pressed tightly. The plate should be larger than the fragment being restored and extend beyond its edges by approximately 10mm. Carefully remove the cooled, hardened wax mold and apply it to the lost area. Now, having previously fixed it along the edges with plasticine, proceed to casting the desired fragment.
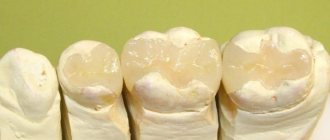
Clean the surface of the chip from grease, prepare a mass that consists of epoxy resin (binder) and dry white titanium or zinc pigment. Grind them until a porcelain-like viscous mass forms. When pouring a mold, you must first try to cover the entire surface of the mold with this mass, and then gradually increase its thickness, accelerating from the center to the edges. It should be noted that pigments containing lime (for example, chalk) are not suitable for preparing a mass imitating porcelain. When the lost fragment is completely restored, process it with sandpaper, gradually moving from coarse grain to “zero” grain. Sand the surface, making sure that the abrasive does not touch the edges of the original product. Now that the surface of the fragment is almost no different from the original, let's proceed to tinting the background.
For tinting, use acrylic white, clarifying the shades of white by adding watercolors. When choosing a shade, you should keep in mind the further preservation of the product with varnish, so the color should be half a tone lighter than the original. Ornaments or drawings on lost fragments can also be reproduced using watercolors and whitewash, since pure watercolor is too bright. At this stage of restoration, patience and good daylight are the main helpers, because the accuracy of color selection determines the quality of the restoration. It is not recommended to use oil paints for tinting, as they may later change color. The process ends with conservation, i.e. coated with dammar or acrylic varnish from MAIMERI or similar, in one or several layers so that the nature of the gloss of the coating completely coincides with the shine of the original.
If small chips are found during inspection of the product, you need to apply mastic, i.e. filling their volumes with an epoxy mixture simulating porcelain, the recipe for which you learned above. In the same sequence, carry out sanding, tinting and preservation. Now the restored product can once again decorate a sideboard, cabinet or home display. However, you still shouldn’t drink tea from your mother’s cup; now it belongs to family history. Food use for restored dishes is excluded; this can negate all your efforts and adversely affect your health.
| If, after turning the product over, you see similar signs on its bottom, rest assured that you have truly collectible porcelain in your hands. | ||||
| Vienna, Austria) | Mayson (Germany) | Imperial Porcelain Factory | Gardner (Russia) | Royal Manufacture (France) |
| Kuznetsov plant (Russia) | ||||