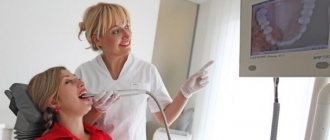
3D modeling of teeth, veneers.
Orthopedic treatment begins with virtual planning of the functional and aesthetic result based on 3D modeling of the shape of future artificial teeth. Preliminary visualization is also used to plan the installation and size of implants. At the same time, the use of a computer program makes it possible to take into account the condition of bone tissue and find the right solution, taking into account the protection of blood vessels and nerves from damage. 3D modeling is also used in orthodontics, since teeth bite correction using individual aligners or lingual braces is carried out only after careful diagnosis and planning of the position of the teeth.
3d implantation step by step
Let's consider all the stages of 3D dental implantation.
What does 3D implantation include:
- Photometry – allows you to identify various defects of the teeth and face, which is necessary for selecting the correct position of the implant in the jaw tissue and preliminary assessment of treatment. This procedure involves photographing the patient's head from different angles using special equipment.
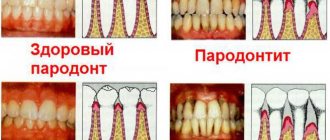
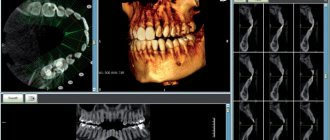
- Computed tomography with a three-dimensional image showing the exact location of all elements of the dental system, as well as the presence or absence of inflammatory processes in periodontal tissues. The results of CT diagnostics allow you to avoid serious mistakes during dental implantation.
- Three-dimensional visualization, which involves creating a virtual 3-dimensional model of the dentofacial apparatus using a PC based on computed tomography data. Based on the results of three-dimensional visualization, a model of a temporary prosthesis is also created.
- At the next stage a 3D surgical template
, which allows you to install the implant with pinpoint precision and minimal risks of postoperative complications. This design is created on 3D printers by layer-by-layer application of polymer. - Installation of the implant along the guides of a surgical template with complete elimination of the risks of errors and falling into the area of missing bone, mandibular canals with nerve endings and nasopharyngeal sinuses.
- A crown is installed on the implanted implant.
In the process of preparing for 3D dental implantation, impressions of the jaw are also taken, on the basis of which the basis of the prosthesis is modeled for its complete adaptation to the bite of the patient’s teeth.
Principles of CAD/CAM technology
Computer CAD/CAM technology is an integral part of the work of every modern orthopedist. The CAD algorithm includes the following steps:
1. 3D scanning, that is, diagnostics using a scanner;
2. Converting the received information into digital format;
3. 3D modeling, that is, building a model of the future structure, which is carried out using a computer program and corrective actions of a specialist. The CAM process is where digital parameters are converted into current action. The milling machine begins to grind the part based on the specified parameters. The advantages of 3D printing are:
• unique precision of the finished product, which most optimally contributes to the restoration of aesthetic and functional problems;
• high production speed;
• full automation of the process, which eliminates the influence of the human factor.
Advantages and disadvantages of 3D dental implantation
The modern 3D implantation technique has many advantages.
Main advantages:
- elimination of medical errors during implantation;
- a low-traumatic operation that does not require incisions in the gums and subsequent suturing;
- maximum accuracy of implant installation;
- reduction of procedure time;
- rapid wound healing without the risk of infection, severe swelling and pain;
- the ability to install an implant and a tooth crown in one procedure;
- comfort for the patient and the doctor;
- minimum recovery time after the procedure;
- There are virtually no risks of rejection of an implant implanted using a surgical template.
The disadvantages of 3D implantation using a template are relatively long preparation and higher cost of the procedure.
3D dental implantation using a template in Moscow dentistry
The procedure for dental implantation using the 3D method is not particularly common in Russia, as it requires a highly qualified doctor to work with specialized computer equipment. But such specialists can be found in Moscow.
One of the leading dental clinics in the capital, Aesthetics, performs 3D dental implantation using surgical templates. Buy
They cannot be prepared in ready-made form; templates for installing implants are made individually for each patient.
Aesthetics dentistry employs high-profile doctors with extensive professional experience. The modern center has all the necessary diagnostic and treatment equipment and 3D equipment for carrying out the implantation procedure using advanced techniques.
Prices for 3D dental implantation using a surgical template can be clarified by phone. All clients who leave their reviews on the site are guaranteed to receive a 3% discount on all dental services (in addition to other available discounts).
We also offer dental treatment and prosthetics in installments and under preferential programs for citizens of certain categories.
Computer modeling of a smile master class stage 1 Digital Smile Design in Russian
- Article reading time:
5 minutes
Photoshop is one of the simplest and most common programs used in computer modeling. To carry out such modeling and create beautiful, high-quality presentations, there is no need to be fluent in this program; it is enough to know a few basic functions. A set of primary knowledge will allow you to clearly show the patient the planned result of the work.
In work, you must be able to modify teeth, change their color, move, align and calibrate using a ruler for the relationship between teeth. Let's start with the simplest Photoshop tools needed for computer modeling. The tools menu is located vertically on the left edge of the monitor. Lasso function (magnetic lasso).
This tool allows you to clearly outline the selected object without completely tracing it with the mouse. The line itself “magnetizes” to the edges of the object if these edges are clear enough. At the end, you need to click on the first square. After this, the outlined object can be copied and pasted back into the picture, stretched or otherwise transformed. To do this, you need to go to the Edit menu, copy the desired image, and immediately paste it into the desired location using the Edit–Paste command. Switch to the movement arrow, and we see the movement of the object as a separate layer. On the right menu you can see the Background button. This is a background that can be removed or enabled at the touch of a button.
The first layer is the tooth, which can be modified. To make changes, you need to go to the Edit menu and select the Transformation function. Its simple version allows you to perform simple transformations of an object (stretching, compressing, rotating, etc.).
A more complex type of transformation is the Warp function.
By pulling one of the highlighted points, you can deform the tooth. You can save changes by clicking on the arrow. After this, a saving window will appear in which you need to select the Apply position, i.e. agree to save the changes.
In this menu there are also mirroring functions, when the right tooth can be transformed into the left one. For a step-by-step return from changes to the original version, there is a History function.
Another handy feature is the History Brush. For example, a tooth turned out to be too long and the gum needs to be returned to its place. You need to select a brush with an arrow in the left menu, move it over the unnecessary part of the picture, and erase the unnecessary part of the image.
There is a regular brush, the Brush Tool, for drawing objects. The color of an object can be set using the eyedropper. First, use a pipette to select the desired color on the part of the drawing from which you want to transfer the color to the area to be painted, then use a brush to transfer this color to the desired area of the drawing.
For ease of use, the image can be zoomed in or out using the Zoom Tool function (magnifying glass).
If text is required, you must select the appropriate position in the menu, enter the desired text and select the font color in the palette.
Removing a picture is done using the Eraser function, which deletes all layers up to the background. The Blur function blurs the boundaries between objects. It is important to remember that it can only be used after merging the layers. Select a function, draw along the boundary between the desired objects several times and smooth out this boundary.
Smile modeling
To maintain proportions, it is important to correctly distribute the proportions with horizontal and vertical lines. To do this, left-click on the ruler in the left menu and drag it to the desired location in the figure.
For example, mark the middle line. Then, by pressing the left button, drag a horizontal line to the desired location in the drawing.
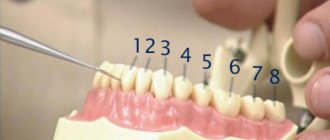
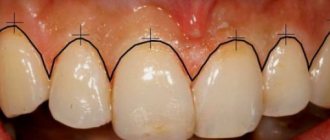
After this, in accordance with the rules of the golden proportion, place the remaining lines, starting with the size of the central incisor. This size can be measured with a compass and ruler. Information on the golden ratio is in the archive of our webinars.
The image of any ruler must be copied from the Internet, superimposed on the drawing and adjusted to the size of the central incisor. Fix the drawing with the Apply button. The ruler is calibrated. After this, use a calculator to calculate the values of the teeth according to the rule of the golden proportion. In this case, the ruler can also be installed in a vertical position using the FreeTransform function.
Another important feature is Merge Visible. After applying this function, an object created from several image layers is fixed, saving all changes made. To copy and move it, you need to select the object using a magnetic lasso, copy and paste it into the desired location. If necessary, mirror or resize.
The brightness, contrast and saturation of the image can be changed using the Image menu.
The Curves function allows you to change transparency, matte, and other image parameters.
You can use color balance to give your image natural tones.
At the end, all layers are combined. Border areas of objects are retouched for a more natural appearance using blur. The finished file is saved using the Save as function.
The program allows you to clearly show the client the difference between the original and processed images.
Such a comparison makes it easier for the client to make a decision on the proposed procedures.
How is it different from traditional
Traditional implantation is a surgical operation in which the doctor makes tissue incisions: he cuts the gum above the alveolar ridge using a patchwork method, peels off the mucous membrane and periosteal tissue. After screwing in the titanium rod, the gum is sutured.
In addition to being traumatic, traditional implantation is associated with a lengthy operation and the risk of negative side effects and complications. Other disadvantages include: the length of the recovery period and the need for preliminary bone augmentation if the volume is insufficient.
Advantages
— minimal tissue trauma (the gums are not cut); — taking into account the anatomical features of the structure of the jaw bone; - reduced operation time - installation of one rod takes 10 minutes; - comfort and absence of pain; - mild tissue swelling after surgery; - short recovery - on average 3 days; - minimal risk of complications.
Flaws
— template production takes 2-3 days;
- relatively high price. If surgical guides allow patients to forego bone grafting, treatment costs will be reduced. The use of surgical templates for dental implantation makes it possible to predict the outcome of treatment due to the accuracy of planning.
Sign up for a consultation
three ROOTT specialists + diagnostics as a gift
All specialists Our specialists
Bolshakova Evgenia Vladimirovna
hygienist
0:45
Alekperov Roman Borisovich
Orthopedic dentist
Stages of computer modeling
Currently, dental treatment in the best advanced clinics in Moscow is carried out using computer modeling.
It begins with creating a model of the patient’s smile, the one that most fully reflects his ideas about the ideal. The first stage is a photograph, based on which a computer program creates the most optimal model. In this case, all the individual characteristics of the patient, his age, gender, facial expressions are taken into account, which is necessary to achieve maximum harmony. The next stage allows the specialist to create various models of tooth shapes, shades of tooth enamel, and find the most optimal solution. All actions are carried out with the direct participation of the patient, who expresses his wishes and comments.
When carrying out orthopedic treatment, the program allows you to copy a model using composite plastic. This makes it possible to verify the convenience of the model during operation. The last stage of using the software is the translation of the project into reality, when the production of prostheses is carried out.
Without computer modeling, it is impossible to carry out orthodontic treatment using lingual braces and individual aligners, since such techniques require particularly accurate diagnostics. As the quality of diagnostics has increased, it has become possible to more accurately install orthodontic structures. The computer program calculates all the necessary treatment parameters so accurately that this significantly reduces treatment time.